
Table of Contents
Research and Development
The Research and Development room is where you go to design components and vehicles. There are also additional functions here for managing your designs.
Top Menu
You access all elements of this room via the Top Menu. We cover the top menu in detail on the Top Menu page.
Design

The Designer is the main element of this room. You can find the Designer menu in the upper left corner of the screen in the Top Bar. Clicking the button will display the Designer menu. From there, you can choose which item you want to design.
Design Components
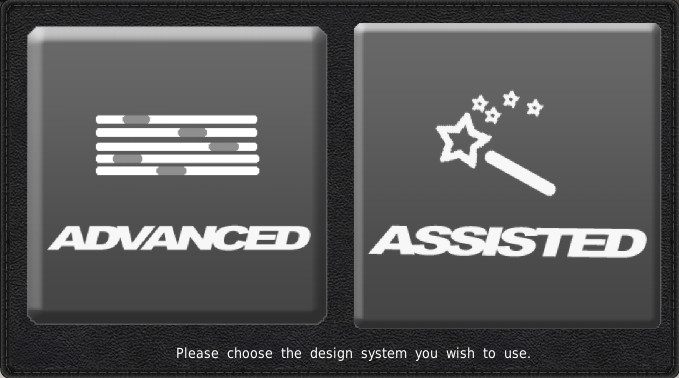
Upon selecting to design a Chassis, Engine, or Gearbox, the game will present you with two large grey buttons at the center of the screen. You will have a choice to use the Advanced designer, which requires a lot of fiddling with sliders. Or the Assisted designer, which reduces the number of sliders to just three.
Advanced
The Advanced designer has several layers to it, and it takes a little longer. But in the end, it allows you much more freedom when creating your design.
Setup
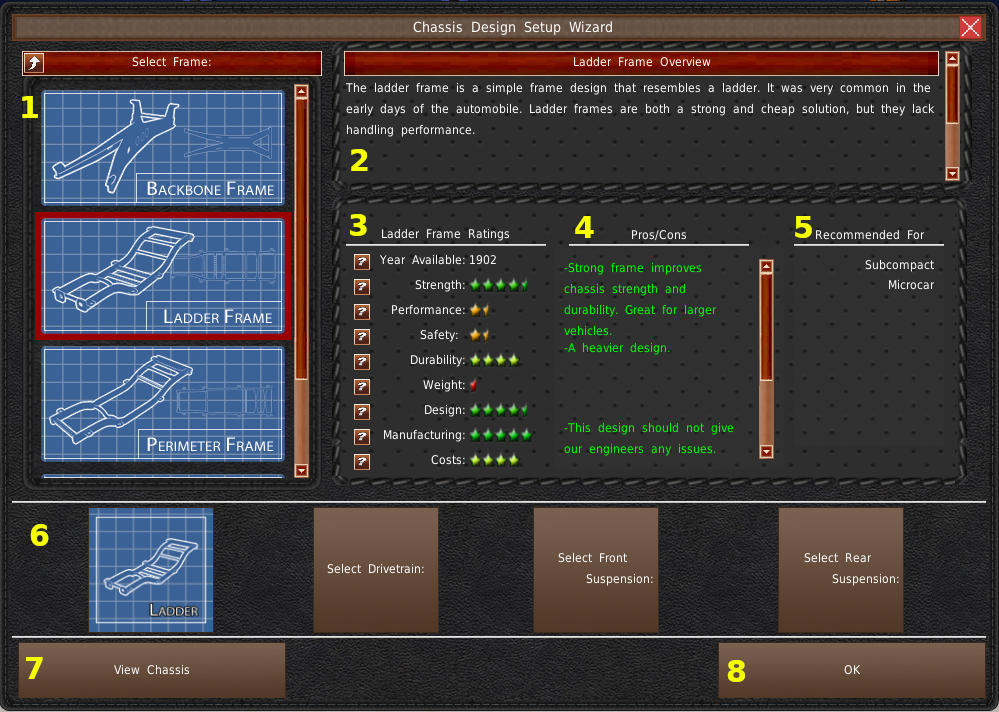
The first Advanced Designer window is the Sub-Component selection screen. You will need to select all sub-components for the design before reaching the component designer.
In the top left is a list of sub-components for the select sub-component type (#1). Selecting an image from the list will load its informational text in the upper right panel (#2). In the center-right panel, the game contains additional rating information (#3), design pros and cons (#4), and what the AI would recommend this sub-component for (#5).
Near the bottom of the window are multiple buttons that correspond to each sub-component (#6). Sub-components that are selected will have the sub-component's image on the button. Brown buttons have not been selected yet. Clicking on a button will reload the list (#1) with the selected sub-component type's entries.
You can view your existing components using the button in the bottom left (#7). When you have made your sub-component selections, click the “OK” button in the bottom right (#8).
Designer
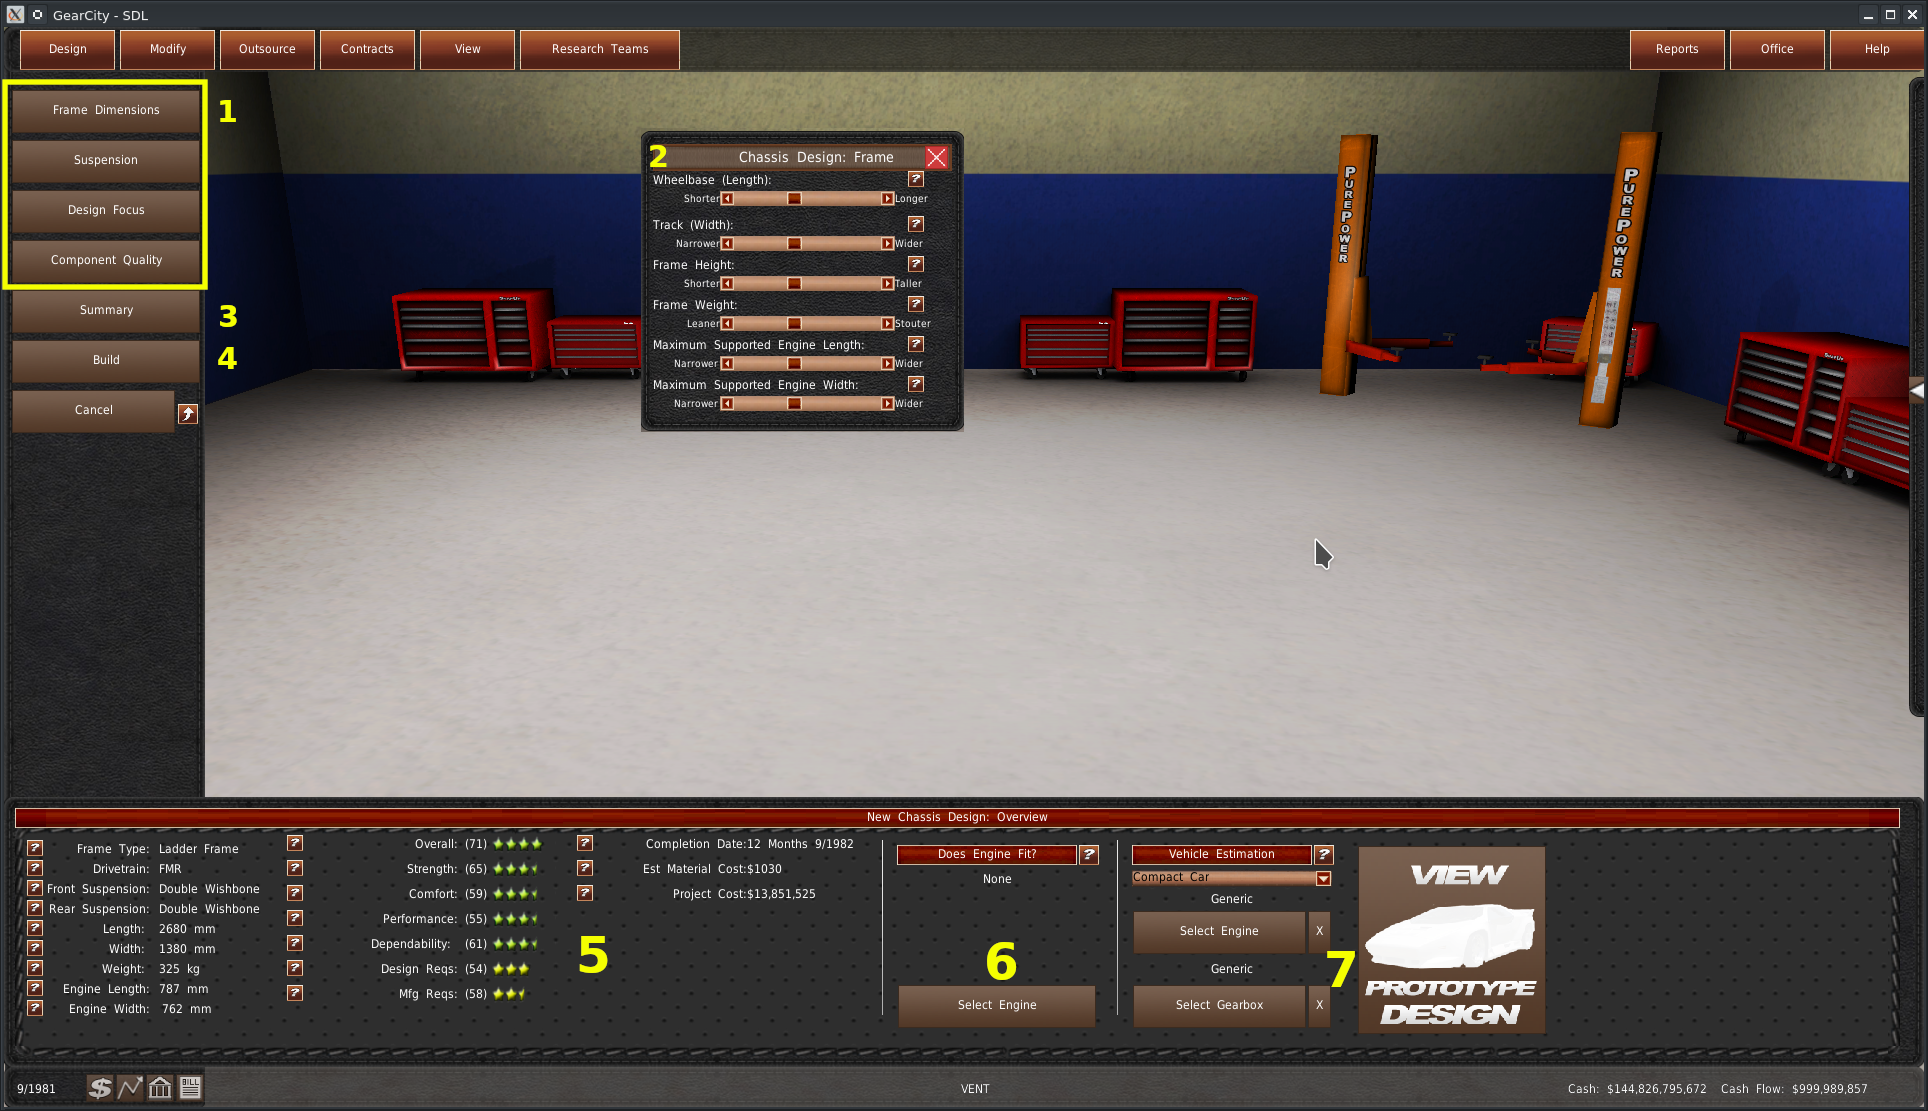 This is the Advanced Designer. On the left side is a list of buttons. The top button group (#1) opens the Advanced Designer sliders windows (#2). We cover individual sliders in more detail on the Vehicles Design pages.
The “Summary” button (#3) allows you to adjust the design sliders as text entries. When you have finished your design, you will click the “Build” button (#4). We will cover both of these systems a little later.
At the bottom is the spec and rating panel. On the left side are the actual specs and ratings (#5). We cover this in more detail on the Vehicles Design pages. In the center is the does it fit tool (#6). This tool allows you to check to see if sister components will work with the component you are designing. See the Checking If Design Fits page for more detail.
On the right side is the Prototype Design system (#7). This system lets you view the specs and ratings of a prototype vehicle using the design you are creating.
Prototype Design
The prototyping system comes in handy if you want to see what your design will do in an actual vehicle. You can pair up other components to get a glimpse of what your design will do.
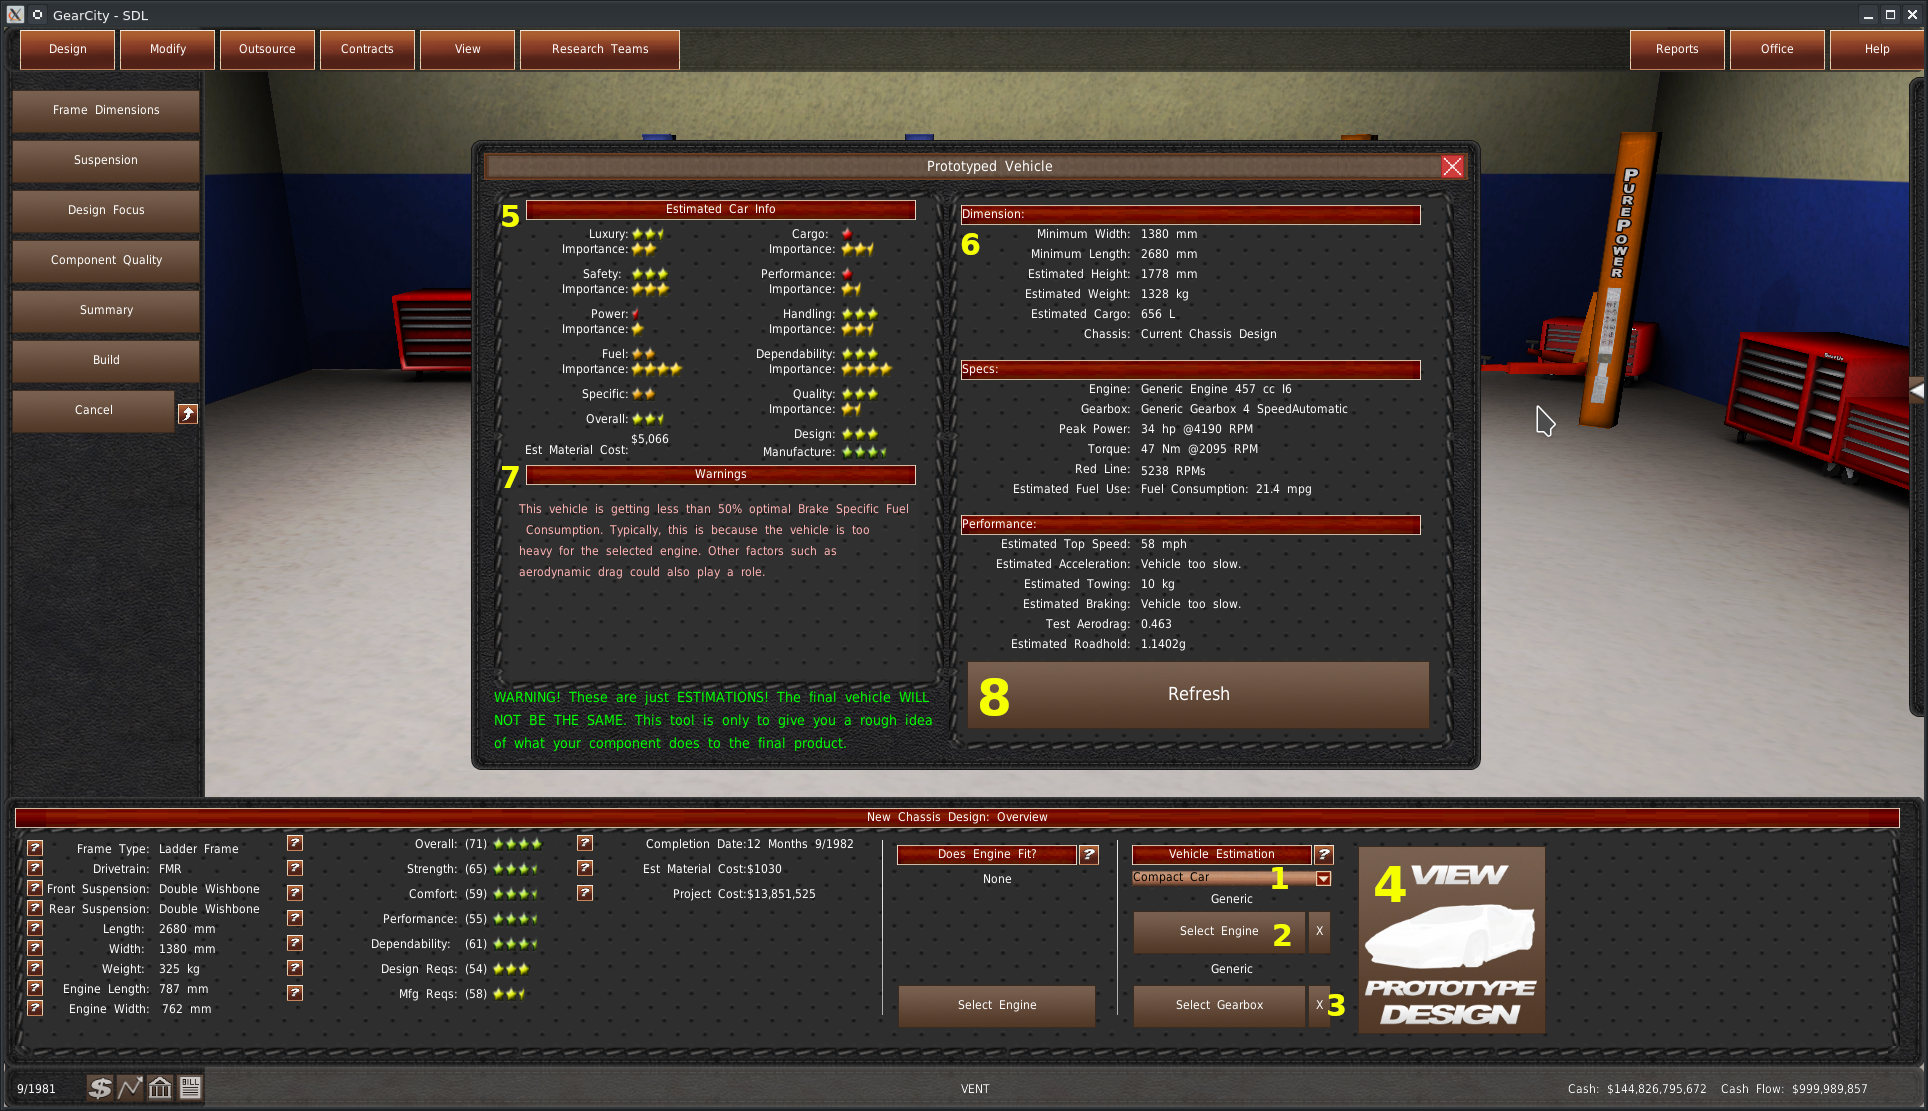
Use the dropdown (#1) to select your vehicle type. If you have additional components to use, click the buttons under the dropdown (#2 and #3). And then select those components. To clear a selection you can hit the “X” buttons. When you're ready to view the prototype, click the “View Prototype Design” button. If you do not have a component, the game will create a generic prototype component.
A new window appears with a prototype design. The game selected a predesigned body for aerodynamic calculations. The vehicle's ratings appear in the top left (#5). Specs are on the right side (#6). And warnings are in the bottom left (#7). The game will not update the prototype design if you make slider adjustments. To update the prototype with any changes you make to your design, click the “Refresh” button (#8).
Please note, these prototypes are estimates of a final product. Your final product will be different, especially if you do not choose the additional two components for the prototype.
Sliders Summary
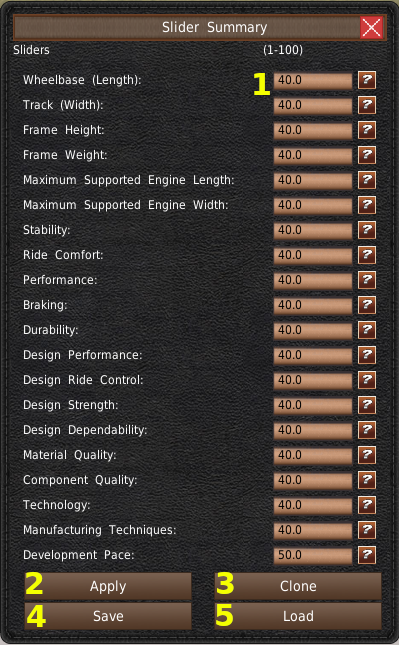
The Slider Summary system allows you to adjust sliders as text boxes, save, and load sliders. At the top of the window, you'll find a list of design categories. And to the right of those textboxes (#1). These text boxes allow you to enter a value between 0 and 100. Those values are the slider's percentages value.
To apply the changes to the design sliders, you'll need to click the “Apply” button (#2). You can also clone an existing design's sliders using the “Clone” button (#3).
This window also allows you to save sliders externally to your hard drive using the “Save” button (#4). To load sliders from the disc, click the “Load” button (#4). See the File Locations page for details on where these files are located. Please note, because the game allows modification, the sliders' files do not save sub-component selections. Some sliders, such as bore and stroke, depends on sub-component values.
Final Build Window

The Final Build window is straightforward. It appears after you click the build button and is the final step to creating your design.
At the top (#1) is an estimation of how many turns it will take to complete the design. And what date your engineers should finish. You can name your model in the left textbox (#2). You can rename components at any time, but because of technical limitations, vehicle models can not.
The dropdown (#3) contains all your marques. Whichever marque you assign will have ownership of this design. Finally, when you are ready to start the engineering process, click the “Build” button (#4).
Assisted
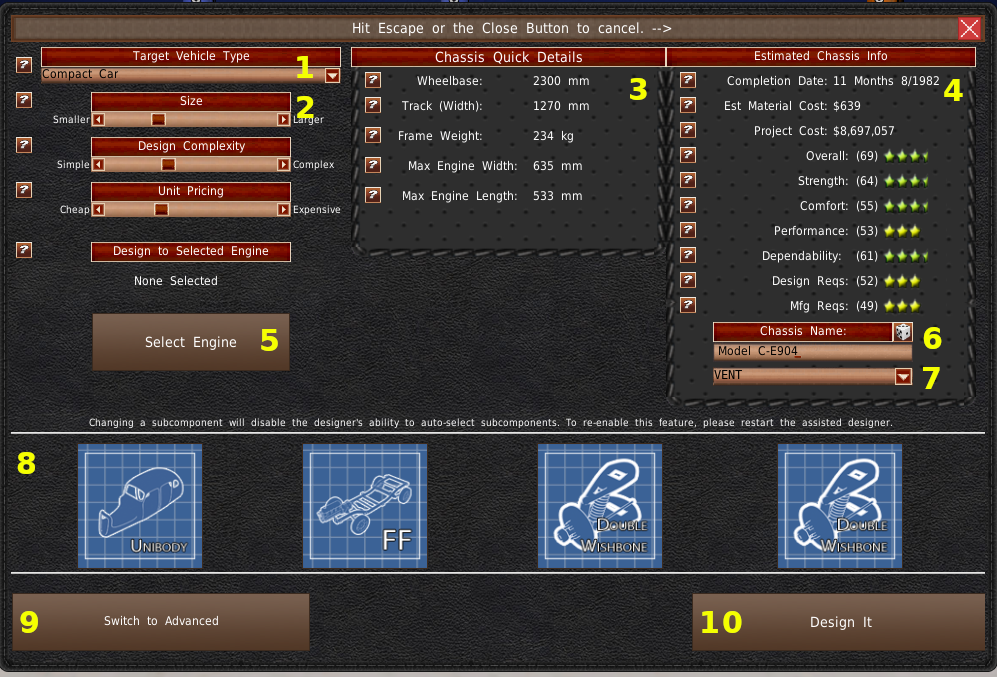 We created the Assisted Designer to ease the designing process. This system should simplify the design process by reducing the number of sliders you need to deal with. At the same time, the Assisted Designer can give you a nearly optimal design using the same system that the AI uses.
Use the dropdown in the top left (#1) to select the vehicle type you are targeting. This is an important step in the design process, as the AI will weigh the hidden Advanced Games slider based on your selection.
Below the dropdown are three sliders (#2). These sliders are a reduction of the Advanced Designer's sliders. The game uses your selected vehicle type target and these sliders to adjust the hidden Advanced Designer sliders.
Many of the remaining features work just like their Advanced Designer counterparts. We also recommend visiting the Vehicle Design pages for details on individual ratings.
In the top center panel (#3) are some specs of your design. And to the right of that is the ratings and costs panel (#4). On the left side, just under the sliders, is the “Does it Fit” system (#5). Much like the Advanced Designer, you can select a sister component and check that this component will work with it. Unlike the Advanced Designer, the Assisted Designer will adjust the sliders to make the components work together.
On the center-right is the component naming textbox (#6). And below that is a dropdown (#7) of your marques to assign ownership of the component.
Spanning across the entire bottom are four blue buttons (#8). These buttons are your sub-component selection system. It works the same way as in the Advanced Designer. Click any of the buttons, and a new window will appear, allowing you to select a new sub-component. For information on that window, see the Advanced Designer Setup section. The Assisted Designer will automatically select your subcomponents for you based on the vehicle type you selected.
In the bottom left is the “Switch to Advanced” button (#9). This button will open the Advanced Designer, using the selection and sliders from the Assisted Designer. Please note, there is no way to return to the Assisted Designer for this design if you click this button.
Finally, when you're ready to design the component, click the “Design It” button (#10).
Design Vehicles
Designing vehicles is very similar to designing components, except there are a couple of extra steps. Upon clicking the Design and Vehicle buttons, the game will present you with two large grey buttons at the center of the screen.
Advanced
Setup

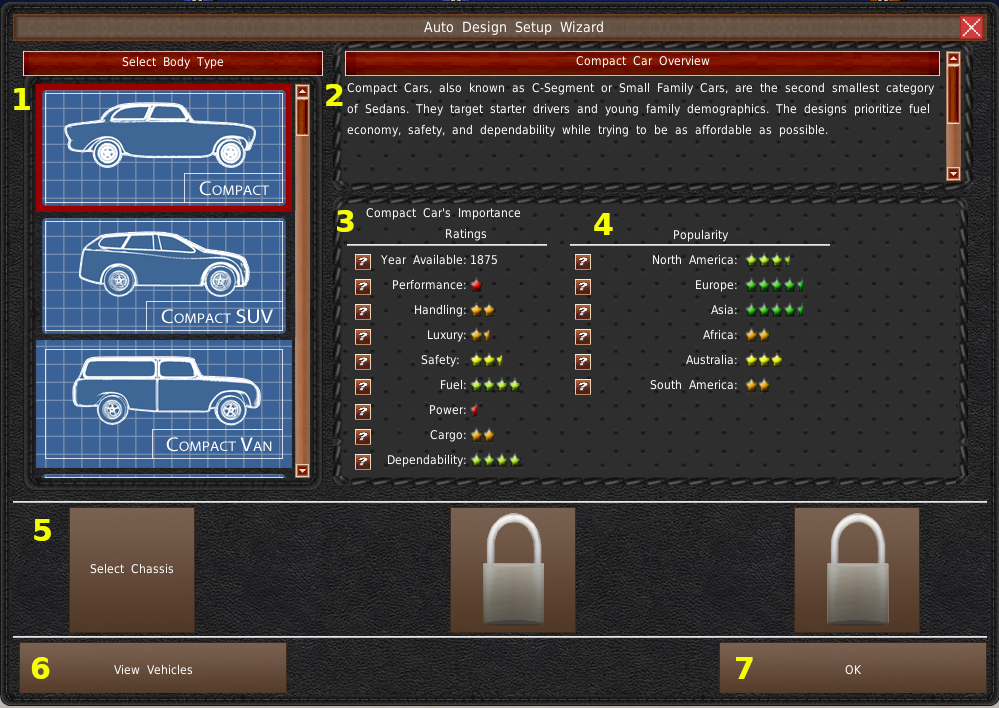
The Advanced Vehicle designer works like the Advanced Component Designer, except you will not be selecting subcomponents. Instead, you will choose the components you designed.
On the left side is a list of vehicle types (#1) for your new design. The panel on the top right (#2) contains fluff information about the selected vehicle type. In the center panel, importance ratings for this vehicle type are displayed in the left column (#3). And regional popularity values are in the right column (#4).
At the bottom, you'll find three brown buttons (#5). These are the component selection buttons. You need to select components in order, starting with the chassis. If the button has a padlock on it, that means you need to select the previous component first. In the selection window, you must click a component from the list (#5a). And then the “Select” button (#5b). If no components are listed, then either those components have not finished the design phase, or they do not work with the other selected component. For example, your engines must have a smaller length and width than the maximum supported engine size of the chassis.
If you wish to view your other vehicles, use the “View Vehicles” button in the bottom left (#6). And finally, when you're ready to continue, click the “OK” button in the bottom right (#7).
Vehicle Body / Premades
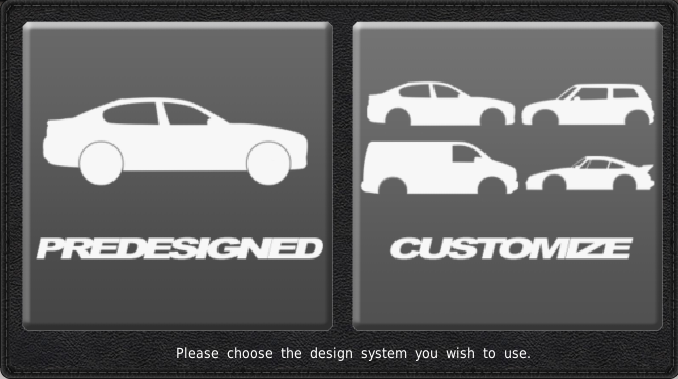 After completing the “Setup” screen, a popup will appear in the center with two options. This popup is the Body Designer selector. At this time, we recommend using a Predesigned vehicle body. But if you wish to create your own vehicle bodies, visit the Body Designer section of this page for more details. And the Designing Bodies page for detailed instructions.
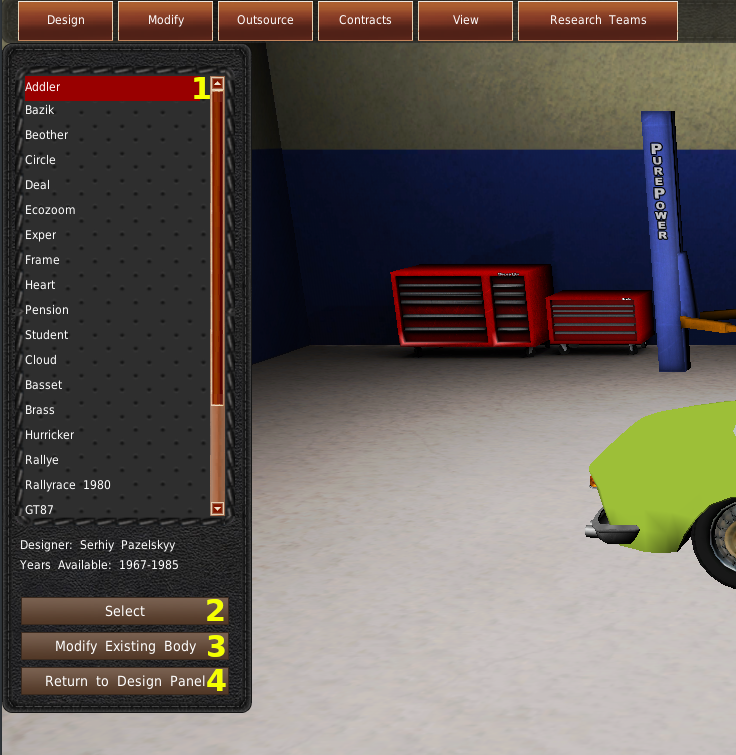 After clicking “Predesigned,” a new panel will appear on the left of your screen. At the top of this panel is a list of names (#1). These are predesigned vehicles made by our community for the selected vehicle type and year you are in. Selecting a vehicle from the list will load that vehicle into the room.
To confirm a selection, click the “Select” button (#2). If you wish to customize this design using the Customize Body Designer, click the “Modify Existing Body” button (#3). If you made a mistake in visiting this part of the game, click the “Return To Design Panel” button. Please note, if you made a new selection from the list, this button works the same as the select button. So be careful.
Designer
 After selecting or creating your vehicle body, you'll enter the advanced designer. The Advanced Designer for Vehicles works practically the same as the component's designer. On the left side of the screen is your design panel. The top five buttons (#1) of this panel opens Design Sliders windows (#2). For more details on what these sliders do, see the Designing Vehicle pages.
Below these buttons is the “Summary” button (#3). We covered this feature in the Advanced Component Designer section.. Just below that is the “Build” button (#4) which we will cover shortly.
At the bottom of the screen is the Design Overview panel. On the left side of this panel (#5) are the ratings of your vehicle design and information on how important those ratings are for the vehicle type. For details on what these ratings mean, see the Designing Vehicles page.
In the center is a warning section to notify you of possible issues with your design. Please note, these are possible issues, and you can ignore some of these warnings. We cover them on the Designing Vehicles page.
On the right side of the panel is the “Ratings” Button (#7). This button opens up additional specs and ratings for the vehicle. And just below it is the “Format” button (#8). This button returns you to the Advance Designer Start screen.
Build
When you have completed the design slider of your vehicle, you'll click the “Build” button (#4 in the previous image). That opens the build window. Much like the Advanced Component designer, the build window has an estimation of the completion date (#1), a place to name your model (#2), a dropdown for the marque (#3), and a “Build” button (#4). Unlike components, you can not rename a vehicle once you click the “Build” button.
Assisted

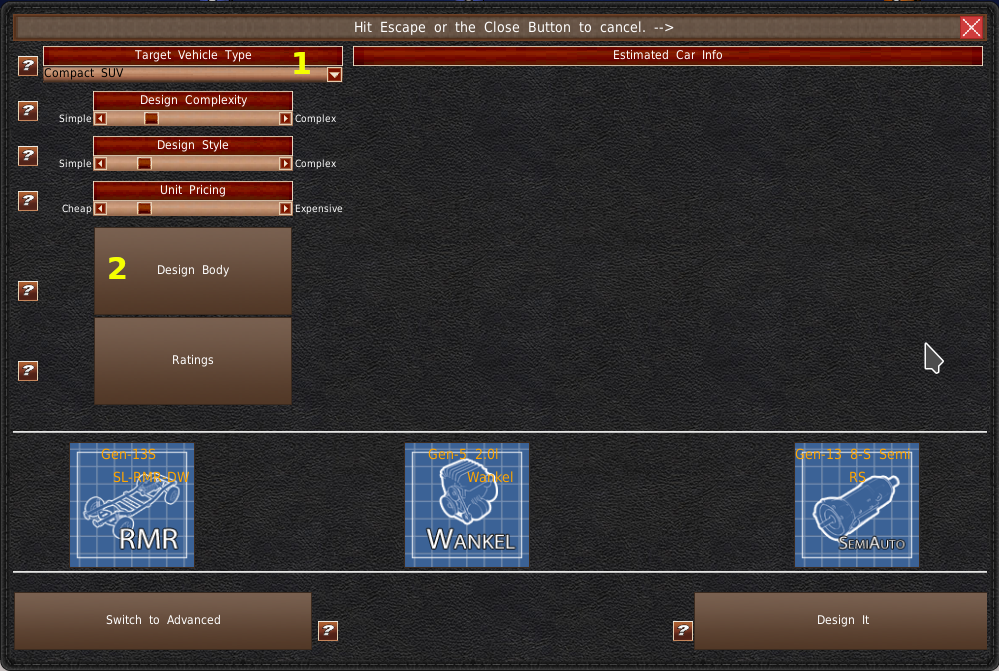
We created the Assisted Designer to ease the designing process. This system should simplify the design process by reducing the number of sliders you need to deal with. At the same time, the Assisted Designer can give you a nearly optimal design using the same system that the AI uses.
Use the dropdown in the top left (#1) to select the vehicle type you are targeting. At first, most of the screen is empty. This is because you don't have a vehicle body yet, and the game requires a vehicle body to generate vehicle ratings.
To create a vehicle body, click the “Design Body” button (#2). The Body Design selector popup will appear. We covered this popup and premades in the Advanced Vehicle Designer section. We also cover Customize Body Designer here.
After selecting a vehicle body, the rest of the assisted designer appears. Now is the time to adjust the sliders (#3) to design your vehicle. In the right-side panel, you'll find specs and ratings (#4). And the vehicle naming system (#5). At the bottom, you'll find three blue buttons. These buttons are for component selection. The Assisted Designer will automatically pick three components it thinks is good for this design, but you are free to override them by clicking the blue buttons and choosing what design you want.
At the bottom left of the screen is the “Switch to Advanced” button (#7). This button will take the current design and switch you to using the Advanced Designer. Please note, once you have switched to the Advanced Designer, you can not switch back to the Assisted Designer for this design. When you have completed your design, click the “Design It” button (#8) in the bottom right.
Vehicle Body Designer
The Custom Vehicle Body Designer allows you to customize your vehicle's appearance. This system can be a little finicky for some users, so we recommend using premade designs if you get frustrated with the system.
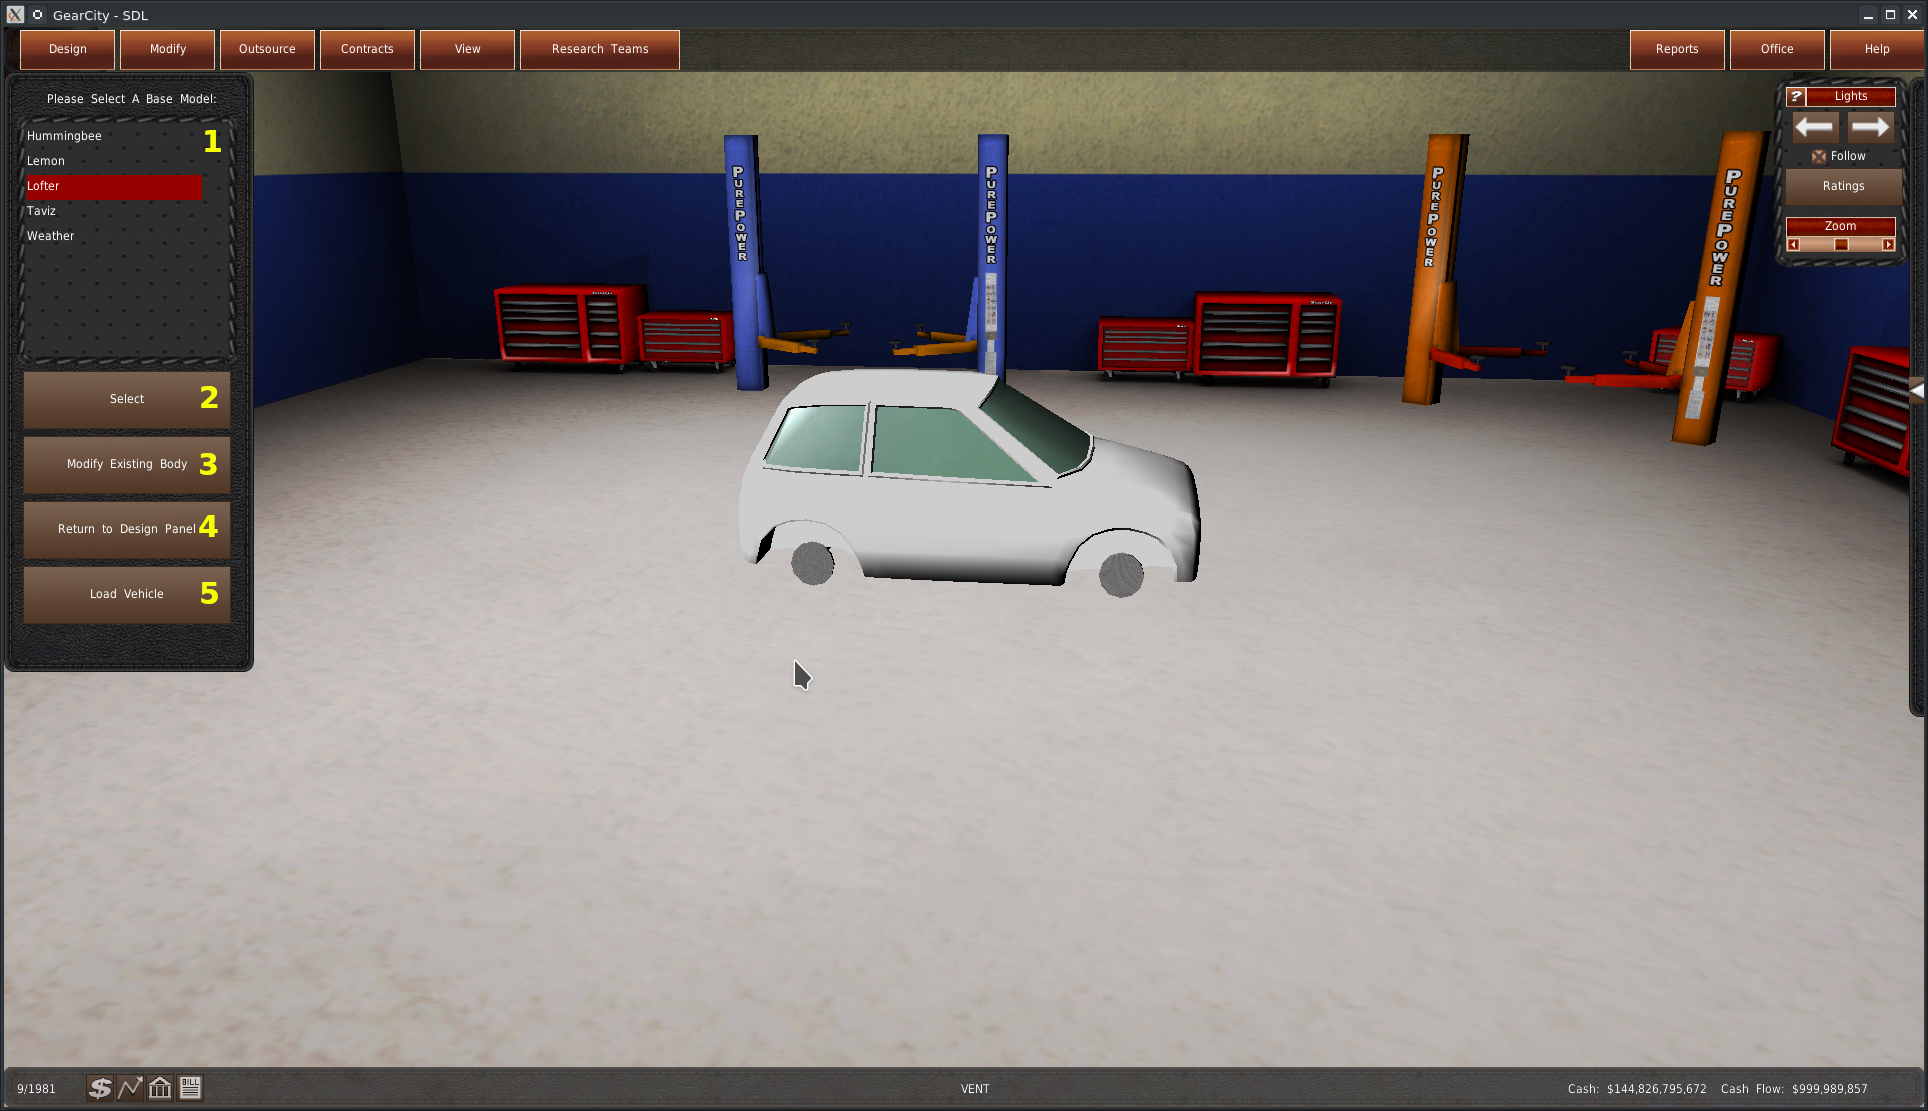
The first thing you'll need to do is select a starting body from the list (#1). Upon selecting a body, it will appear in the design room.
If that is the body you want, click the “Select” button (#2). If you appeared on this screen, but you want to modify your current design, or you got here by accident, DO NOT select anything from the list (#1). Instead, click the “Modify Existing Body” button (#3) to modify your current design. Or click the “Return To Design Panel” button (#4) to exit out of the body designer.
If you have a previously saved body design, you can use the Load Vehicle button (#5) to load that vehicle design if it meets the year and vehicle type requirements.
The Designer Menus
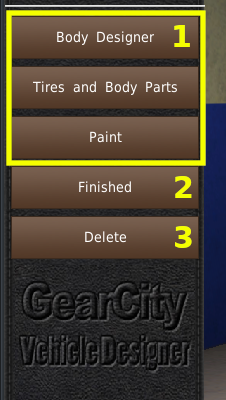 After selecting a base vehicle body, the design menu will appear on the left side of the screen. At the top are three buttons (#1) that you will use to design the vehicle body. We will cover these individual buttons soon.
Below those buttons is the “Finished” button (#2) which will complete your design and return you to the Advanced or Assisted Designer. Below that is the “Delete” button (#4) which will erase the design completely.
Body Designer
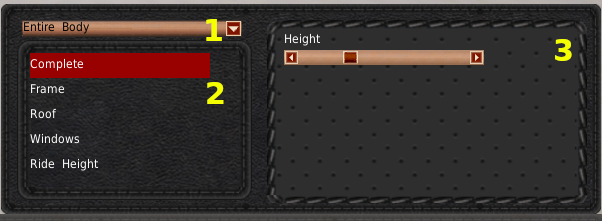
The first option of the menu is the Body Designer. Clicking this button opens the Body Designer Panel in the bottom right of the screen.
Each vehicle body is designed with morph animations. And you can manipulate these animations using sliders to get your desired body shape.
At the top of the panel is a dropdown (#1) containing body location categories. Selecting a category from this dropdown will populate the list below (#2) with sub-categories. Selecting a sub-category from the list will load the animations associated with that sub-category (#3). Using the sliders will alter the vehicle body in the design room.
Tires and Body Parts
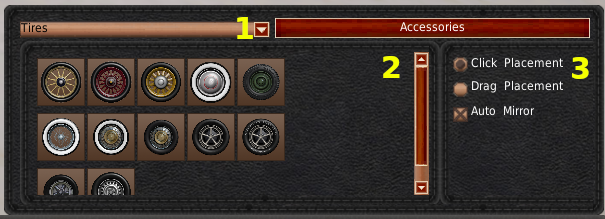
To place tires and body parts onto the vehicle, you'll need to click the “Tires and Body Parts” button from the Designer Menu. This button will open up the “Accessories” panel.
At the top of this panel is a dropdown (#1) that allows you to change what type of component you wish to add to the vehicle. Below the dropdown is a list of components in button form (#2). On the right-hand side, there are three placement options (#3).
- Click Placement ⇒ Click on the component button you want to place on the vehicle. And then click where on the vehicle you want to place it.
- Drag Placement ⇒ Drag the component button to where you want the component to be placed on the vehicle.
- Auto Mirror ⇒ Will automatically place a second component on the opposite side of the vehicle.
To select an accessory already on the vehicle body, simply click it. And to move an accessory already on the body, drag it to its new location.
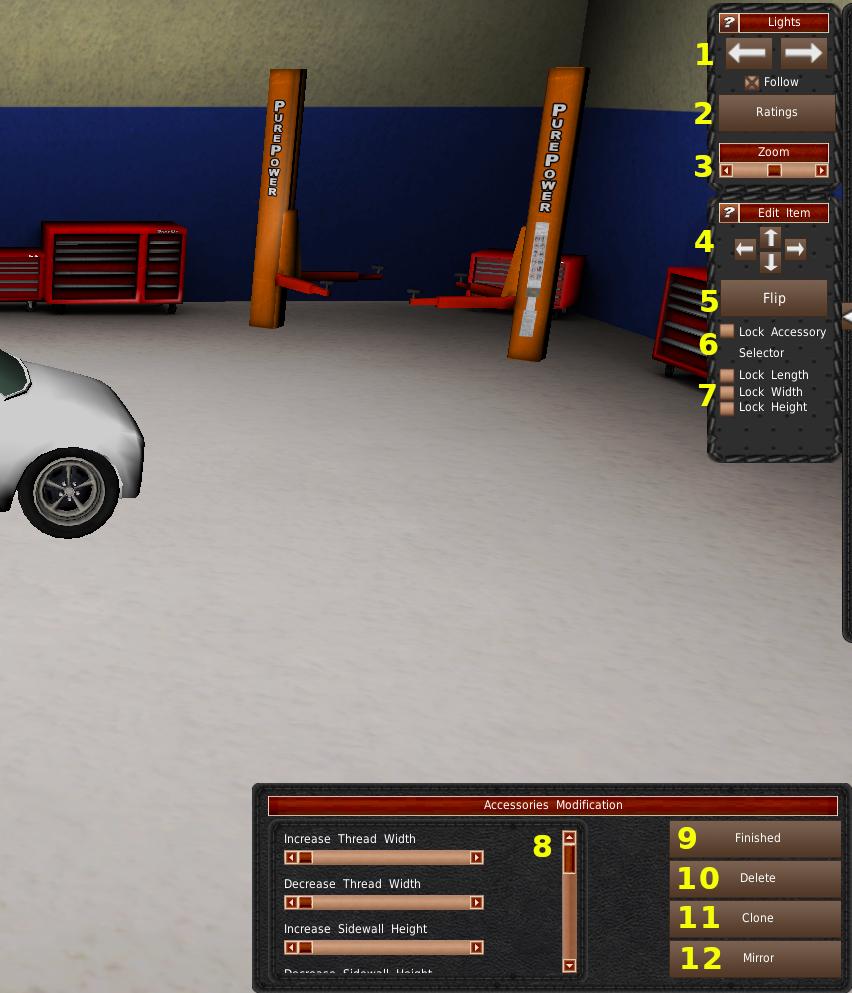
Once you place an Accessory (Tire, Body Part, etc.) vehicle, and that accessory is selected, the game will display the Accessory Modification system. This system consists of two panels. In the top right is the Lighting and Location panel. Some of this panel is visible the entire time of the design process. At the bottom right is the Accessory Modification system. It works very much like the Body Design system, except it has a couple of extra functions.
Looking at the Lighting and Location panel, at the very top are the Light controls (#1). These two buttons allow you to pan the lighting around the room. Just below those buttons is a check box labeled “Follow.” When enabled, this setting will have the lighting follow the camera panning around the room. You can pan the camera around by right-clicking the design room and then dragging. Or by using the arrow keys.
Below the Lights settings is the “Ratings” button (#2). This button opens the vehicle specs window. Vehicle bodies' shape and size affect aerodynamic drag, dimensions, and surface area. Those specs affect many different ratings, from fuel economy to performance and from luxuriousness to cargo ratings.
Below the “Ratings” button, you'll find the Camera Zoom Slider (#3). This slider allows you to zoom the camera in and out.
You'll find in the middle of this panel four arrow buttons arranged in a cross (#4). These are the Accessory Placement buttons. They will pan and tilt the accessory along the horizontal and verticle axis. Holding the button down will repeat the action, so you don't have to click the button multiple times if you wish to rotate the accessory a lot.
The “Flip” button (#5) flips the Accessory along the horizontal access. This action is useful if you wish to place something on the other side of the vehicle.
Below the flip button are several accessory lock systems. The first of these is the “Lock Accessory Selector” (#6). This checkbox prevents you from selecting other accessories on the vehicle body by clicking them, thus locking you to the currently selected accessory.
The “Lock Length,” “Lock Width,” and “Lock Height” checkboxes (#7) will prevent the selected accessory from being moved by dragging in the direction that you have locked. For example, if you set “Lock Length,” you won't be able to drag the accessory from front to back.
In the bottom panel, you'll find the accessory's morph animation sliders (#8). Just like vehicle bodies, you can alter the shape, size, and appearance of items you place on the vehicle.
To the right of those sliders are a series of buttons. The top button is the “Finished” button (#9). This button will return you to the Accessory panel. Use the “Delete” button (#10) to delete the selected accessory. The “Clone” button (#11) duplicates the selected accessory. This duplicate is placed directly on top of the parent. So you will need to move by dragging the item off each other to another part of the vehicle body. Finally, the “Mirror” button (#12) will create a second accessory located on the other side of the vehicle if Auto-Mirror was not enabled for this accessory type.
Paint
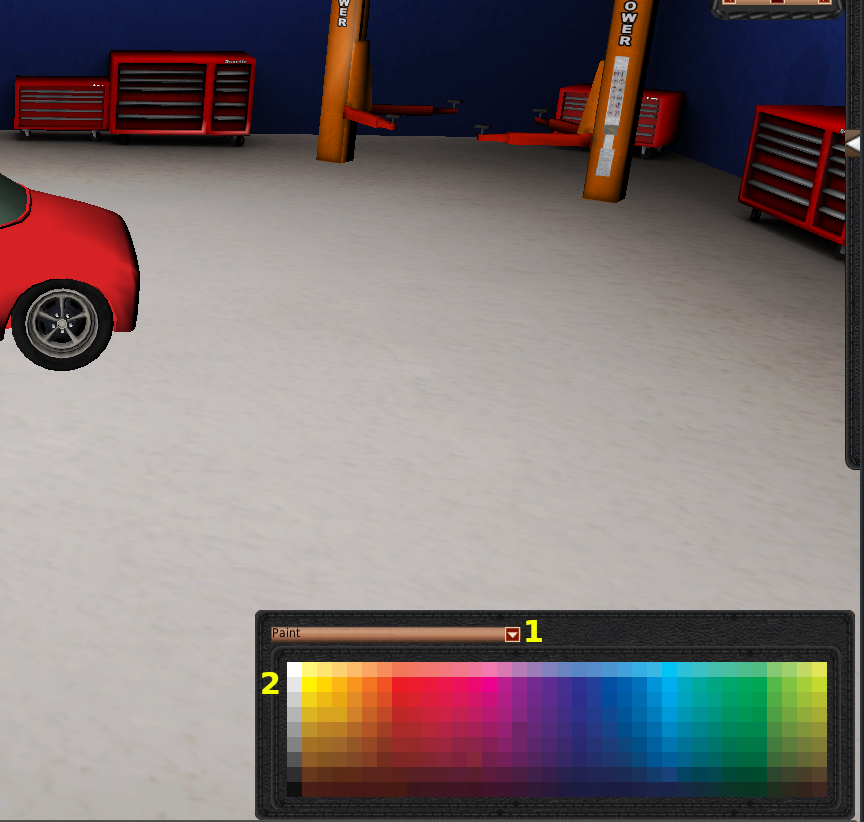
With the paint system, you can paint various parts of your vehicle design. The paint menu opens in the bottom right of the screen. At the top is a dropdown (#1) that you use to select the paint type. With this dropdown, you can select paints, metals, glass, and Materials. Some parts of the vehicle can only be painted with a specific category of paint. For example, you can only change the glass on the vehicle with the “Glass” category selected in the dropdown.
Below the dropdown are your paint options (#2). Click the color or material you want, and then click the object you want to paint. It should change that color.
Saving Design
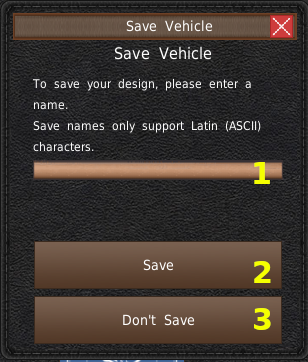 Once you click the “Finish” button, the game will return you to the Advanced or Assisted Designer. And the game will also display the “Save Vehicle” popup window. This window is to save the body design of the vehicle in case you want to use it again later using the “Load Vehicle” button. You do not have to do this step if you do not want to use the design again in the future. *This window does not save the car design. It's just for loading the body design again in future games you play.*
To save the body design for future use, enter the name of the design in the textbox (#1). Then click “Save” (#2). The body will now appear in the “Load Vehicles” list when you design a new vehicle. If you don't want to save the body design, click “Don't Save” (#3).
Modify Components
Over time, you can improve your component designs using the Modification systems. The modification system allows you to upgrade your components using a quick and easy system.
This window will appear after clicking the Modify button in the top bar and selecting one of the three components.
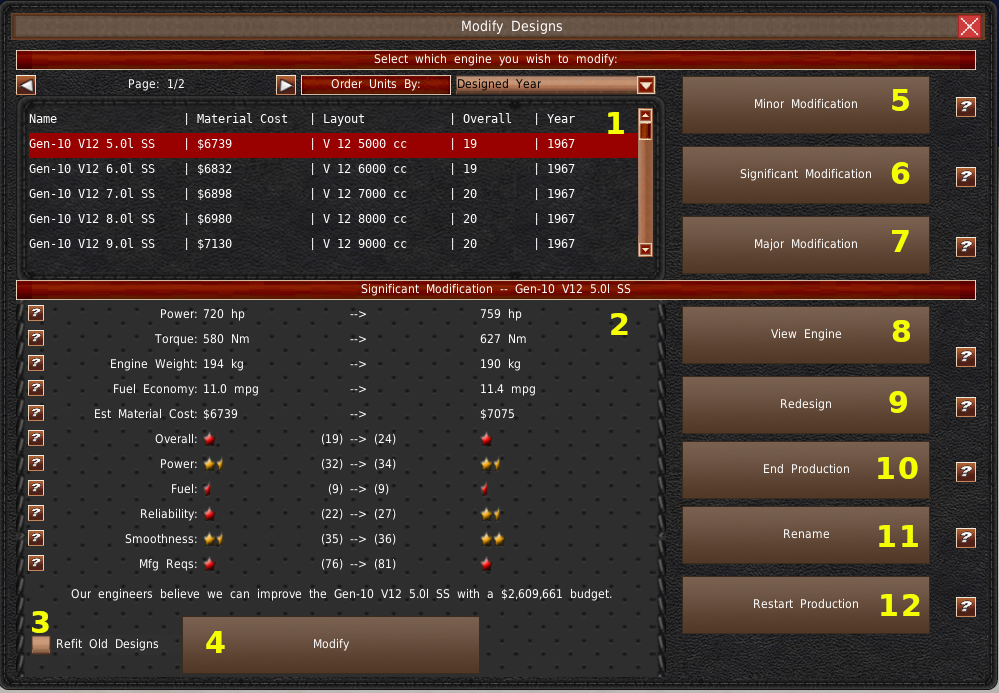
At the top of the window is a list of your designs (#1). Selecting a design from this list will load the default “Significant Modification” results and display them in the panel below the list (#2). Your original values are on the left, and the new values are on the right.
At the bottom left is the “Refit Old Design” checkbox (#3). If you enable this checkbox, the game will open the Refit Design screen after you modify the design. We will cover that window shortly.
The modification button is at the bottom of the window (#4). Clicking this button will complete the modification process.
On the right side of the window are the various options and tools for the modification system. At the top are the modification modifiers (#5, #6, #7). These buttons increase the magnitude of the modification you're making to the design. The smallest modification is the Minor Modification (#5), whereas the largest modification is the Major Modification (#7). Selecting any of these buttons will change the modification values in the panel (#2). You will need to click the “Modify” button (#4) to complete the modification.
The “View” button (#8) opens the view window to the selected vehicle. To redesign the component from scratch, click the “Redesign” button (#9). This button will load your selected sliders and components into the Advanced Designer.
To end the production of this component, click the “End Production” button (#10). Please note, you can not end the production of a component used in an active vehicle design. Use the “View” panel to see which vehicles are using this design.
You can rename a component using the “Rename” button (#11).
And if you wish to restart production of a discontinued design, click the “Restart Production” button (#12). This will open the Restart Production window.
Refit
When you modify a component, it does not automatically update your vehicles. Instead, you will need to refit future models with the new design. The Refit tool helps you do that quickly and in bulk.
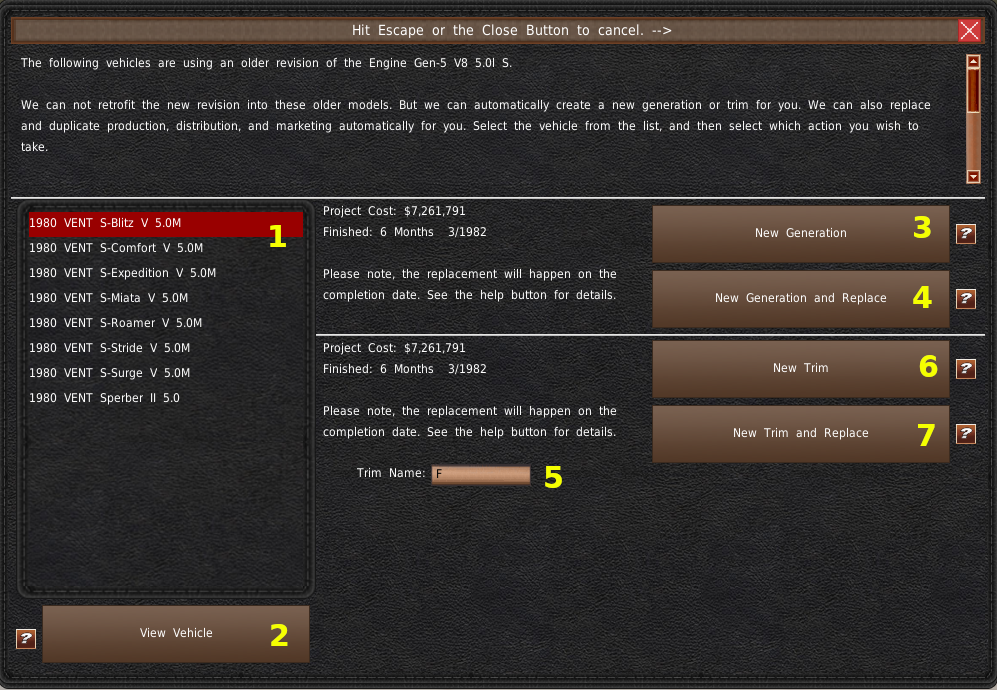
On the left is a list of your vehicles using this design that can be refitted (#1). Please note, you can not make more than one new generation of vehicles a year. So if you plan on modifying all three components, start with one, then do the next, and then do refitting on the third group of components.
At the bottom left is the “View Vehicle” button. This button will open the View window for the selected vehicle.
On the right are your refit options. The top one (#3) will create a new generation of the selected vehicle. However, the button below that (#4) will not only create a New Generation, but that new design will replace the old design in your factories and branches. And your old design will be discontinued.
The section below the New Generation area is for creating new trims. Trims require a trim name or suffix, so you must enter that in the textbox (#5). Then like the New Generation section, “New Trim” will make a new trim of the selected vehicle. However, “New Trim and Replace” will make a new trim that replaces the old trim at your factories and branches. And it will end the production of the old model.
Restart Production
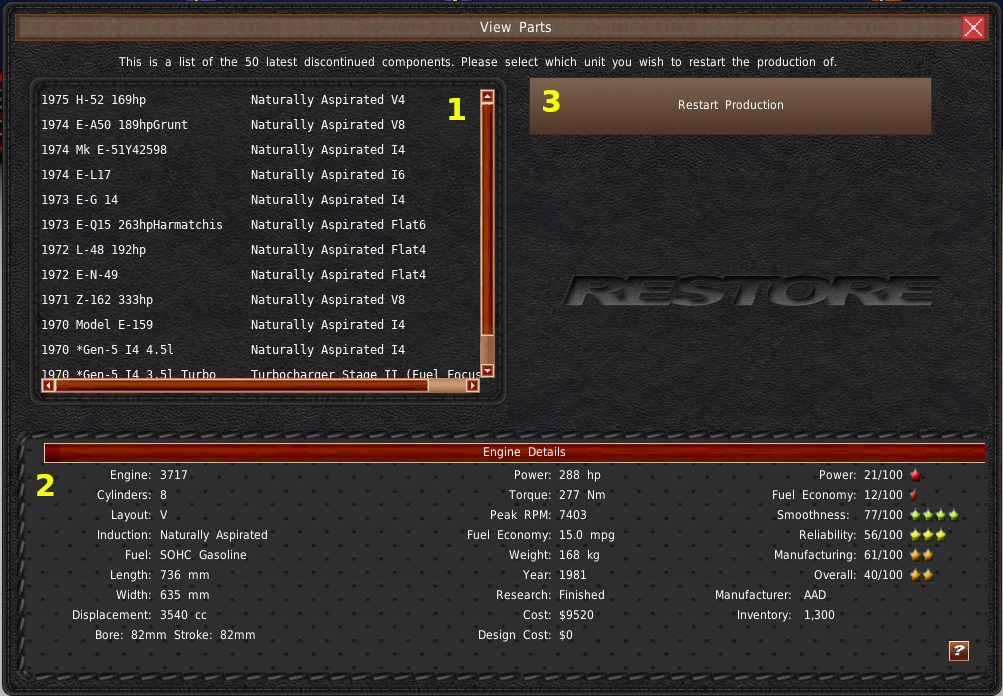
If you want to restart the production of a design, you'll click the “Restart Production” button in the modify window. That will open a new window that will allow you to restore a component to active status.
The list on the left contains your discontinued components (#1). At the bottom is information about the selected component (#2). To restart the production of this design, click the “Restart Production” button (#3).
Modify Vehicles

The Vehicle Modification system is not the same as the Component Modification system. Instead, you redesign vehicles into new generations or new trims.
At the top of the window is the “Show Discontinued Vehicles” checkbox (#1). If you enable this toggle, the list (#2) will display any vehicles you have ended the production of. If you select a discontinued vehicle from the list, a “Restore” button will appear under the list. You can use this button to restart the production of the discontinued vehicle. Otherwise, the buttons below are for creating new generations, trims, and ending the production of the vehicle.
The “View Vehicle” button will open the View window with information about the selected vehicle.
“New Generation” (#4) creates a new generation of this design. New generations are considered redesigns of the previous model. They are not model years. New model years of vehicles happen automatically based on when you produce the vehicles, and they do not have any major redesign of the vehicle. Do not confuse model years with generations in real life or the game.
It's a smart idea to create a new generation of a vehicle every five to eight years if that vehicle has good image ratings. Older vehicle designs receive age penalties starting at five years, and new generations inherit the vehicle image ratings from previous generations.
See the New Generations page for more details.
The “New Trim” button (#5) allows you to create a new trim. A trim is a predefined set of options or components for a vehicle different from the base model. For example, a Sports trim might have a more powerful engine. If you want to use different combinations of components with your design, this is the system to use.
See the Trims page for more details.
The “End Production” button (#6) will halt the production of this vehicle and discontinue it. The system will remove the vehicle from sale IF you have inventories or an outstanding outsourced contract. Otherwise, the vehicle will remain for sale at your branches. This button will end any contracts you have with this vehicle design. So be careful and make sure you don't breach.
New Generation and Trims
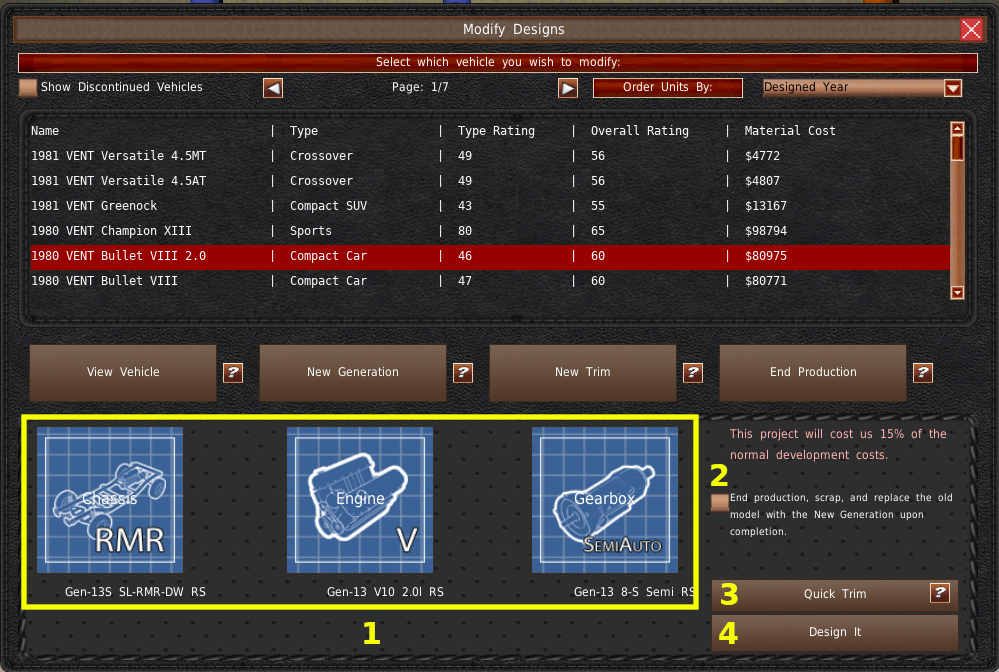 When you click on the New Generation or New Trim buttons, a new section will appear at the bottom part of the window. The area on the left has three buttons to select which components you want to change (#1). Changing any of these components will increase the cost and time it takes to design the new model. Chassis negate any time or cost savings, but if you plan on changing engines or gearboxes, the discounts are substantial. You can find the development costs on the right side (#2). When developing a New Generation, just below the discounts is a checkbox that says, “End Production, scrap, and replace the old model with the New Generation upon completion” (#2). This checkbox will end the production of the base model, scrap any inventories, and remove it from sale when you complete the New Generation.
At the bottom right, you'll find two buttons. The “Quick Trim” button (#3) skips the body design and Advanced Designer. The game will immediately start the engineering process using the old body. The “Design It” button will take you to the Advanced Designer, where you can change the vehicle body and make slider adjustments. Please note, if you make too many adjustments to sliders, you will lose the component selection discounts. The game will consider the vehicle being designed from scratch.
Outsourcing System
The Outsourcing system allows you to buy or license designs from other manufacturers. And it also allows you to sell designs to other manufactures.
The system consists of three different types of outsourcing. * Licensing ⇒ which is selling a design where the person buying the design has to manufacture it. * Outsource / Purchase ⇒ The buyer buys pre-produced units from the supplier. * Platform Sharing ⇒ A parent or child company uses designs for their family marque.
You can find three radio buttons in the upper left (#1) to toggle between these systems.
Below those radio buttons are five buttons (#2). These buttons allow you to switch between the different components, vehicles, and manage existing outsource orders.
In the center are your filters. At the top is a dropdown to select which company you want to outsource from (#3). By default, your company is selected. When your company is selected, the outsourcing system goes into “sell” mode. It allows you to sell your designs. If you change this dropdown to a third-party company or “All Companies,” the game will remove your designs. And the system enters into “buy” mode.
Below the dropdown are your filters (#4). You can use these filters to reduce the number of entries in the model list (#5). You will need to click the “Apply” button to have the filters go into effect.
On the top right side is a list of models available for sale or purchase based on your Purchasing option (#1), selected company (#3), and filters (#4).
The panel on the center-right (#6) is where transactions take place. And the panel at the bottom of the screen shows information about the selected design (#7).
Licensing
When you license a design, you're purchasing the instructions and the right to manufacture that model. You pay a royalty for every unit you manufacture.
Sell

When you put up a design for license, any manufacture may purchase it. The game does not allow you to deny any company the right to license your design.
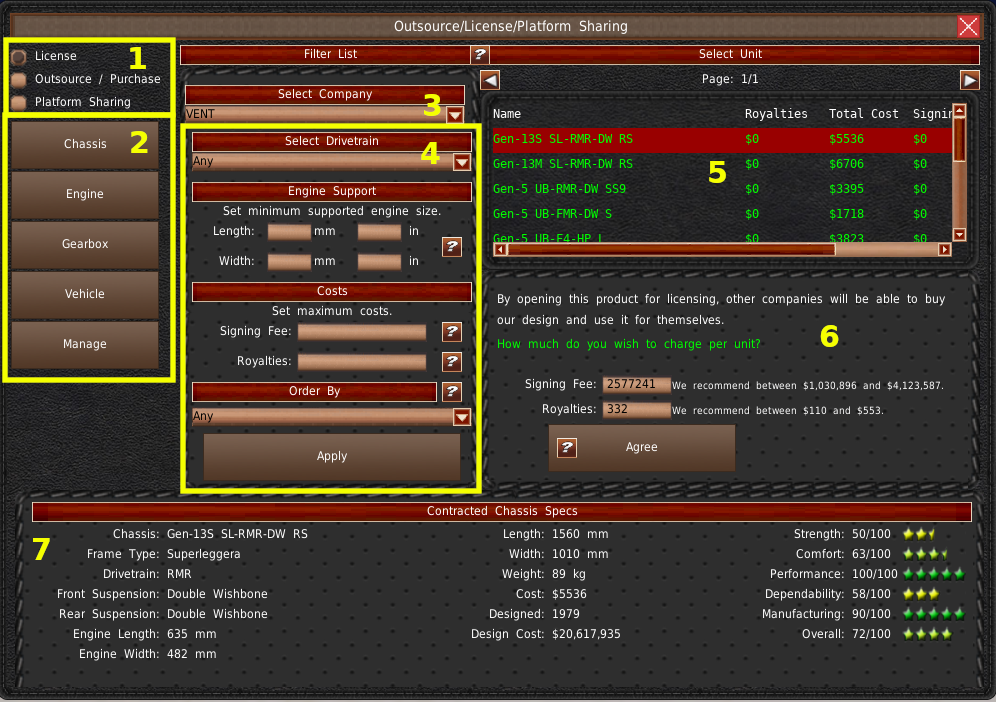
To allow your design for license, you must have “License” selected in the upper left of the screen (#1). And you must have your company selected in the company dropdown (#2).
Select the design you want to put up for sale in the list.
In the central-right panel is a textbox for the “Signing Fee” (#3). This fee is a one-time payment made to your company when another company purchases your design.
Below that fee is the “Royalty” rate textbox (#4). This value is the amount the other company will pay for you for each unit they manufacture.
The game provides a recommended price range to the right of each entry. The cheaper these values are, the more likely they are to be licensed.
When you are ready to put the design up for sale, click the “Agree” button (#5). You can alter the prices or remove the design from license by repeating the process.
Buy
Purchasing a license will allow you to produce that design for the rest of the game. You will have to pay a one-time fee and an extra royalty payment for each unit you produce.
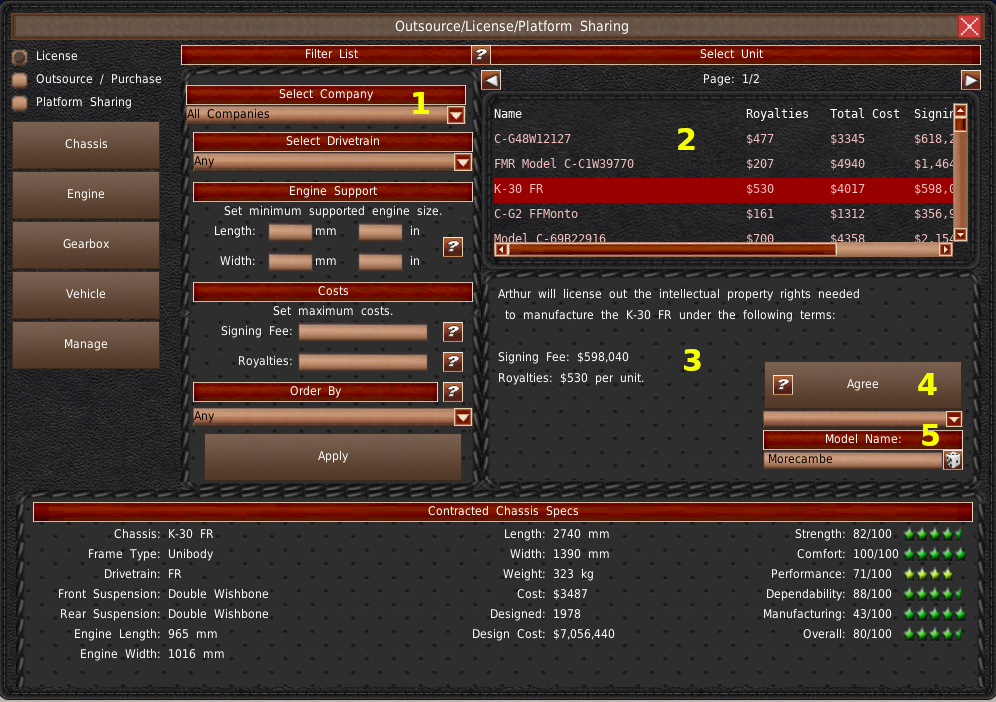
To purchase a license, select a company other than your own from the company dropdown (#1). The upper-right list (#2) will populate with the company's licensable designs. You can filter this list using the filters in the center panel. You are not licensing red entries in the list (#2), but you are licensing any green entries.
Below the list, in the central panel, are the licensing terms (#3). If you want to license this design, you can enter the name of the design and select a marque in the bottom right of the central panel (#5). When you're ready to license the design, click the “Agree” button. You will pay the signing fee immediately. The model's unit costs include the royalties payments in the price, and the game will automatically pay them as you produce units.
The license lasts forever, but you can still end the production of the design to remove it from the game.
Outsourcing
Outsourcing is where you have another manufacture build units and ship them to you. In the case of components, you use those units to manufacture your own vehicle. In the case of outsourced vehicles, you sell them, thus skipping the manufacturing process.
The Outsourcing system requires you to manage inventories of components. And so, you will need to use the Outsource Manage system that we cover a little later.
Sell
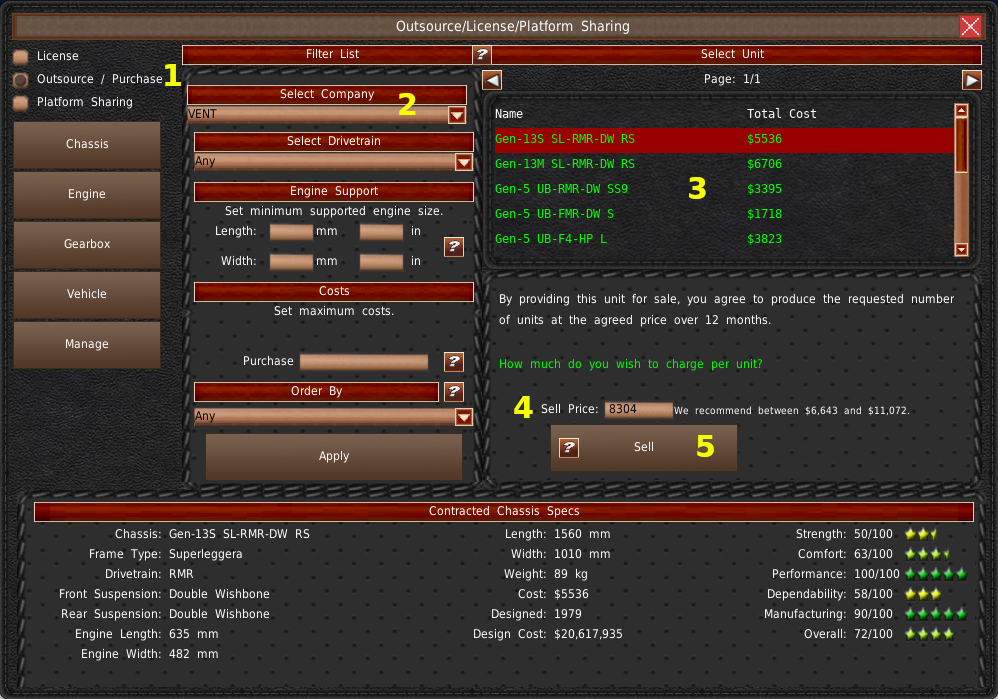
To allow other companies to buy manufactured units from you, you'll need to make them available for sale. To do that, you'll need to select “Outsource/Purchase” from the upper left radio buttons (#1). Selecting this will put you in the Outsourcing mode. Next, select your company in the company dropdown (#2) if it isn't already. Then select the design you want to sell from the list (#3).
Enter the price you want to sell a unit for in the “Sell Price” textbox (#4). Please remember to consider manufacturing costs, as you will be producing this unit in your factories.
Click the “Sell” button (#5) when you're ready to sell the design.
If an AI company chooses your design, it will create a contract with your company. This works like any other contract in the game. The AI may also renew the contract if they run low on units. Unlike normal contracts, however, you may terminate them at any time without penalty.
Buy
Buying units from other companies have the benefit of avoiding the manufacturing process. However, the units are more expensive than producing them yourself.
If you want to buy units from other companies, select the name of the company from the company dropdown (#1). The list will populate with their designs (#2). You can filter this list using the filters in the center panel. You are not licensing red entries in the list (#2), but you are licensing any green entries.
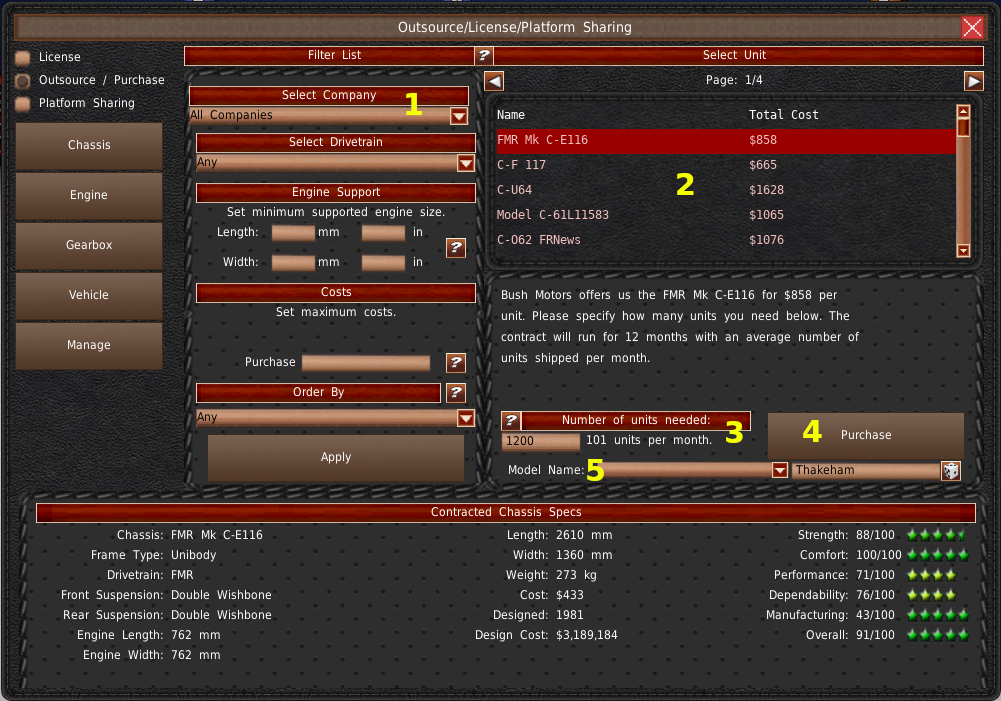
After selecting a unit, you can enter the number of models you want to order over a one-year (12 turn) span into the textbox in the center-right panel (#3). The number of units shipped per month will appear next to the textbox.
Select the design's parent marque and enter a name in the dropdown and textbox (#5). And when you're ready to purchase the design, click the “Purchase” button (#4).
Your purchase will become a contract for the manufacturer. And it will have top priority. However, they still may go out of business or discontinue the model. So be on the lookout if this happens.
When you need to order more, you'll need to use the Outsourcing Management system. We'll cover that system shortly.
You can end an outsourcing contract by ending the production of the design.
Platform Sharing
Platform sharing allows for a child or parent marques to use each other's platforms at no cost. You can use any design of a company that you own 50% of or any design of a company that owns 50% of you. Likewise, they can use your designs at no charge.
You can disable child companies from using your designs by using Disable Platform Sharing in the Autocommands section of the Office Mega Menu.
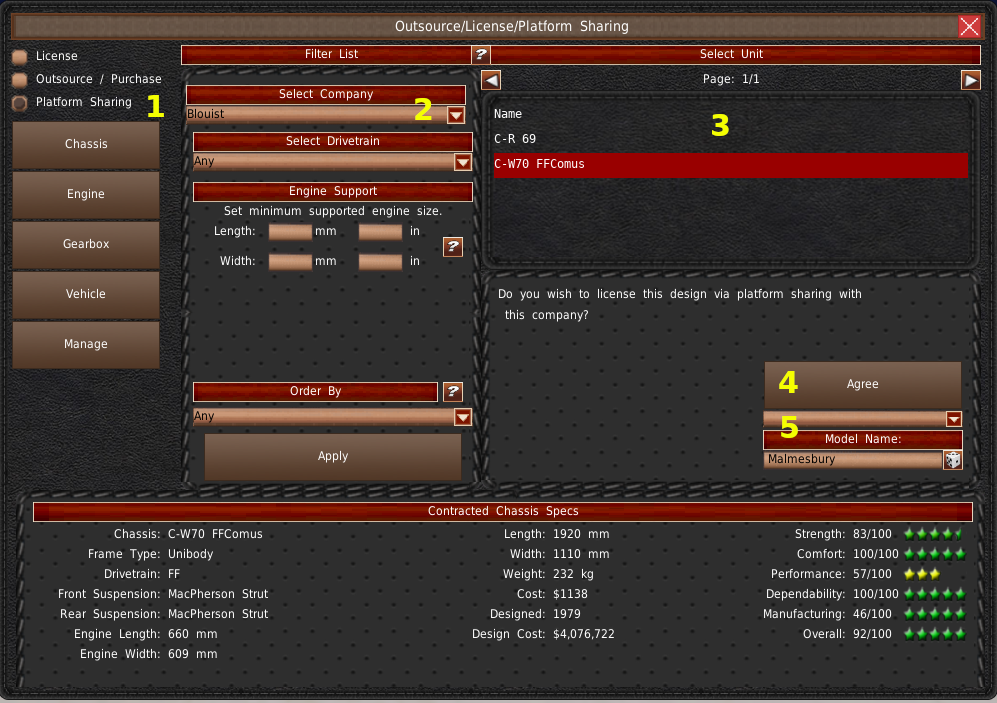
To use your child or parent's designs, select the “Platform Sharing” radio button (#1) in the upper left of the screen. You can change the selected company using the company dropdown (#2).
Only designs you have not shared appear in the list (#3). Select a design from this list. The bottom panel will populate with information about this design. Set the owner marque for this design, and name it (#5). And when you're ready to take this design, click the “Agree” button (#4).
Manage
If you purchase units from another manufacturer, you'll need to manage your inventory of those units. You can do this with the Manage system. This system is also available in the Office Mega Menu, and it works the same way.
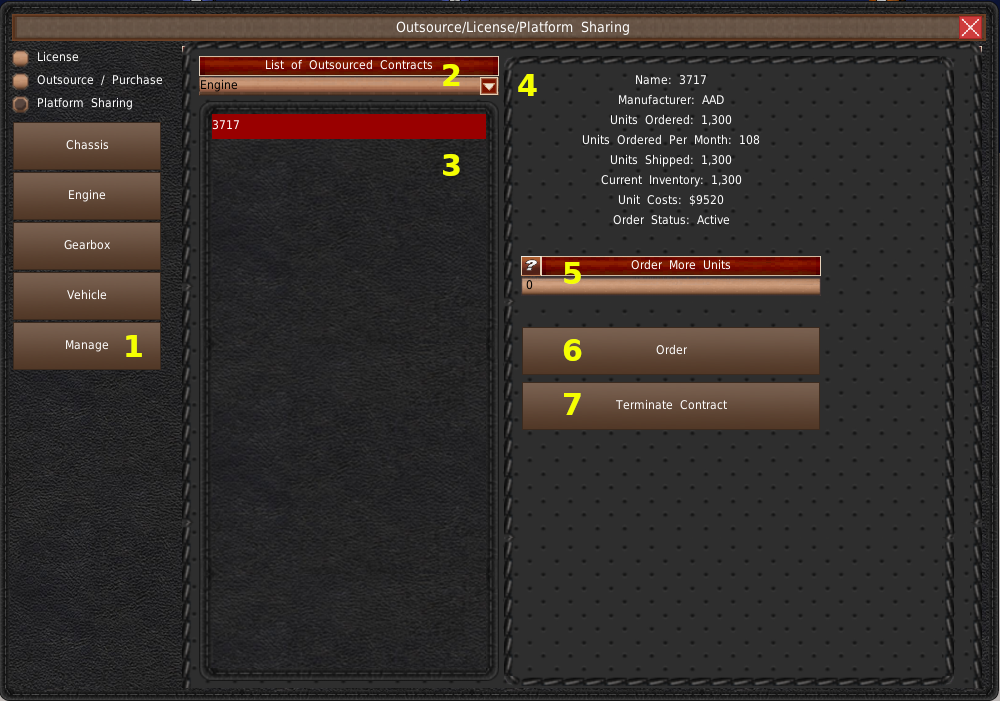
First, you'll need to select “Manage' from the right side buttons (#1). Next, select the type of design (Chassis, Engine, Gearbox, Vehicle) from the dropdown (#2). This list (#3) will populate with your active outsourced purchase contracts.
Selecting a design from this list will fill in the information about the current contract on the right (#4). Note the “Units Ordered” and the “Units Shipped” rows. The difference between these two numbers is the outstanding units.
To adjust the Units Ordered number, enter the value into the text box (#5). Please note, this order overrides the existing order. The number you enter is added to the number of units shipped to give you your new “Units Ordered” value. For example, let's say you have 100 units remaining on your current order, and you enter 200 into the textbox. The new order will have 200 remaining units and not 300 units.
When you're ready to order more units, click “Order” (#6). If you want to terminate your order, you can click the “Terminate Contract” button. Alternatively, you can set the order to 0 units or end production to terminate the contract.
If you're selling units to other manufacturers and wish to stop, you can cancel their contracts without penalty. You can not cancel licensed designs or anything that has been platform shared.
Contracts System
The RnD room contains the contracting system, so you can see the contract requirements while you're designing. This system works exactly the same as the system found in the office, except for the “Assisted Design Component” button located at the bottom center of engine contracts.
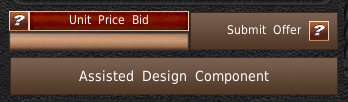
This button will open the Assisted Designer, and the game will attempt to create a design that will work for this contract.
View System
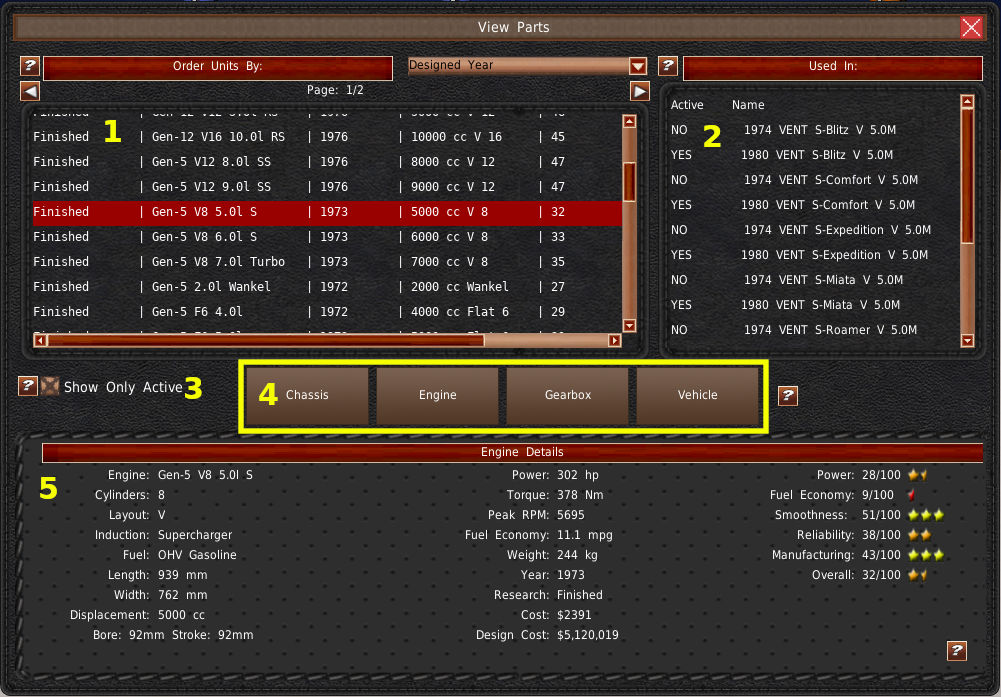
Use the View system to look at your designs and view their specs and ratings. Many other systems in RnD open this window, specifically any button that says “View” on it.
On the top left is a list of your designs (#1). Selecting a design from this list will populate the bottom panel with information about that vehicle (#5). And a second list in the upper right (#2) will fill with which vehicle designs and contracts use the select component if you're viewing components. Or it will show any contracts or badge-engineered vehicles based on the selected model if you're viewing vehicles.
In the center area is a checkbox that says “Show Only Active” (#3). If this checkbox is disabled, the view list will show discontinued models as well as active models.
You can switch between components and vehicles using the buttons in the center (#4).
Research Teams
You will use Research Teams to boost your engineer's design skills in addition to designing new things. Research Teams are a powerful tool that can raise your skills faster and prevent skill decline. See the design skills page for more details.
The Research Teams window also provides you with a look at future technologies you're about to unlock. The year you can unlock them and the skill level it will take to unlock them.
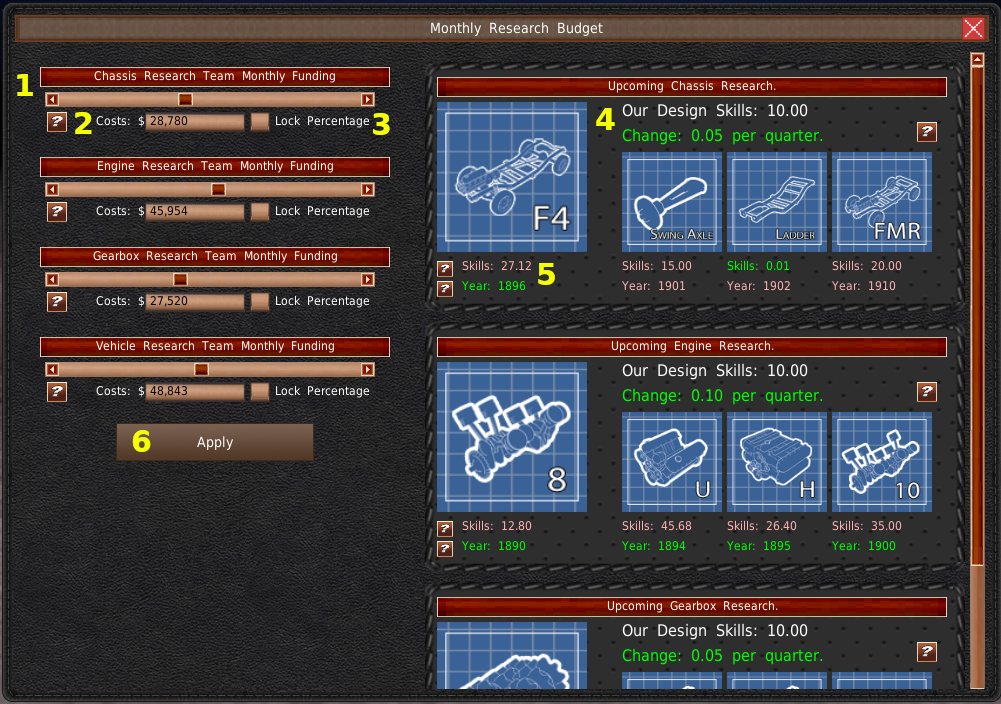
On the left side are your budget sliders for each category of research (#1). You can see a monthly budget value just under the slider in the textbox (#2). To the right of the textbox is a checkbox that says “Lock Percentage” (#3). Every year the maximum budget for research teams increases. This checkbox will automatically update your budget to the same slider position when the maximum budgets increase.
On the right side of the window are the research panels. These panels display information about upcoming research. Looking inside the panels, you'll find your current design skill and your quarterly design skill growth at the top (#4). Design skills grow based on the average overall ratings of your active designs and your research team budget.
The blueprint pictures show the designs you'll most likely unlock next. Just below each picture are two categories, “Skill” and “Year.” These are the requirements you need to unlock these sub-components. If the category is green, you have met the requirement. If it is red, you have not.
To save any changes to the research budgets, including locks, you'll need to click the “Apply” button on the left side, just below the sliders (#6).