
Table of Contents
World Map
The World Map allows you to interact with the parts of the game that require geographical locations. You do this by clicking the locations on the map.
City Information
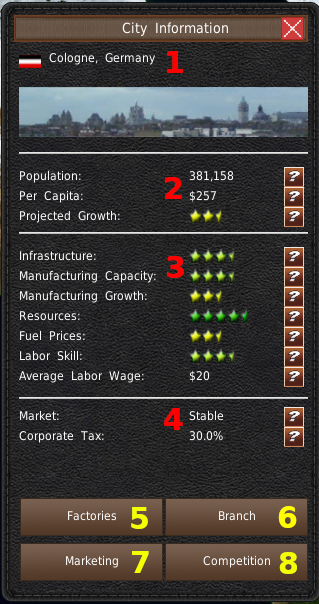
When you click a city or territory, the City Information window will appear. This window provides all the information and stats about the location. And it acts as an access point to the main functions of this room.
At the top is the name of the selected location (#1). The window has three segments contain city variables.
For more information on the ratings, see the City Variables page.
The top segment (#2) contains information about the city's population and wealth. These are extremely important factors when selling a vehicle.
The middle section (#3) contains information important for building and operating factories and branches at this location.
And the bottom panel contains market status and tax rates for this location (#4).
At the very bottom of the window is four buttons. You will use these buttons to interact with the city. The “Factory” button (#5) will open the factory tools for this city. The “Branch” button (#6) will open the branch tools for this city. And “Marketing” and “Competition” buttons (#7, #8) will open up their corresponding tools as well.
Factories
GearCity is about building and selling cars. And to build cars, you'll need a factory. Luckily, the World Map has just about everything you could want out of factories.
Build Factories
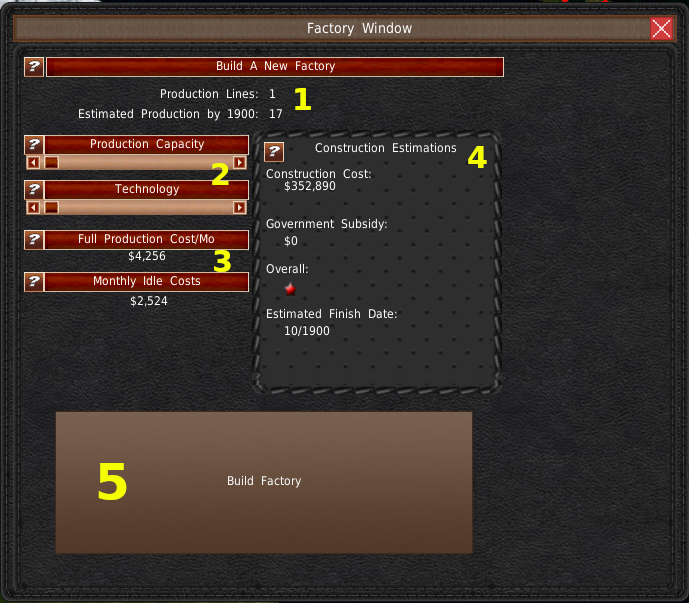
If you have no factories at the selected location, when you click the “Factory” button, the game will greet you with the Build Factory window. This window allows you to build a factory at this location.
For more information on the individual sliders, see the Building Factories page.
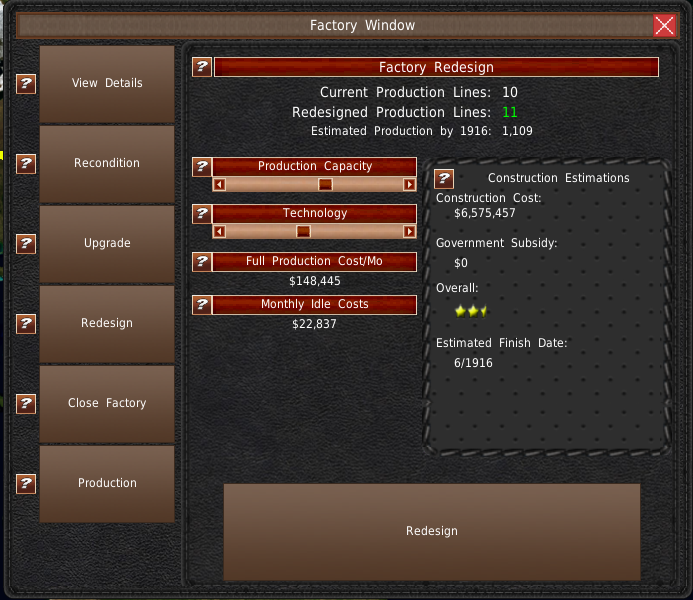
At the top is the number of production lines your new factory will have (#1). Just below that number is an estimation of the total number of vehicles that could be produced here with a 40-manufacture rated vehicle.
On the left side of the window, you'll find the build sliders (#2). You will use sliders to set the size and output of the factory. The top slider, Production Capacity, changes the number of production lines the factory has. And the “Technology” slider mainly adjusts the maximum number of vehicles you can produce for each line.
Just below the sliders are the costs metrics (#3). “Full Production Costs/mo” is the monthly costs to operate all production lines at the factory. This value does not include vehicle material costs or mass production discounts. The Monthly Idle Costs is this factory's costs if no production lines are in use.
On the right side of the window is the Construction Estimations panel (#4). This panel displays the total estimated costs of factory construction, how much money local governments will give you, and the estimated finish date for the factory. Please note, random events can cause delays or increase construction costs.
When you're ready to build the factory, click the big “Build Factory” button (#5). The factory will go into construction, and it won't be finished until the completion date. You can check the side panel to monitor progress.
View Details
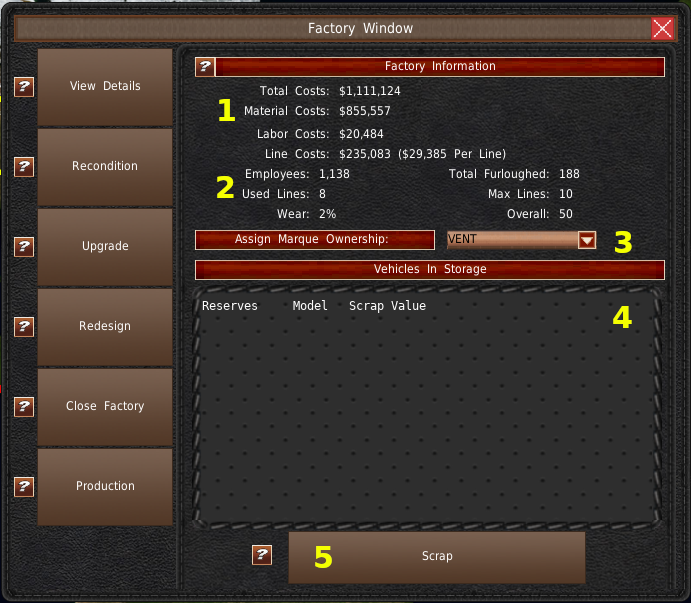
If you have a factory at this location, the default panel is the “View Details.” You can also access this section of the Factory Window by clicking the “View Details” button on the upper left side.
The View Details panel gives you an overview of your factory's costs and employment situation. And it also gives you access to the scrapping system.
At the top are various cost metrics (#1). Below that are your employee, production line utilization, and wear information (#2).
The dropdown box in the center (#3) allows you to change the factory owner.
The list you find at the bottom is the scrap list (#4). This list has all vehicles currently in inventory at this factory. Selecting a vehicle from this list and then clicking the “Scrap” button (#5) will scrap the inventory.
Recondition
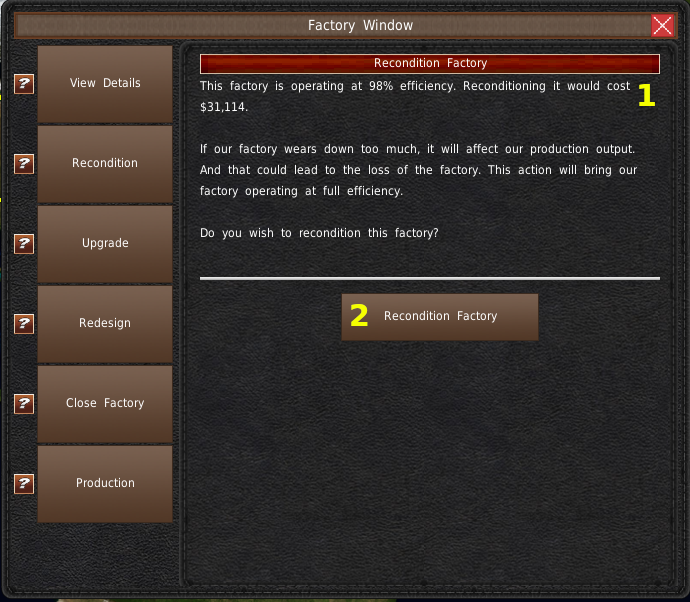
Over time your factory will wear out. The game will let you know when it starts to affect production with an action memo. There is also an Auto Recondition system. However, if you want to manage to recondition manually, you can use the Recondition system from the factory window. To get to the Reconditioning system, click the “Recondition” button from the left side of the factory window.
At the top of the panel is the recondition cost and current factory wear amount (#1). When you want to recondition, click the “Recondition Factory” button (#2).
Upgrade
The game allows you to upgrade your factory and increase the number of production lines without going through the expense of redesign the factory. Upgrading also takes much less time than a redesign.
To get to the upgrade panel, click the “Upgrade” button on the left side of the window.
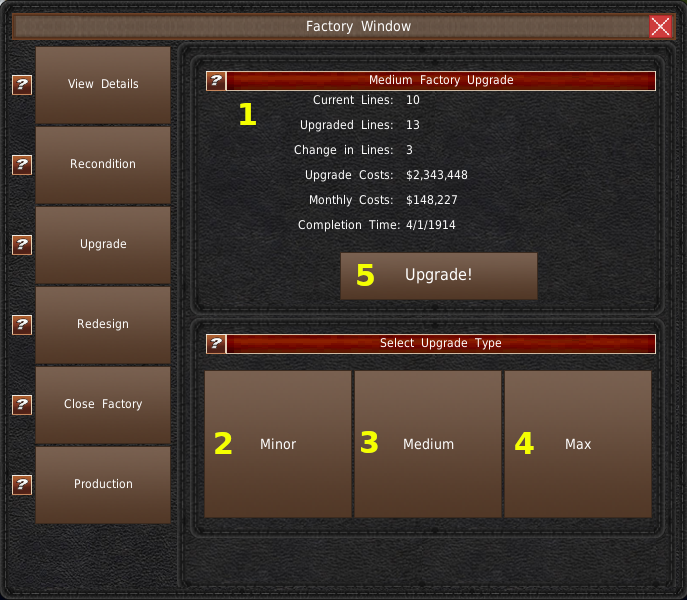
At the top of the panel (#1) is information about the factory and upgrade plans. It includes the number of lines you're adding, the cost, the new monthly cost for the factory, and when the upgrade will finish.
There are three different size upgrades in the game. You'll find them at the bottom (#2,#3, #4). The larger the upgrade, the more expensive and longer it will take. The top information (#1) will change after clicking one of the bottom buttons. When you're ready to upgrade, click the “Upgrade!” button (#5). Note, upgrades get exponentially more expensive the more you do. At some point, it will be cheaper to redesign the factory.
Redesign
GearCity currently only allows one factory per location. So if you want to do a large expansion or contraction of your factory, you'll have to redesign it. To access the redesign system, click the “Redesign” button from the left side of the Factory Window.
The Redesign System works just like the Build Factory system. See the Redesign section of the page for details. When your redesign is complete, it will replace the old factory, and if there are enough production lines, production will automatically shift to the new factory.
Close Factory
If you need to close a factory, you can do so in the Factory Window using the close factory panel. To access this panel, click the “Close Factory” button on the left side of the Factory Window.
The game will automatically sell the factory when you close it.
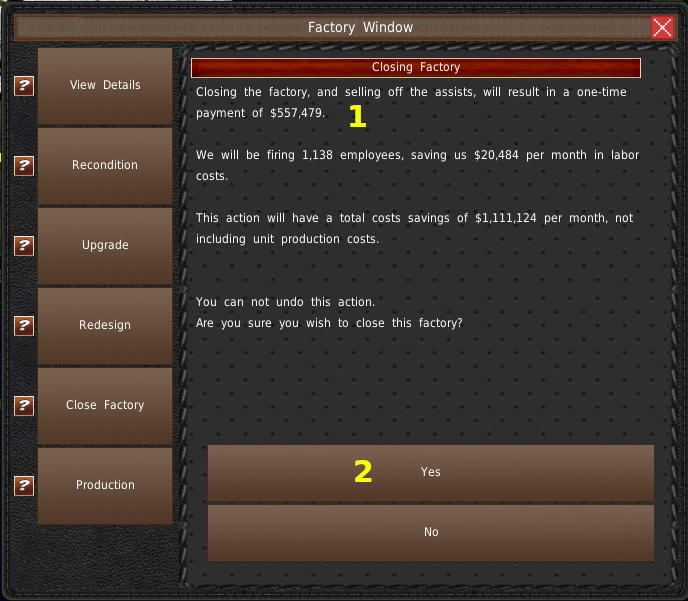
At the top of this panel, the game will tell you how much money you will make selling the factory (#1). Just below it, the game also tells you how much monthly cost savings you'll have from closing the factory.
If you wish to close this location, click the “Yes” button (#2). Clicking the “No” button will exit the panel.
Production
The production window is the main focus of the factory system. You access it by clicking the “Production” button on the “Factory Window.”
This system is shared with the Factory Mega Menu in the Office.
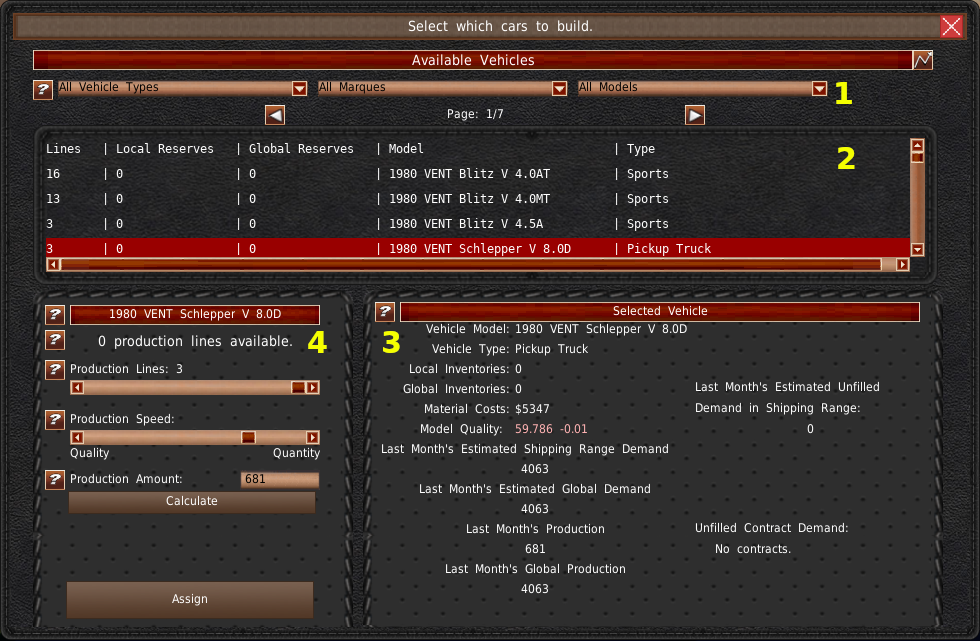
At the top of the window are filters (#1) for the vehicle list (#2). That list shows all active vehicle designs you have in the order of the number of production lines they're using at this location.
Selecting a vehicle from this list will populate the sliders (#4) and the information panel (#3).
Production Vehicle Info
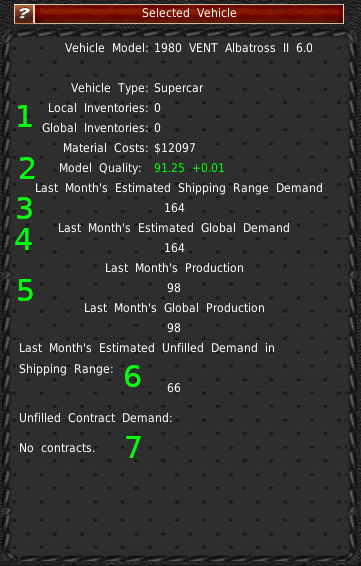
When you select a vehicle from the list, its data will populate the information panel in the bottom right. Most of the variables are self-explanatory, we cover them on Office Mega Menu page.
- Local Inventories are the number of unsold vehicles of this model you have in reserve at this location. And Global Inventory is the number of units you have in reserve worldwide.
- Model Quality is the average build quality of the selected vehicle. This rating changes over time, based on the production speed. Higher quality production speed leads to an increase in the rating, whereas more quantity will decrease the rating. The game generates the base value from the initial vehicle design. For more detail on this, see the help buttons in RnD. The quality rating is an important factor in consumer purchasing decisions. By increasing the model quality, you should improve your sales over the competition.
- Last Month's Estimated Shipping Range Demand is an estimation of the number of units of this model branches are requesting from this factory and any other factories inside the branches' shipping radius. You can fill this demand with one factory or several. Nearby factories may also supply the same branches.
- Last Month's Estimated Global Demand is an estimation of the number of units branches requested worldwide. If the demand worldwide is not being met, and you have excess production capacity at this location, you may want to increase shipping ranges of branches that don't pull from this location. Please note the further you have the transport vehicles, the more expensive it will be.
- Last Month's Production is the number of units we produced of the selected vehicle at this factory. The Last Month's Global Production is the number of units you produced of this model worldwide.
- Last Month's Estimated Unfilled Demand in Shipping Range is the number of vehicles we could have sold but didn't because we did not produce enough units. Use this value as an estimate of the number of additional vehicles you need to fill all branch demand that pulls from this factory. Please note, if multiple factories are in this shipping range, they too can fill this order. Be careful not to overproduce!
- Contract Demand shows how many units contracts require from this vehicle each month.
Production Adjustment Panel

Upon selecting a vehicle from the list, its production information will automatically load into the Production Adjustment panel (#4 from previous picture).
The top of the panel displays the total number of available production lines at your selected location (#1).
The current number of production lines assign are automatically loaded when selecting a vehicle. You can adjust the number with the Production Lines slider (#2). The number of production lines you wish to assign is also here. As you move the slider, you will notice that the number at location #2 changes in the opposite direction as the number at the top (#1).
The Production Speed slider (#3) adjusts how fast your production lines produce vehicles. The faster you build them, the more you will build. But the worse quality they are.
The number of vehicles the game predicts you'll build is in the Production Amount textbox (#4). This textbox also serves a dual purpose, in that you can type the number of vehicles you want to build and click “Calculate” (#5). The game will then calculate the Production Line and Production Speed sliders for you.
Finally, to save any changes you make, click the “Assign” button. The game will not alter any production numbers until you do.
Auto Production
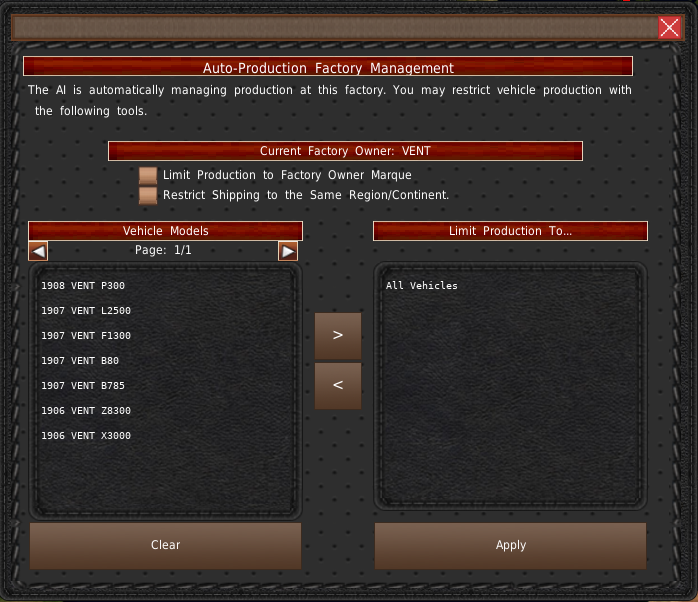
If Auto Production is enabled, the Auto Production restriction window will open instead of the Production window. We cover this window in detail in the Office Mega Menu page.
Branch
Most manufacturers do not sell directly to customers. They sell vehicles to dealerships who then sells them to customers. You will need a branch office to take in dealer's orders and ship vehicles to them.
Build Branch
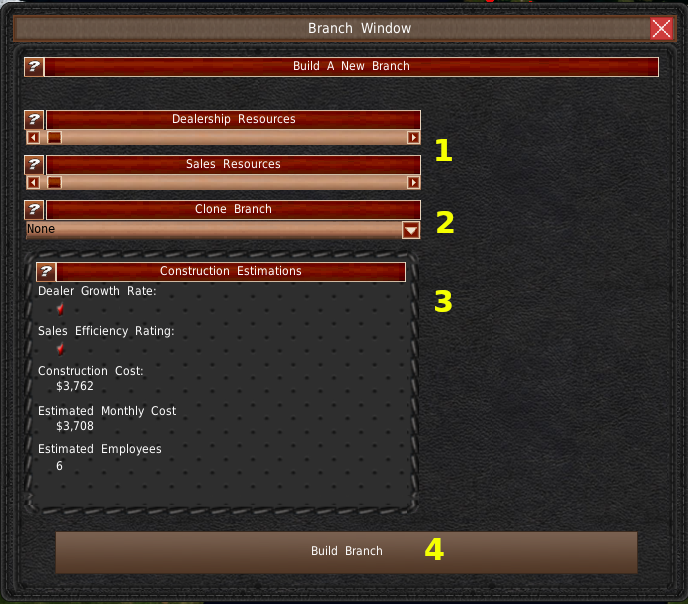
If you click the “Branch” button in the City Information window and the is no branch at this location, the Build Branch window will appear.
You use this window to build a branch at this location. You use the top two sliders to set the resources for your branch (#1). Dealer Resources help increase the number of dealerships sign up with your company. And Sales Resources help those dealerships sell more vehicles.
Below the sliders is a dropdown labeled “Clone Branch” (#2). This dropdown will copy the sales prices of the selected branch, so you don't have to enter each price manually.
The panel near the bottom contains information about the branch you're building.
When you're ready to build, click the “Build Branch” button (#4). Unlike factories, branches build instantly.
View Branch
The default panel for the Branch window is “View Branch.” You can also access this panel view the “View Branch” button on the left side of the Branch Window.
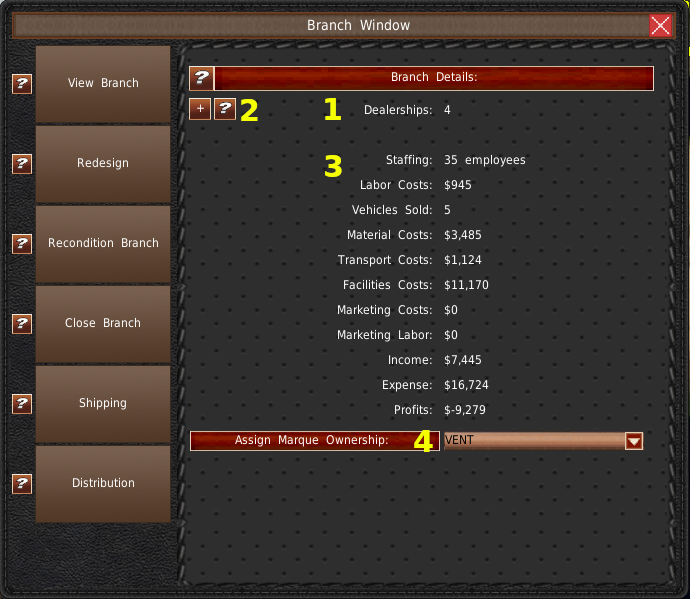
The View Branch panel contains a lot of information about the selected branch.
At the top of the panel is the number of Dealerships (#1). Dealerships are the companies that actually sell vehicles to consumers. The more of them you have, the more sales you will get.
To the left of the dealership number is a “+” button (#2). This button allows you to subsidize new dealerships and increase your dealership count.
The rest of the panel covers the branch's costs, sales, and income information (#3). These variables are self-explanatory.
At the bottom of the panel is a dropdown to change the branch's owner (#4).
Redesign
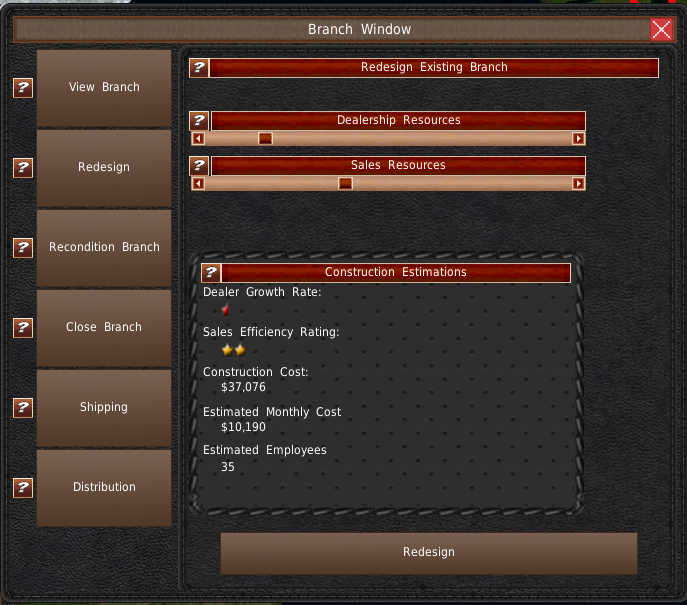
GearCity currently only allows one branch per location. So if you want to improve your branch, you'll have to redesign it. To access the redesign system, click the “Redesign” button from the left side of the Branch Window. The Redesign System works just like the Build Branch system. See the Redesign section of the page for details.
Your sales prices will automatically transfer to the new branch.
Recondition Branch
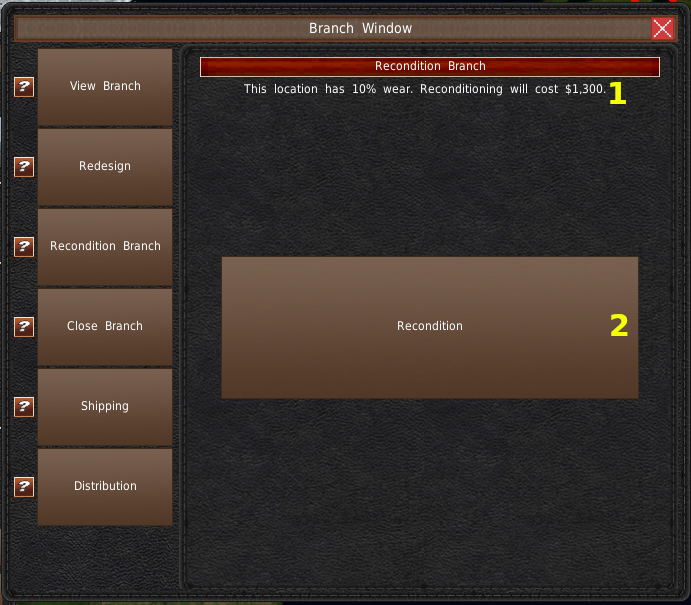
Over time your branch will wear out. The game will let you know when it starts to affect sales with an action memo. There is also an Auto Recondition system. However, if you want to manage to recondition manually, you can use the Recondition system from the factory window. To get to the Reconditioning system, click the “Recondition” button from the left side of the branch window. At the top of the panel is the recondition cost and current branch wear amount (#1). When you want to recondition, click the “Recondition Branch” button (#2).
Close Branch
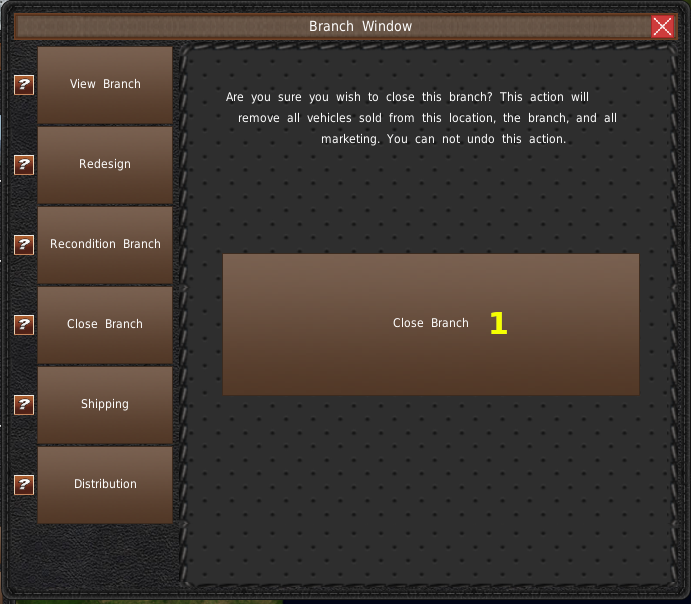
If you need to close a branch, you can do so in the Branch Window using the close branch panel. To access this panel, click the “Close Branch” button on the left side of the Branch Window. Then you only need to click the big “Close Branch” button (#1) for confirmation.
Branch Shipping
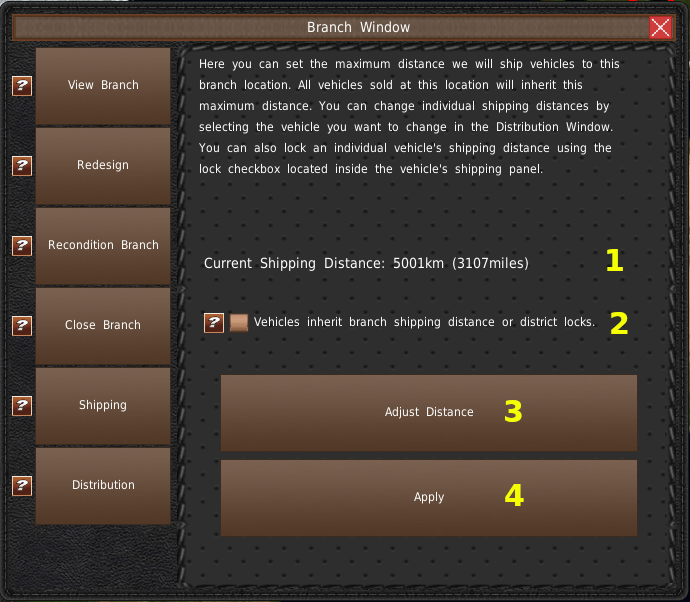
Branches source their vehicles from factories, which factories depend on the distance. Branches will not source vehicles from outside of the vehicle's shipping distance range.
The game allows you to adjust shipping distances in bulk via the Branch Window. Click the “Shipping” button on the left side of the window to open the Branch Shipping panel.
This panel allows you to change every vehicle's shipping distance at this branch.
You'll find the currently set shipping distance in the middle section of this panel (#1). This value is what the current shipping sliders are at, and it is the value that would be applied if you click the “Apply” button.
You can adjust the distance by clicking the “Adjust Distance” (#3) button. This button will take you to the map shipping mode. We cover the distribution shipping mode further on this page.
In the center of the window, you'll find the “Vehicles inherit branch shipping distance or district lock” checkbox (#3). When enabled, any new vehicle you set for sale at this branch will automatically have the branch shipping distance applied to them.
To save your changes, click the “Apply” button (#4).
The Branch Shipping panel and all shipping distances are disabled when auto-production is enabled.
Distribution
The main function of the branch system is the Distribution window. You access this window via the “Distribution” button at the bottom left of the Branch Window.
The distribution system is where you'll go to set vehicle prices and change vehicle shipping distances.
This window shares much functionality with the Mega Menu Branch panel.
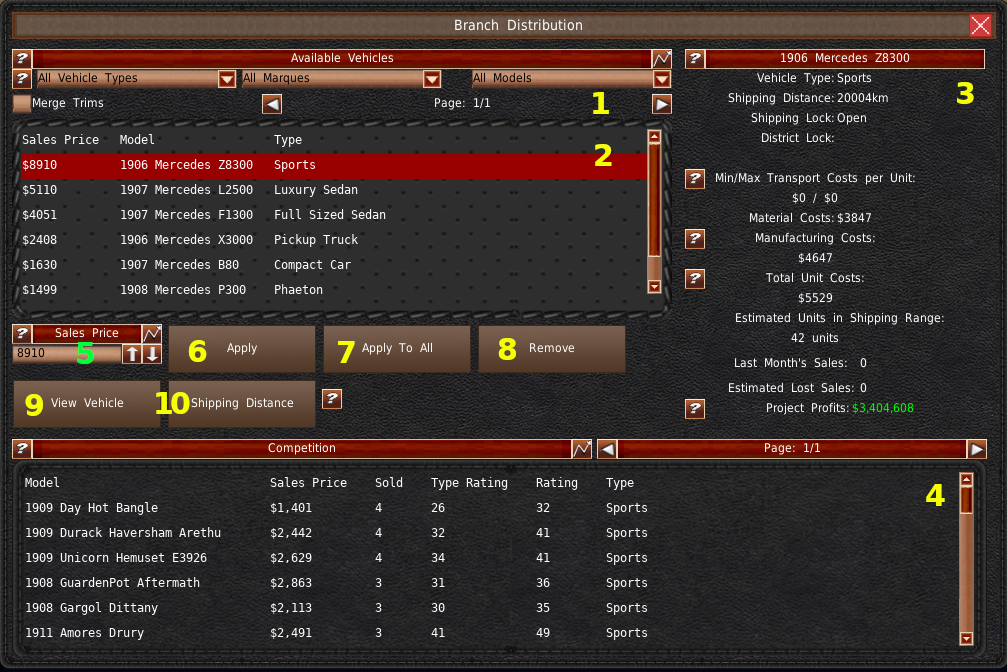
At the top of the window are filters for the vehicle lists (#1). Just below the filters is your vehicle list (#2). This list only displays active vehicle models and any models for sale at this location. If a vehicle has a $0 price, it is not for sale at this location.
On the right side is a panel (#3) with information about the selected vehicle. We cover this in detail a little later.
At the bottom of the window is the competition list (#4). This lists all vehicle models of the same vehicle type in the selected city as your selected vehicle. The list displays the name of the model, the sales price, how many units were sold last month, the specific vehicle type rating, the overall rating, and the vehicle type. The game also highlights your vehicles in yellow for easy identification.
In the center is the Price Change Panel. Upon selecting a vehicle from the list, the game loads its sales information for this location into the panel. This panel allows you to make pricing and shipping distance changes.
The vehicle sales price is in the text box at the top left of this panel (#5). It is in this box that you would change the price. Any changes require you to hit an Apply button to take effect (#6 or #7).
The graph button next to the Sales Price header (#4) is one of the most important reports in the game. It is the Wealth Demographics and Buyer Rating table. Use the information in this report to set your price.
To save any price or distance changes, you'll need to click the Apply button (#6) or the “Apply To All” button (#7). The “Apply To All” button will save the changes to every branch you control in the game.
If you want to remove a vehicle from sale, you can click the “Remove” button (#8). Or you can set the price to $0 and hit “Apply.” If you want to remove the vehicle from sale at all locations, one way is to set the price to $0 and then click “Apply To All.”
The “View Vehicle” button (#9) displays the ratings and specs of the selected vehicle.
The “Shipping Distance” (#10) button opens the Shipping Distance system. You use this button to adjust the shipping distance for the selected model. We cover this in more detail here.
Vehicle Price List

The Vehicle Price list displays the current sales price of the vehicle. If this price is $0, then the vehicle is not for sale. You will need to select a vehicle from this list to view its information, change the price, or alter the distribution information.
In the upper of the panel is the “Merge Trims” checkbox. If you have many trims, you can check this box, and the game will merge all the trims in the list into the base model. If you make price changes to the base model, it will change the price of the trims based on the percentage difference over material costs. For example, if your base model's material costs are $1,000 and you set the sale price to $1,500, then if your trim's material costs are $2,000, the game will automatically assign it a $3,000 sales price.
Selected Vehicle Information

When you select a vehicle, the game will pull up information specific to unit costs and the distribution of that model. Most attributes here are self-descriptive, so we will only cover some of the more important variables.
- The upper portion of the Information Panel contains the shipping information. The Shipping Distance is how far away you're willing to source this vehicle from a factory. Below that are the Shipping Locks. These indicate if you locked this vehicle to get vehicles only from a particular district.
- The Minimum Transportation Costs is the lowest amount it costs to ship one vehicle to this location. The maximum value is the maximum amount it will cost to ship a unit to this location. Several factors affect where branches source vehicles from. The location of inventory, the city ratings, and the number of units needed in other cities all impact which vehicles get shipped to this location. The game will automatically choose the cheapest options possible, depending on its shipping priorities.
- The Manufacturing Cost only factors in the costs to manufacture the selected vehicle and the material cost of that vehicle. It is the break-even point for manufacturing if you sold every unit manufactured this month. The Total Unit Cost is the break-even price for the selected vehicle's portion of your corporate expenses IF you sold every unit you produce this month. (Including other vehicle models.) This price only includes a portion of corporate overhead costs based on the number of units you have of this model compared to other vehicles.
- Estimated Units in Shipping Range is the number of vehicles within the shipping range of this branch that you have inventories of or you are producing.
- Project Profit is the profits or losses the selected vehicle has generated since its creation. This value includes all manufacturing, marketing, and branch costs, its share of research costs, and its share of fixed costs. The number excludes corporate overhead, racing, and other miscellaneous expenditures. It does not factor in additional research costs being offset by licensing or contracting of vehicles and components or any additional income generated by these ventures. But it does include units sold through the contracting system.
Distribution Shipping
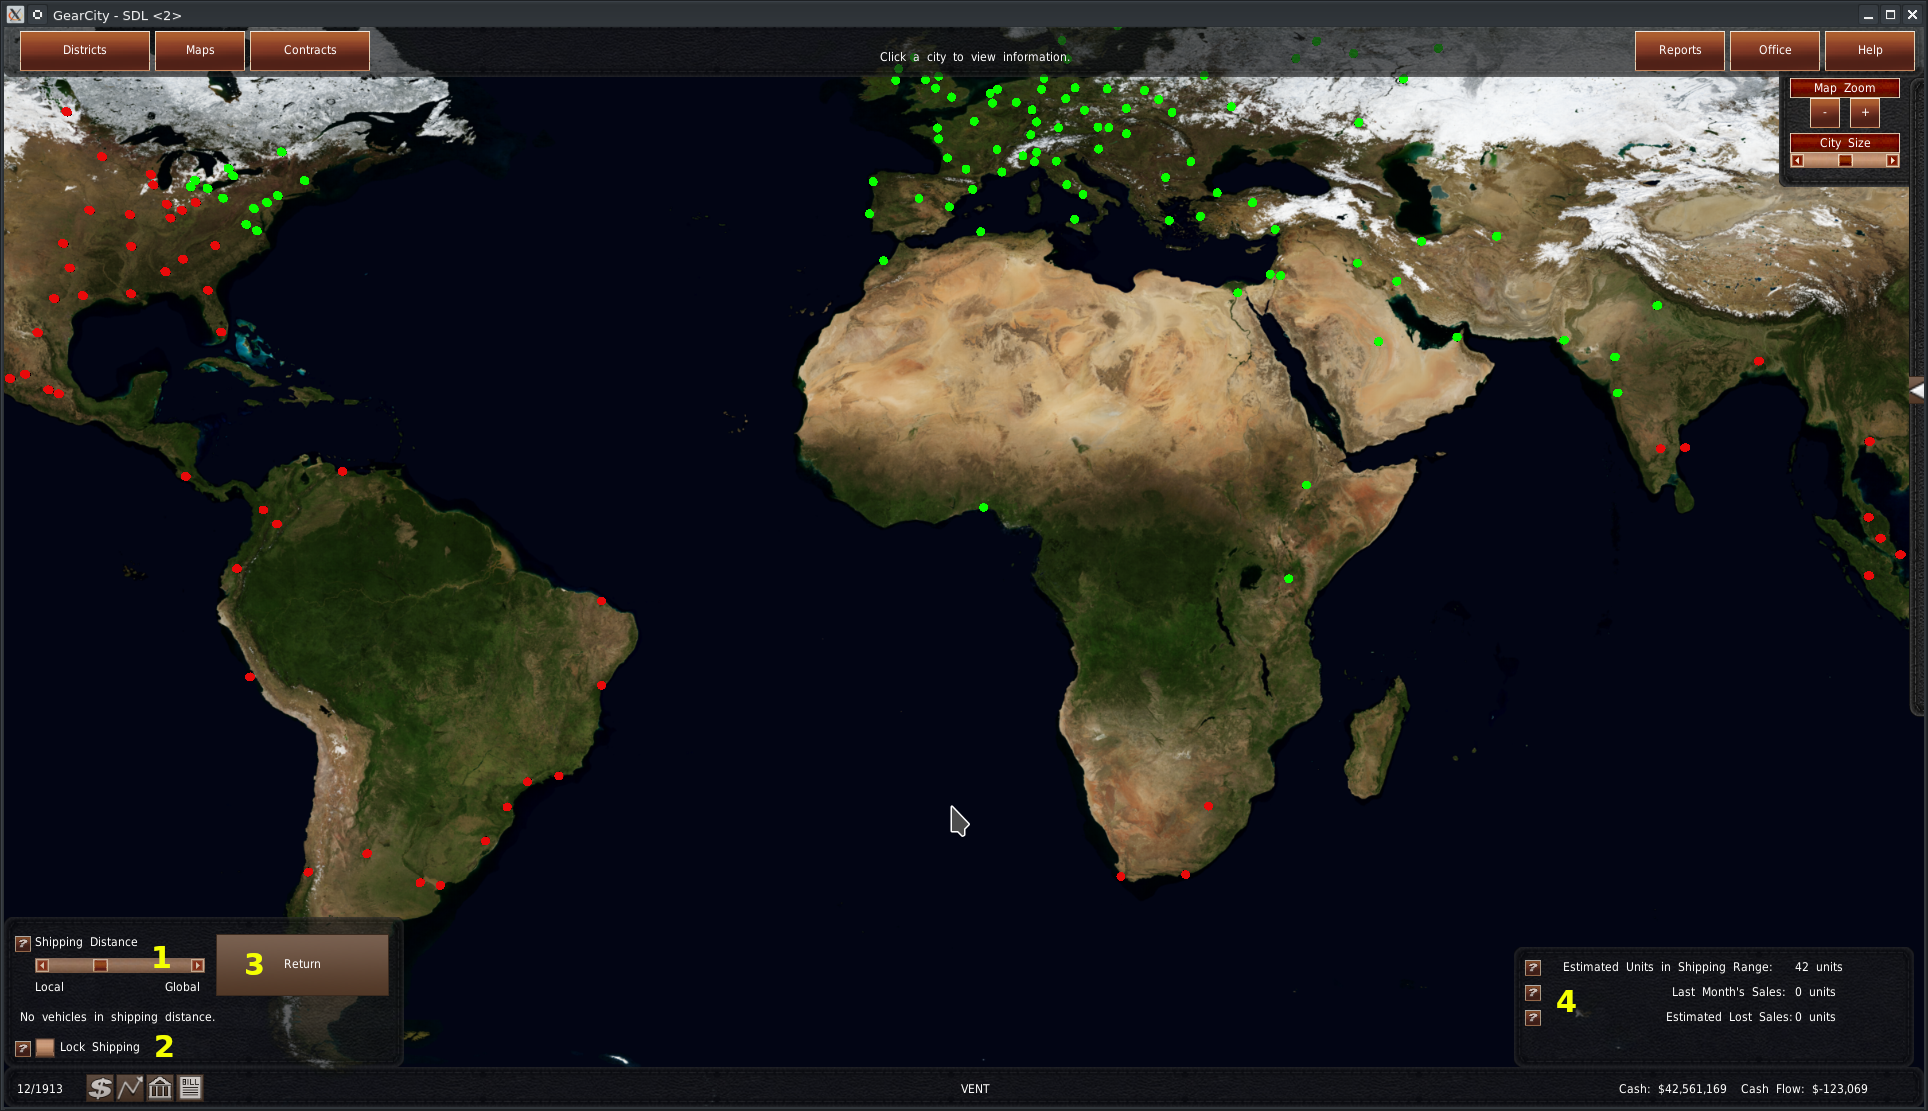
When you click the “Shipping Distance” button in the Distribution window, the game will take you into Shipping mode. This mode allows you to visualize your model's shipping radius.
In the bottom left is a panel with a slider (#1). You'll use this slider to adjust the distance your branch will source the selected model. The cities or territories on the map will change color based on how long you make those distances.
Below the slider is a checkbox called “Lock Shipping” (#2). This checkbox will lock the shipping distance for this vehicle so that any changes made via the Branch Shipping, Apply to All, or districts can't override it.
In the bottom right of the screen, you'll find an information panel. This panel displays the estimated units within the shipping radius, including vehicles in production. It also contains last month's sales at the selected branch, and an estimation of your last sales.
Marketing

You can access the marketing system via the city information window.
See Marketing Gameplay Mechanics for information on how marketing works and the individual marketing types.
At the top of the Marketing Window are a series of buttons (#1). These buttons are for each category of marketing in the game. Clicking any of these buttons will change the selected marketing category in the bottom panel. If you wish to change all marketing categories at the same time, use the Office Mega Menu.
In the center is the Budget panel. This panel lists every category of marketing and your budget for each at this location.
In the bottom is the adjustment panel. The information here will change based on which marketing category you selected.
The budget adjustment slider is at the top of this panel (#3). This slider allows you to quickly change the budget within a minimum and maximum budget range. You will also find the monthly dollar budget in the textbox below (#4). Adjusting the slider will change the numbers here. Alternatively, you can enter the values you want here too. This budget is the monthly amount you will spend on the select category.
In the bottom left is the locking checkbox (#5). Every year the maximum marketing budget increases. If enabled, the game will automatically increase the marketing budget based on the slider's percentage.
To save the changes to your marketing budget, click the “Apply” button (#6).
Competition
To access the Competition window, click the “Competition” button from the City Information window.
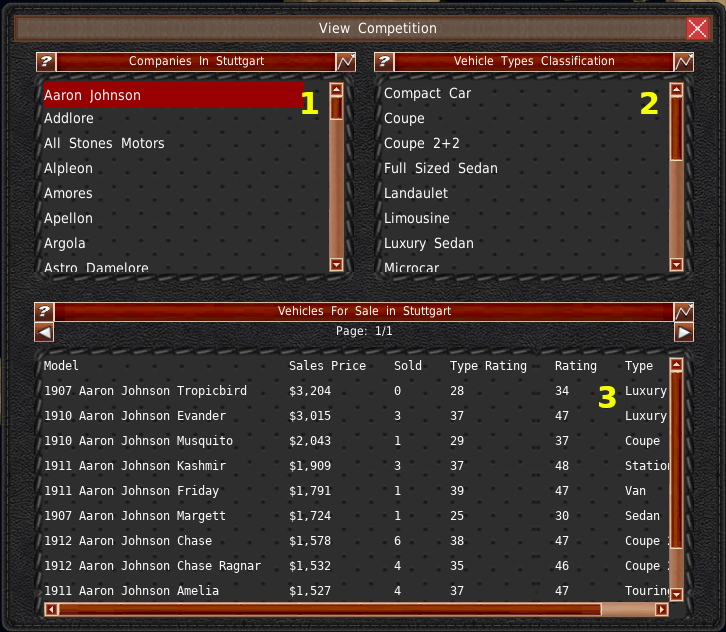
The Competition window contains last month's sales at this location.
In the top left is a list of companies (#1). And in the top right is a list of vehicle types (#2).
Selecting an entry from either of these two lists will populate the list at the bottom with sales data (#3). If you selected a company, all sales of that company in this city will fill the list. If you select a vehicle type, all sales of that type will be on the list.
Districting
The Districting system allows you to manage many branches or factories as if they're a single entry.
To access the Districting system, click the Districts button from the top menu. That button opens the district panel.
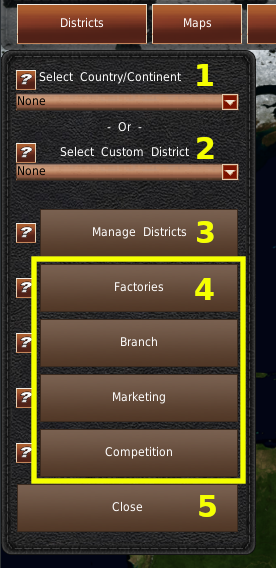
At the top of this panel are two dropdowns. The top dropdown (#1) is predefined districts. These include continents, regions, and countries. The dropdown below (#2) is the custom districts you created. You can only select one entry from either dropdown box.
Upon selecting a district, an information window will open next to the panel. The information window has aggregated information about all the cities in the district.
To create, edit, or delete a custom district, use the “Manage Districts” button (#3).
The next four buttons (#4) work exactly like their corresponding buttons in the City Information window, except they apply to every city in the selected district.
The “Close” button at the bottom of the panel (#5) closes the Districts panel.
Creating Districts
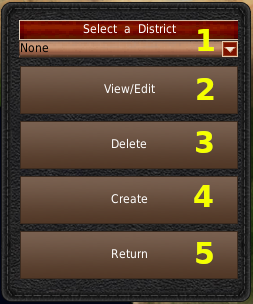
To create, manage, or delete a custom district, you'll need to click the “Manage Districts” button in the districts panel. Doing so will open the District Management window.
At the top of this window is a dropdown (#1) with your existing custom districts. Selecting a district from this dropdown will allow you to use the “View/Edit” and “Delete” buttons (#2, #3). These buttons are disabled if you have “None” selected.
The “View/Edit” button (#2) will take you directly to the select cities mode, which we will cover shortly.
The “Delete” button (#3) deletes the selected district. You can not undo this action.
To create a new custom district, click the “Create” button (#4).
To return to the District Panel, click the “Return” button (#5).
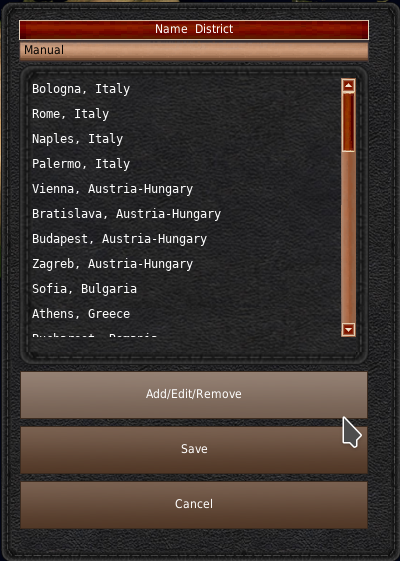
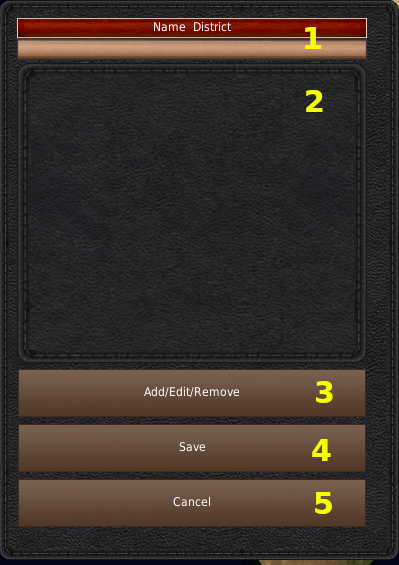
If you clicked the “Create” button in the Manage Districts window, or you edited a custom district, you'll land on this window. This window is the District City List. If you're creating a new district, it will be blank (left image). If you're editing a district or just completed selecting cities, the window will look like the right picture.
At the top of the window is where you name the district (#1). If you're creating a district, you must enter a name. If you're editing one, it should be prepopulated with a name. If you change this name and hit “Save,” the game will create a new district.
The list in the center (#2) is where the names of cities in your district.
To add or edit the district's cities, click the “Add/Edit/Remove” button (#3). This button will take you to the select cities mode, which we will cover shortly.
When you're finished with this district, click the “Save” button (#4). You can also exit back to the Manage Districts window by clicking the “Cancel” button.
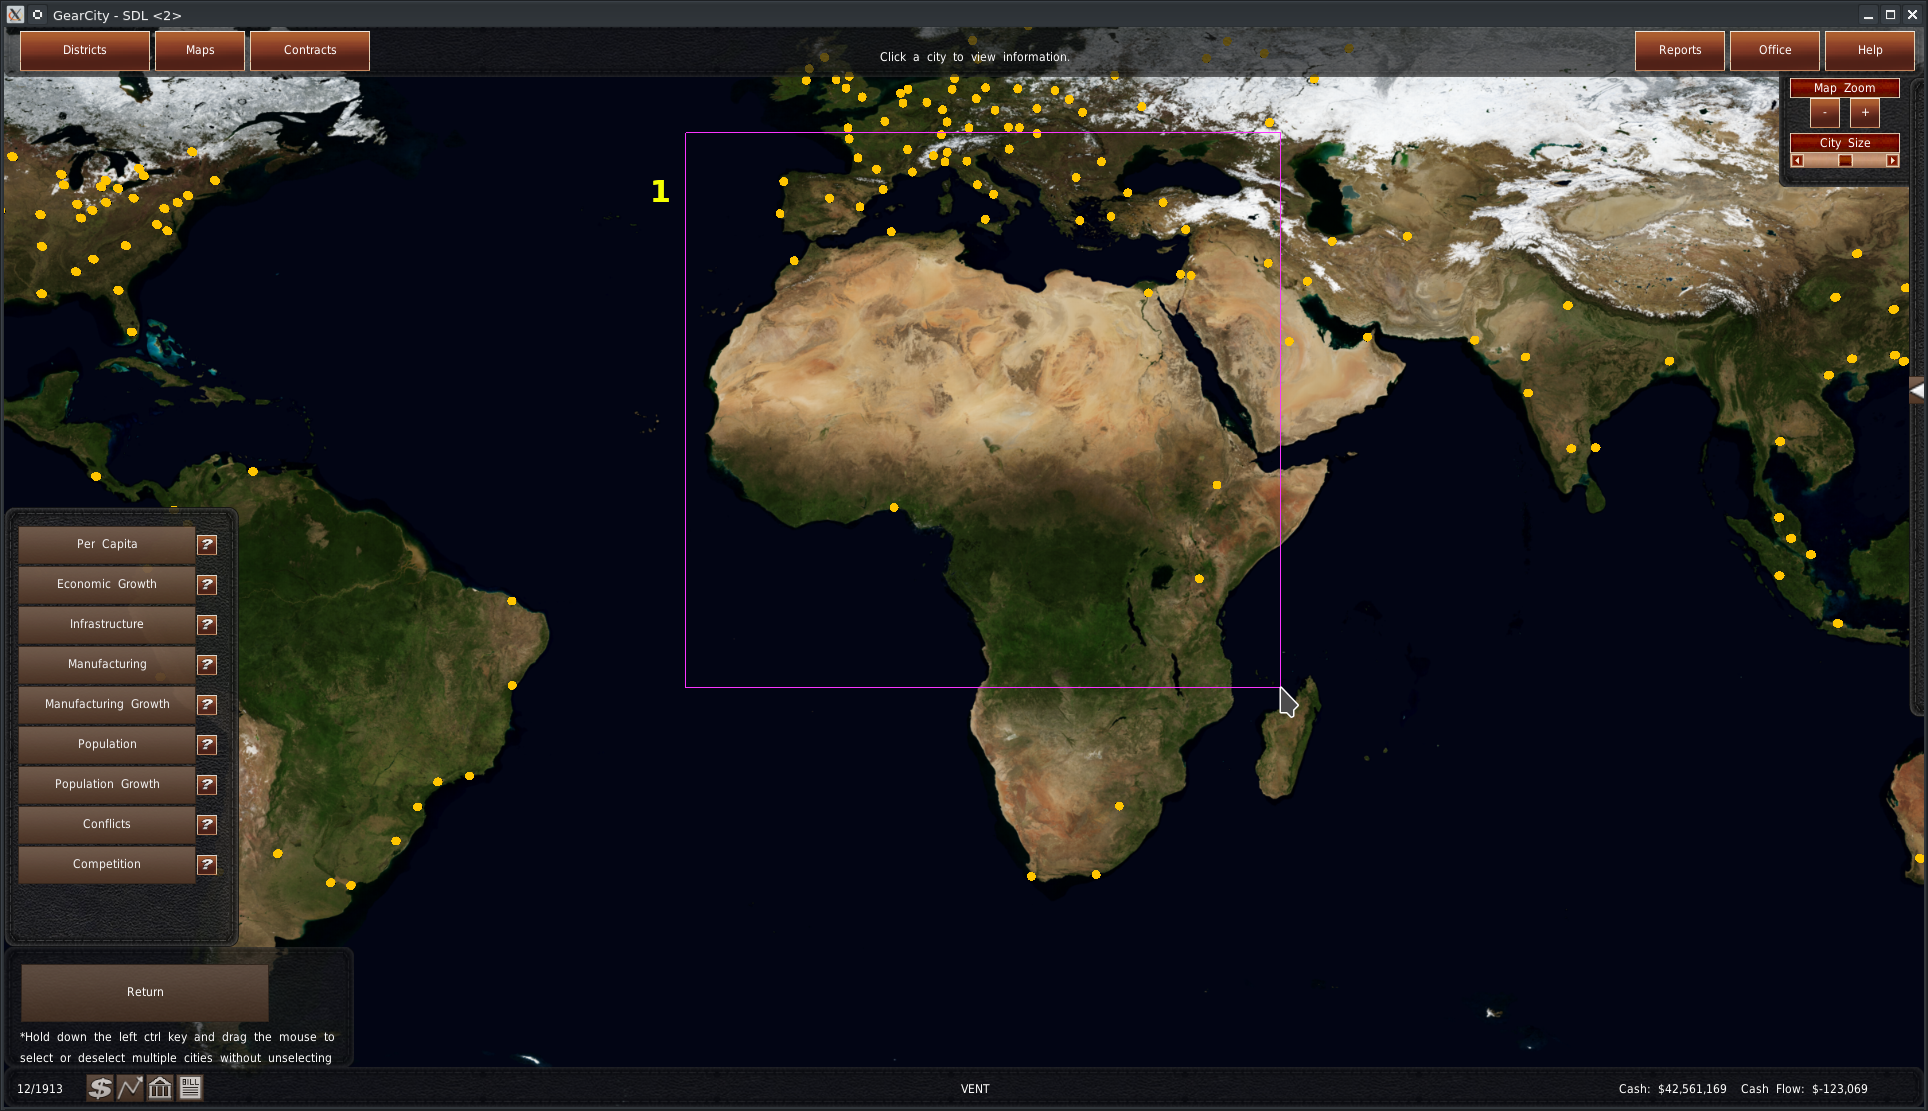
This is the select cities mode. Cities which are selected are pink with a white box around them. You can click and drag the mouse to create a selection box to select multiple cities at once (#1).
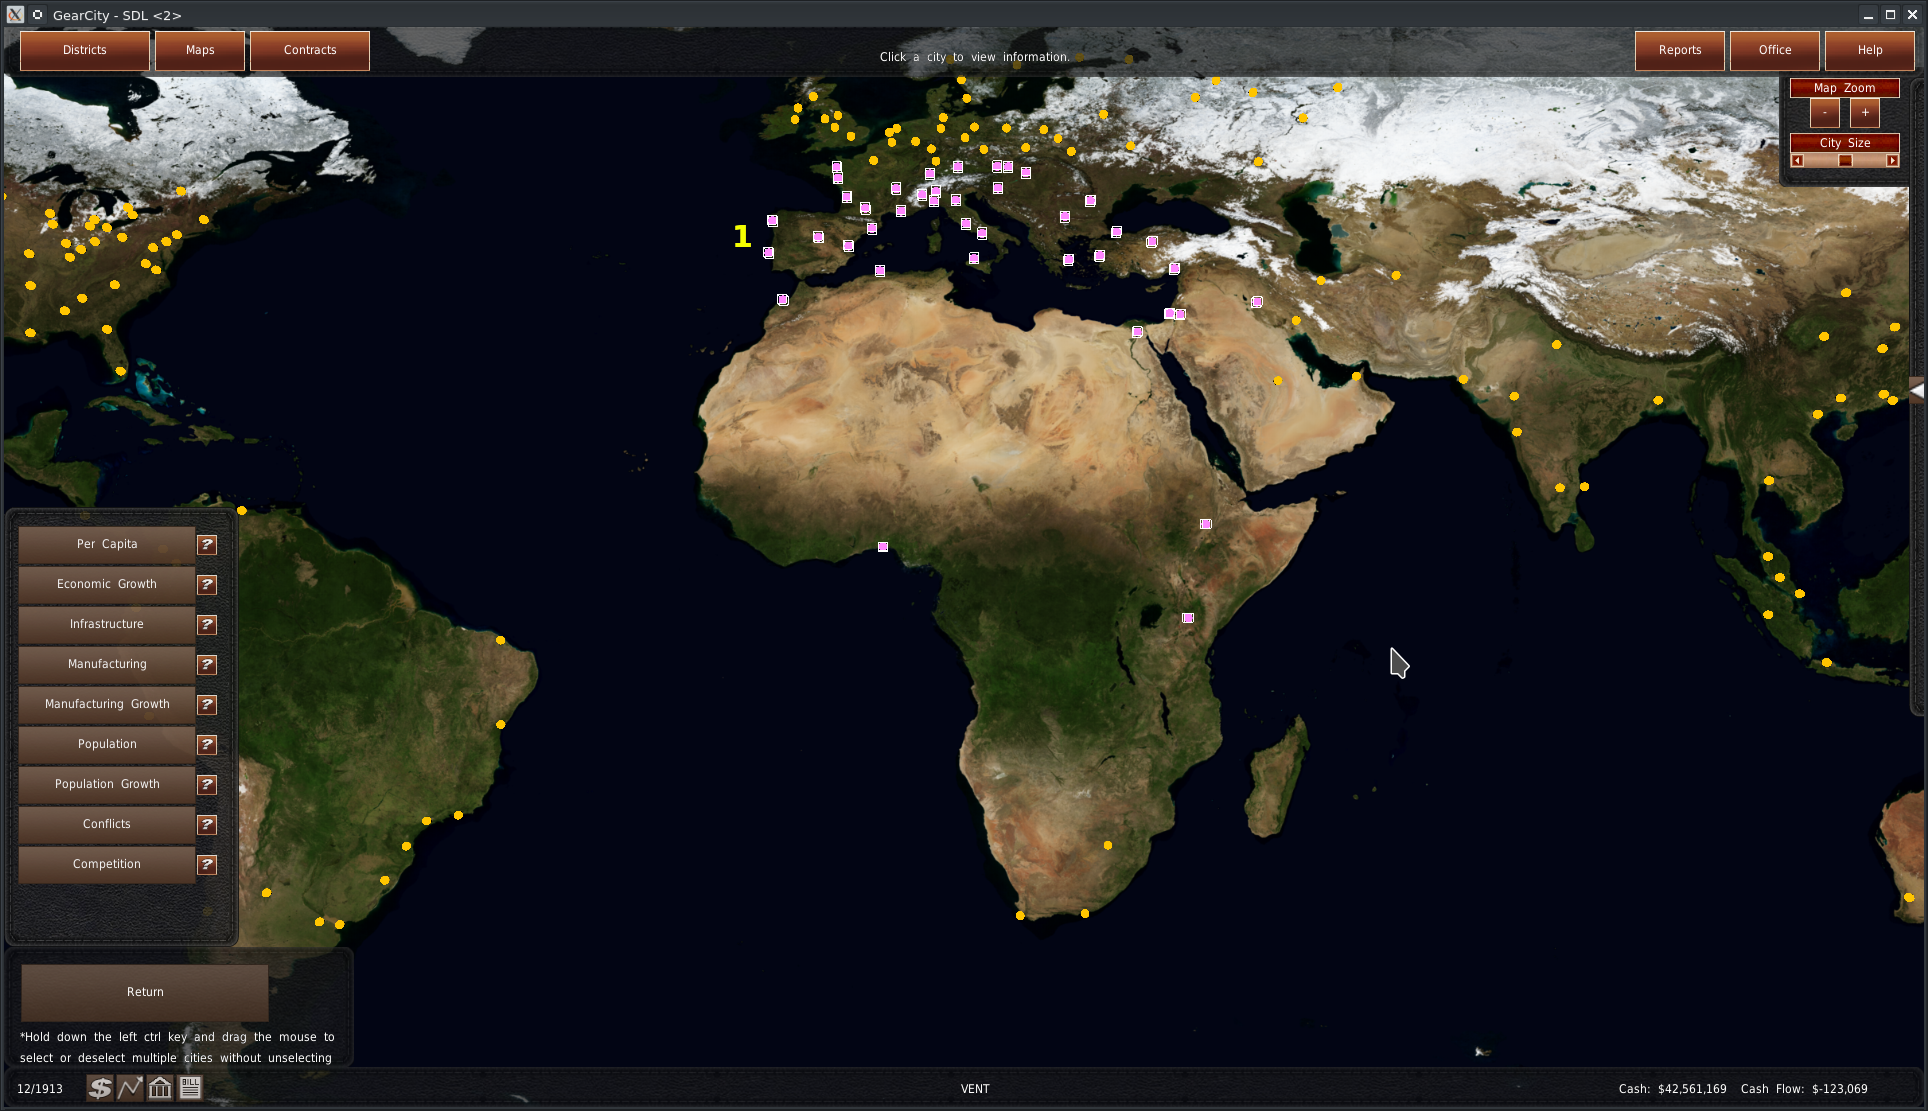
Holding down the left control key will allow you to select or deselect cities without unselecting your other selected cities. When you have finished selecting cities, click the return button.
Maps
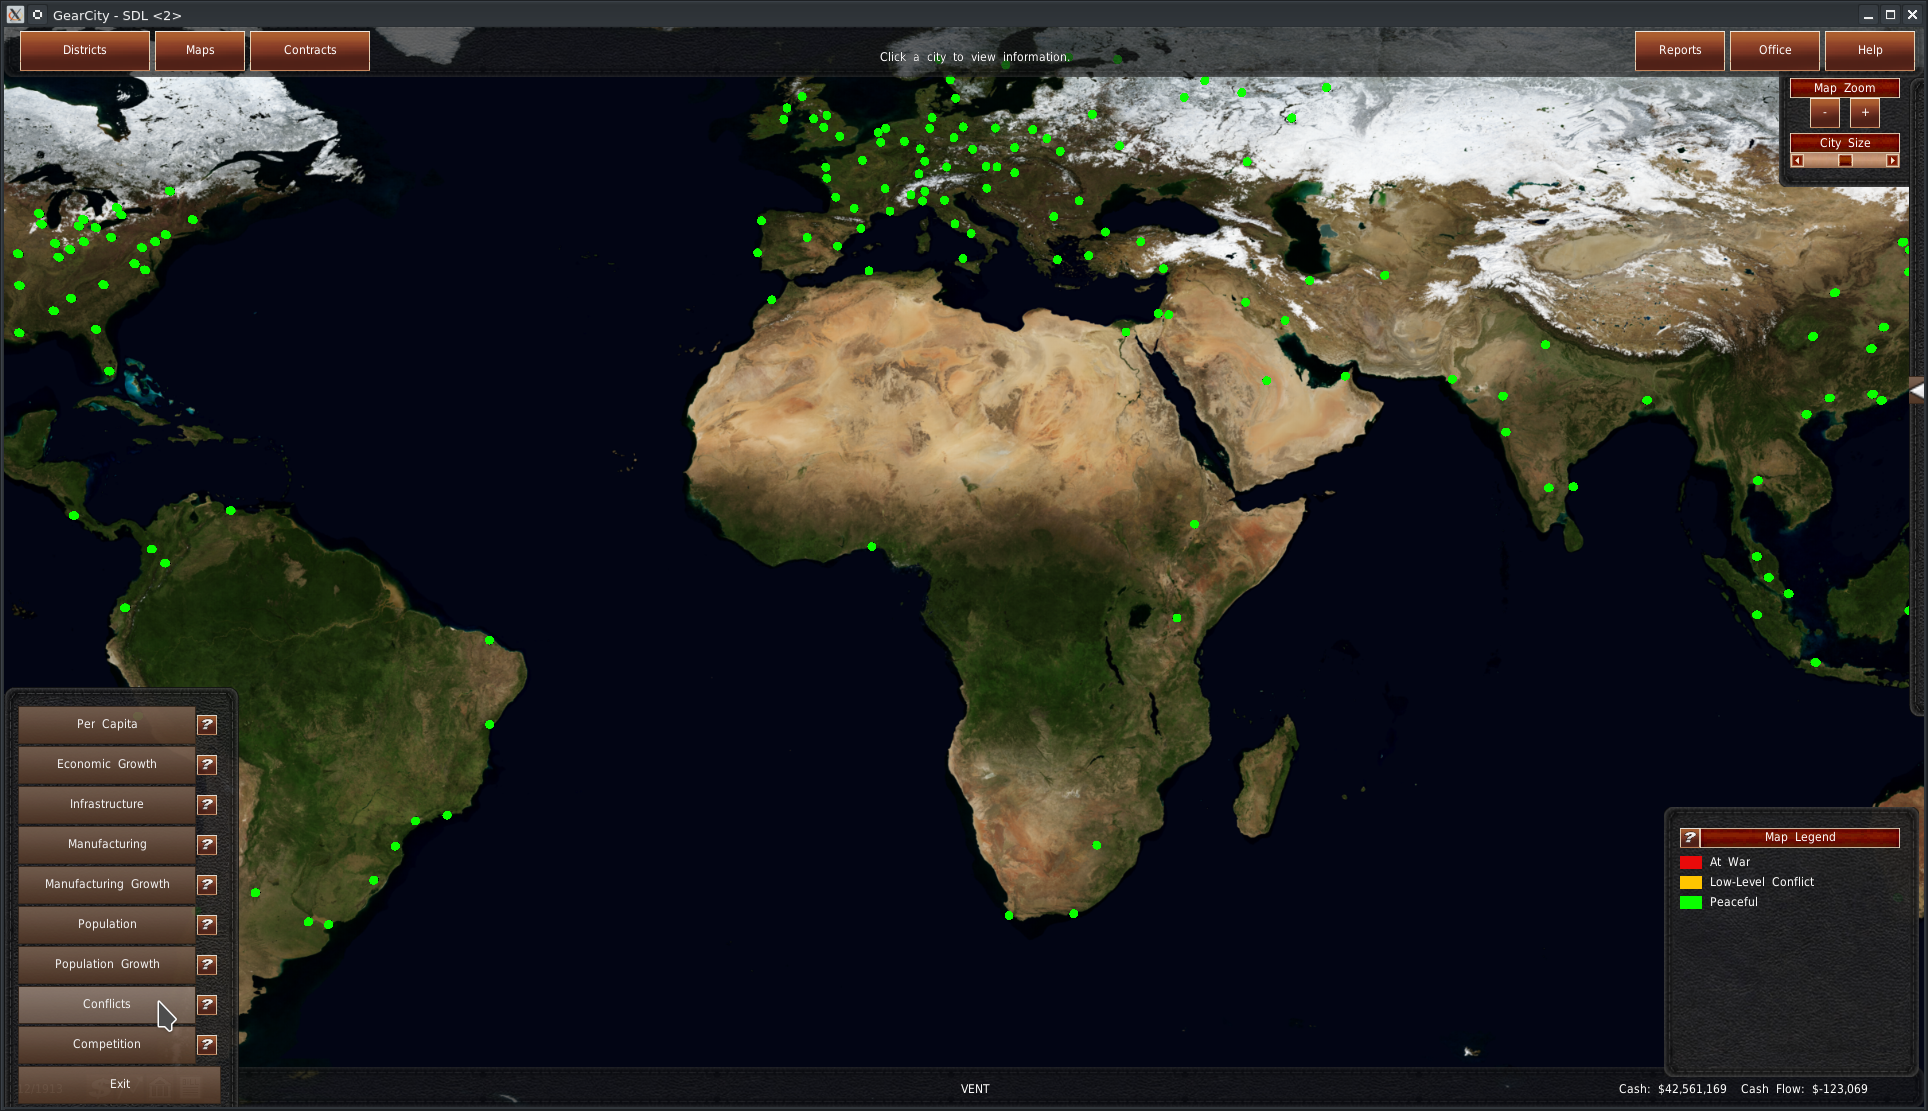
The map system displays information using colors on the cities or territories. You can access the map mode by clicking “Maps” in the top menu.
At the bottom left, you'll find the Map Data Menu. This system uses the world map to give you data about every city at once. Clicking any one of these buttons will change the colors of the cities or territories. The game also supplies a legend on the bottom right-hand side explaining what each color value means.
The different map options are as follows:
- Per Capita ⇒ Shows the average household income.
- Economic Growth ⇒ Shows the growth of household income per year.
- Infrastructure ⇒ Shows the infrastructure ratings.
- Manufacturing ⇒ Shows the manufacturing ratings.
- Manufacturing Growth ⇒ Shows the growth in manufacturing ratings per year.
- Population ⇒ Total number of people living in the city.
- Population Growth ⇒ The change in population per year.
- Conflicts ⇒ War and government status.
- Competition ⇒ Shows the branches and factories for a selected company. A company selection dropdown appears in the legend screen.
- Exit ⇒ Exits out of the map mode.
Map Data Legend
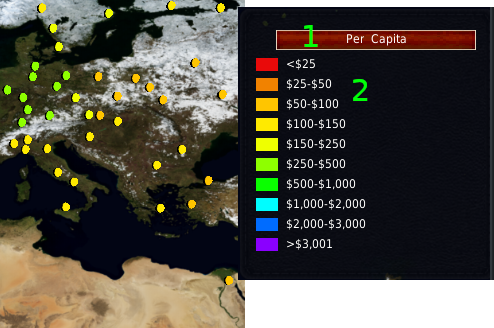
On the bottom right of the screen, you'll find the legend when you're in Map Data mode. The legend is here to let you know what the color values on the map mean.
The header of the Legend (#1) lets you know what data you have selected. The colors of the cities or territories are under the header (#2). And the color's values, represented as a single value or range of values, are next to the colors.
Contracts
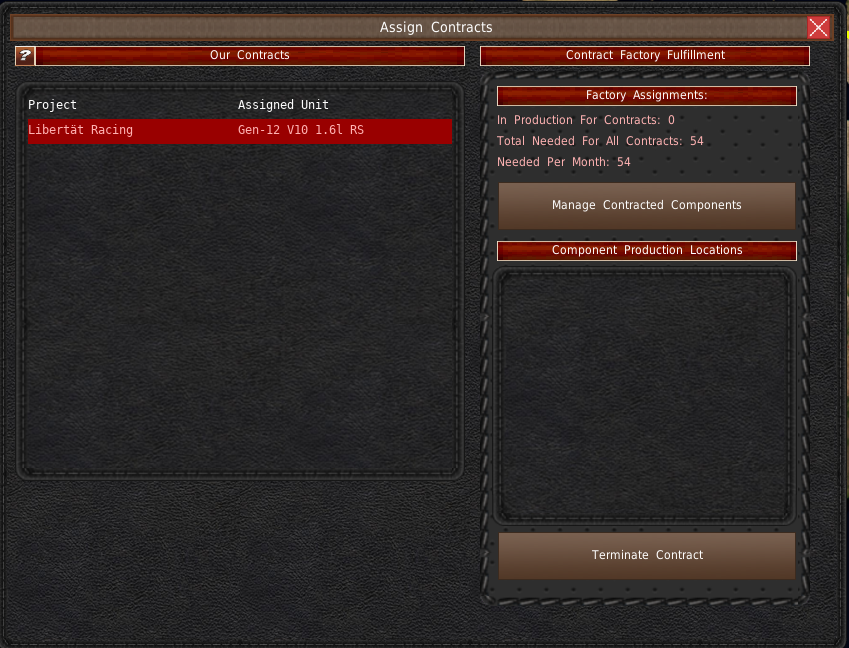
To assign component contracts to a factory, you'll need to use the Contract Assignment system. You can access this system by clicking the “Contracts” button from the top menu.
This system works exactly like the system implemented in the Office Mega Menu. Please refer to the Office Mega Menu Assign Contract page for more information