
Table of Contents
Settings
GearCity has many settings options for you to change based on need or desire. What the game does not do is decide your settings for you. As such, we recommend you know a few things about your computer, such as your monitor's resolution, your supported full-screen resolution, and your monitor's HiDPI status. The game and settings tool tries to limit the resolutions lists based on what your video card driver and operating system report. However, note that the only guaranteed supported full-screen resolution is the maximum (highest) resolution listed.
The in-game settings editor pulls data from the GPU running the game. The external settings editor will only poll your operating system for settings. There are some additional settings in the external settings editor not found in the in-game settings editor.
Internal Engine Settings
You can access the Internal Engine Settings by clicking the “Settings” button from the Main Menu.
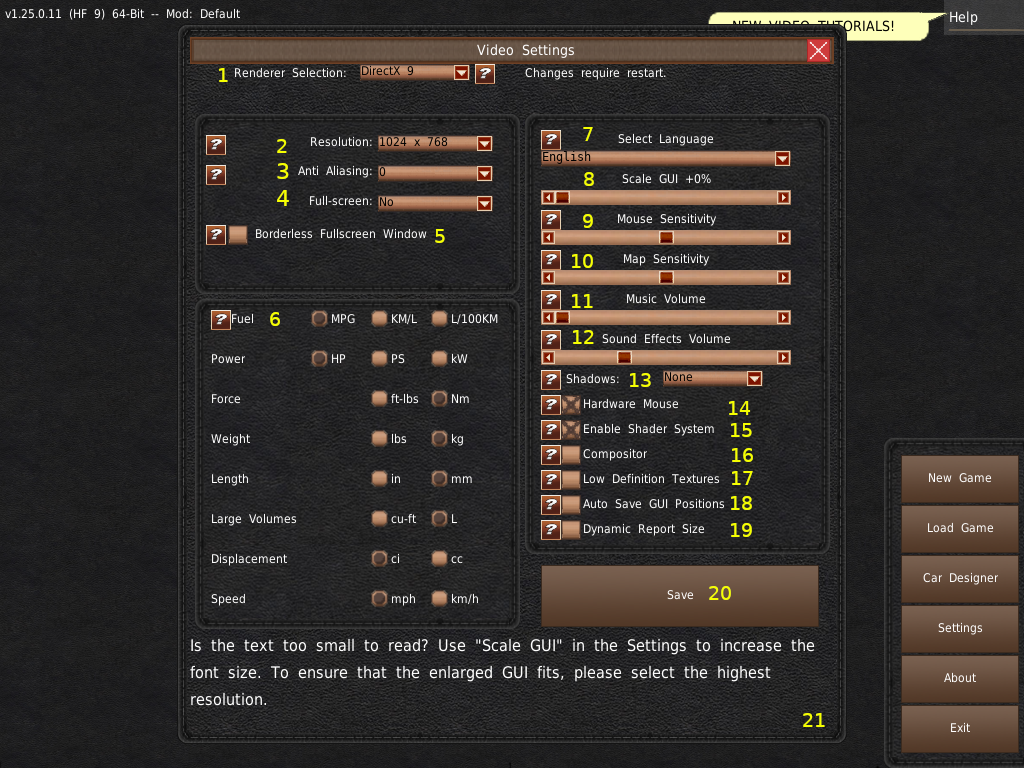
- Renderer Selection ⇒ This drop-down allows you to change the graphical API the game uses. DirectX 9 is the default for 64-bit Windows. OpenGL 2/1.1 is the default for 32-bit Windows and Unix-likes. If you have a problem with one renderer, please try the other. Software Rendering, OpenGL3, DirectX 11, Vulcan, and Metal might come in the future depending on funding.
- Resolution ⇒ This setting is number of pixels the game uses. The higher these numbers are, the smaller objects will appear in the game. If the text appears too small, you can use Scale GUI to increase it. If you want large Reports, Magazine, and Newspaper windows, please selected a vertical resolution above 1050px. Please note, if you are running in Windowed mode, your desktop environment, such as the task bar, window title bar, etc may decrease the size of the window below what you set it. For example, Windows 10 uses 40 pixels for the Task and Title bars. If you set the game to 1080p resolution, the game will only display 1040 pixles, and you will have the small reports window. The listed resolutions are the supported resolutions is provided by your graphics driver. If you want a custom resolution, please use the external Video Settings Editor included with the game.
- Anti Aliasing ⇒ This setting minimizes the distortion of high-resolution images displayed at a lower resolution. The higher the number, the smoother the graphics will look. This effect hurts performance, and the gains are generally not worth it for the low-quality graphics the game has. We recommend you leave this setting at 0.
- Full Screen ⇒ Setting this to true will cause the game to run in true full-screen mode. Please note, your monitor must support the resolution you have the game set to. Otherwise, the game will crash. If it does this, use the external settings editor to reset the video settings. We recommend using the biggest resolution values provided by the game.
- Borderless Full Screen Window ⇒ This setting removes window decoration and set the game to the highest resolution possible. Giving the appearance that the game is full screen, but it's still in Windowed mode. Please note, the borderless window will initially try to set itself at 10,000 x 10,000 pixels in size, and relies on your operating system to correct that size to the supported resolution. If for some ever reason, your OS does not do this, please disable this setting using the external settings editor. This setting is only available for the DirectX9 renderer.
- Units ⇒ These are the measurement units in the game. The only measurement not customizable is the engine Bore and Stroke values. The data in the game uses a mixture of SAE and Metric. Some rounding minor errors may occur.
- Select Language ⇒ This drop-down lets you change the game language. Changing the language will require you to start a new game. Thanks to the community, many other languages are near translated and are in a playable state.
- Scale GUI ⇒ Use this slider to increase the size of the font and GUI for HiDPI monitors. It's also helpful if you have trouble reading the game text. Please do not use this for low-resolution monitors. If you make a mistake, you can reset the GUI scale with the external video settings editor.
- Mouse Sensitivity ⇒ This slider changes how quickly the Software mouse cursor moves. Please note, this only applies if you disable the Hardware Mouse mouse setting.
- Map Sensitivity ⇒ Use this slider to adjust how quickly the world map moves when the mouse hits the edge of the screen.
- Music Volume ⇒ This slider adjusts the volume of the in-game music. You do not have to restart the game if you make an adjustment to this setting.
- Sound Effects Volume ⇒ This slider adjusts the volume of the in-game sound effects and the tutorial voice-over. You do not have to restart the game if you make an adjustment to this setting.
- Shadows ⇒ This drop-down is for the shadow system. Some shadow types may not work with the rendering API or your graphics drivers. The lower quality shadows are more compatible with various systems than the higher quality ones. But the highest quality shadows should work on the vast majority of modern computer systems.
- Hardware Mouse ⇒ If enabled, the game will use the Operating System's mouse, and it will no longer be bound to the window. If disabled, the game will use a locked software mouse cursor inside the window.
- Enable Shader System ⇒ The shader system adds reflectiveness to the vehicle paints. This effect may not work with the OpenGL renderer.
- Compositor ⇒ The compositor adds additional glow effects to the click-able objects in the office and safe. However, it can slow the program significantly if used at high resolutions.
- Low Definition Textures ⇒ The Low Definition Textures setting will set all textures in the game to resolutions of 1024×1024 and less. You should use this option if your graphic card does not support higher resolution textures, such as the Intel i915 and PowerVR. If your GPU is older than 2005, check its technical specifications for the maximum supported resolution.
- Auto Save GUI Positions ⇒ This setting will automatically save your changes to the GUI when you exit a room. The game will store your resized windows and your window positions. This setting also overrides the automatic centering of windows in the game. The game will delete saved positions if you decrease the game's resolution, or if the game updates.
- Dynamic Report Size ⇒ This setting makes the web browser (reports) window as large as the game's window. The browser will use non-power of two textures, and some GPUs using DirectX9, you may have issues with non-power of two textures. If you experience graphical distortion on the pages or low performance in the reports, disable this setting. This setting should work with OpenGL on all platforms.
- Save ⇒ This button saves your settings. Most settings will require the game to restart to take effect.
- HiDPI Advice Text ⇒ Some folks have no idea what a computer is beyond turning it on and logging it in. This is a friendly reminder for those folks that they can increase the size of the GUI and text for their HiDPI monitors by using the Scale GUI setting.
In-Game Settings
Some settings are available after loading a save game. These settings do not require a restart and generally affect how save games and data are stored.
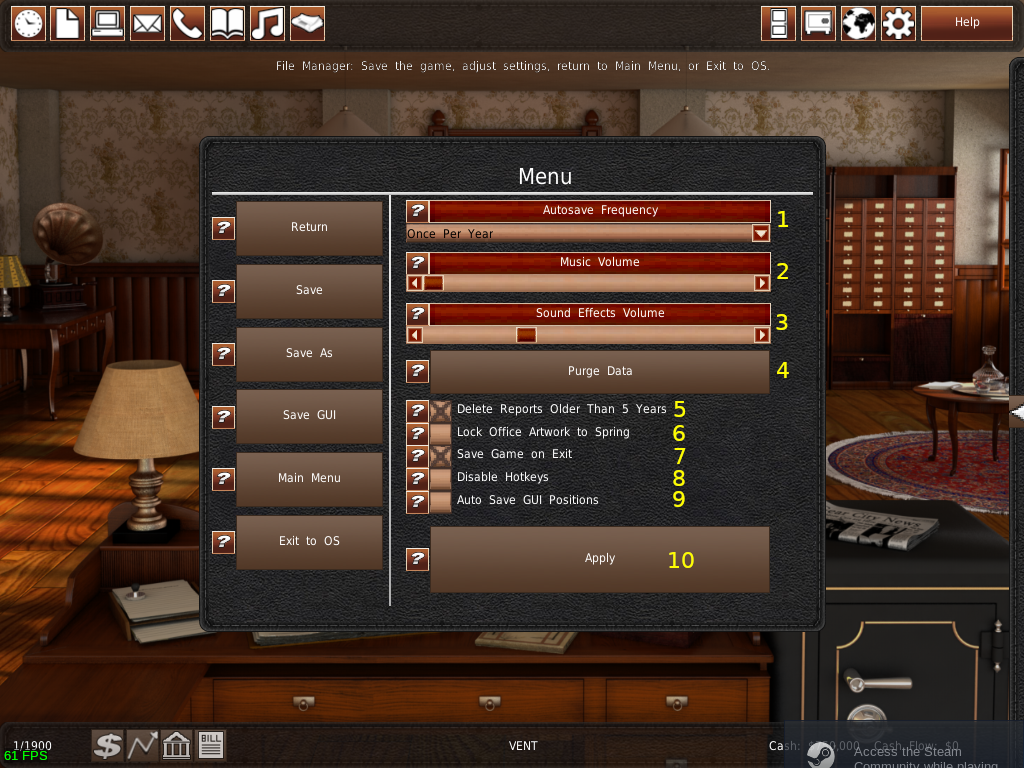
You can access these settings by clicking the file cabinets in the Office, hitting the escape key while in the Office, or clicking the gear icon next to the “Help” button in the top menu.
- Autosave Frequency ⇒ You can have the game automatically save every certain number of turns. To select the frequency, select a value from the drop-down. Please note, because of the amount of data in the game, save files can get into the hundreds of megabytes range. If you notice a considerable slow down during turn processing, you may want to disable Auto Saves, especially if you are using a spinning disk hard drive.
- Music Volume ⇒ This slider adjusts the volume of the in-game music.
- Sound Effects Volume ⇒ This slider adjusts the volume of the in-game sound effects and the tutorial voice-over.
- Purge Data ⇒ GearCity save games can get rather large. If you want to reduce the file size of the save game, you can remove much of the historical data by clicking the Purge Data button. Please note, you will lose AI sales figures and many other historical variables in the game.
- Delete Reports Older Than 5 Years ⇒ Every report in the game is an HTML file stored locally on your machine. To avoid having thousands of little files everywhere, the game automatically deletes reports that are older than 5 years. You can disable this feature with this checkbox.
- Lock Office Artwork to Spring ⇒ Some users may find the seasonal changes to the office annoying. For those users, you can disable this feature with this checkbox.
- Save Game on Exit ⇒ This checkbox enables automatic save on exit. Anytime you exit the program or return to the main menu, the game will automatically save over the last loaded save name or “save as” name.
- Disable Hotkeys ⇒ This toggle disables in-game hotkeys. This setting is particularly useful if you have the happen of using the “end” key to jump a cursor to the end of a text box.
- Auto Save GUI Positions ⇒ This setting will automatically save your changes to the GUI when you exit a room. The game will store your resized windows and your window positions. This setting also overrides the automatic centering of windows in the game. The game will delete saved positions if you decrease the game's resolution, or if the game updates.
- Apply ⇒ This button saves any changes you made to the settings. You must click this button to save your settings changes!
External Engine Settings Editor
You can access all game settings via an external program we call the Settings Editor. The Settings Editor also includes some settings that are not in the game, and it contains additional features such as mod selection, cache clearing, etc.
How to Open
Steam
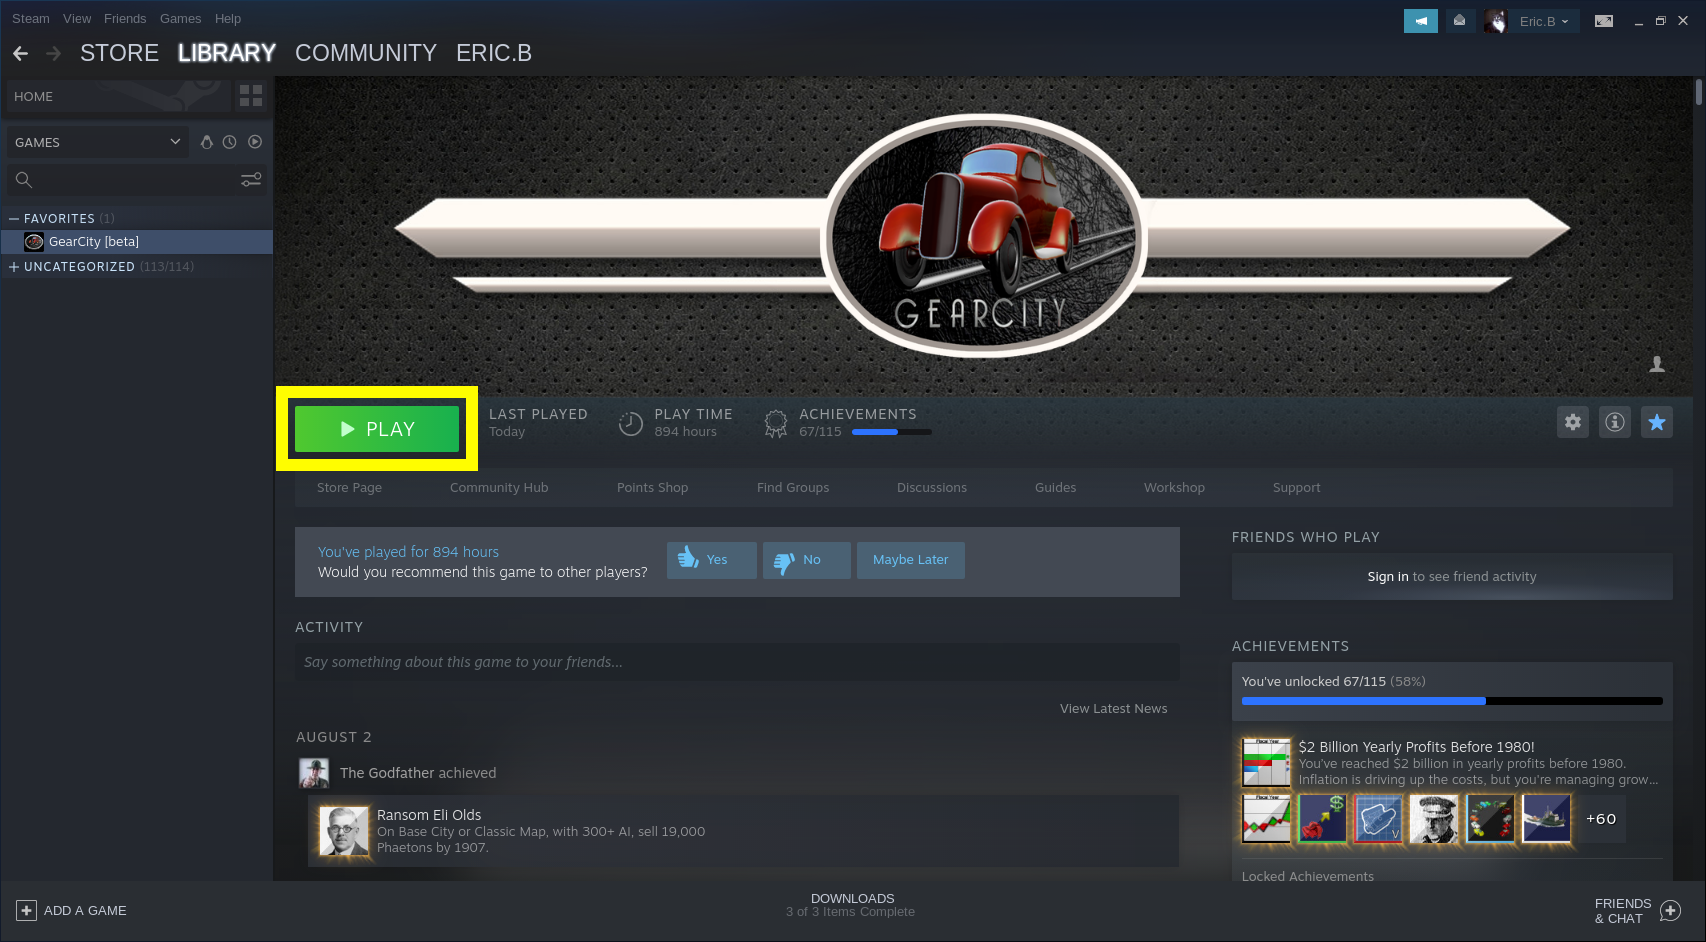 To open the External Settings Editor via Steam, click the “Play” button.
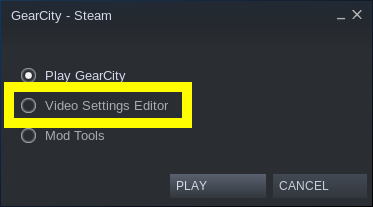 A pop-up window will appear. Click the Video Settings Editor radio button from this window, and then click “Play.”
Galaxy
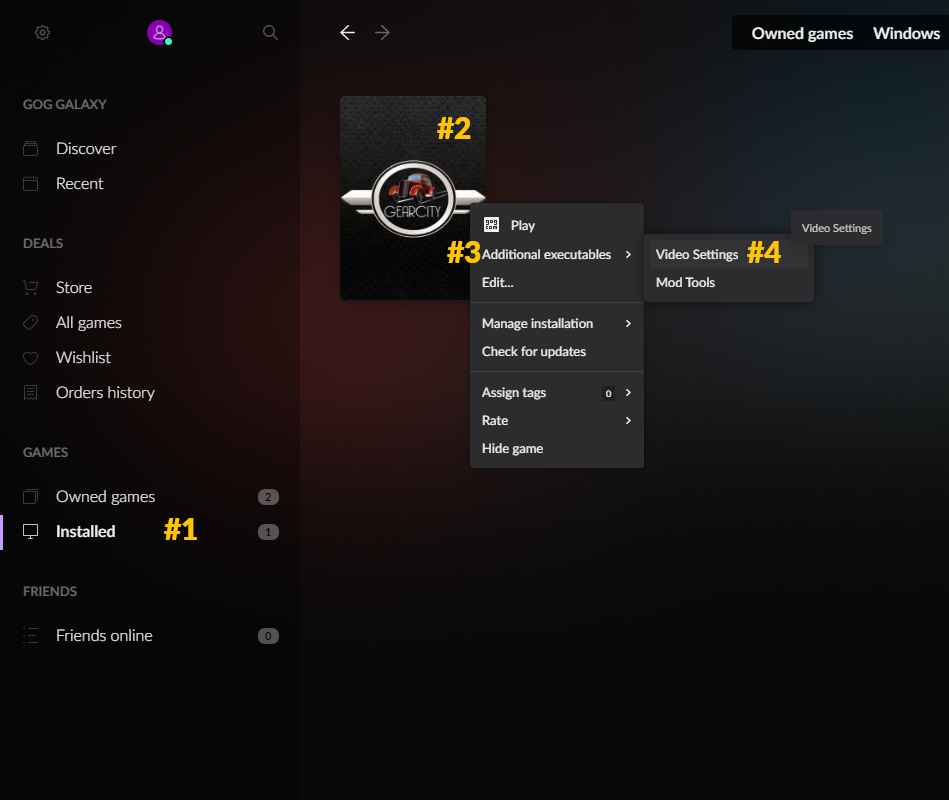
- Click on “Installed” games
- Right click on GearCity
- Hover over “Additional Executables” in the context menu
- Click Video Settings
Tabs

- Engine Settings ⇒ This tab contains windowing and graphical settings for the game.
- Engine Settings 2 ⇒ Additional game engine settings are in this tab.
- In game Settings ⇒ Settings which effect game play are found here.
- Units ⇒ You can change the units of messurements in this tab.
- Modifications ⇒ Use this tab to load a game modification.
Engine Settings
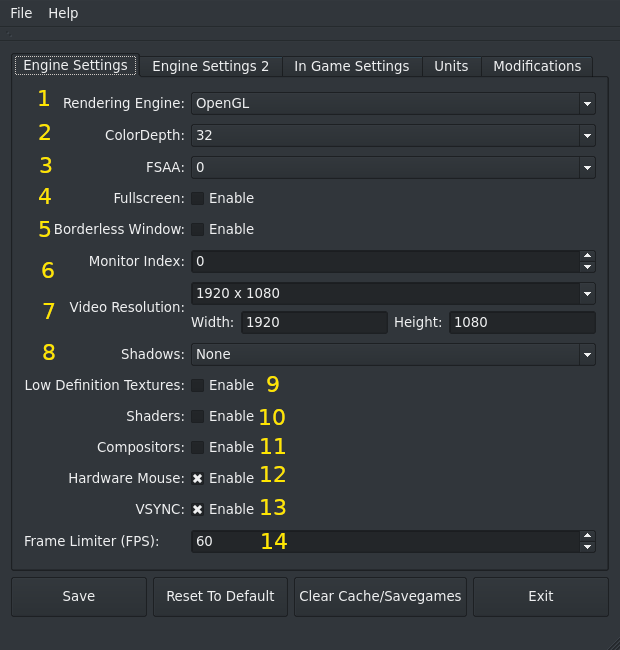
- Rendering Engine ⇒ This drop-down allows you to change the graphical API the game uses. DirectX 9 is the default for 64-bit Windows. OpenGL 2/1.1 is the default for 32-bit Windows and Unix-likes. If you have a problem with one renderer, please try the other. Software Rendering, OpenGL3, DirectX 11, Vulcan, and Metal might come in the future depending on funding.
- ColorDepth ⇒ This setting allows you to set the number of bits used to represent a single pixel. By default, this is at 32-bit. You should keep it at this level unless you have a good reseason to change it to 16-bit.
- Anti Aliasing ⇒ This setting minimizes the distortion of high-resolution images displayed at a lower resolution. The higher the number, the smoother the graphics will look. This effect hurts performance, and the gains are generally not worth it for the low-quality graphics the game has. We recommend you leave this setting at 0.
- Full Screen ⇒ Setting this to true will cause the game to run in true full-screen mode. Please note, your monitor must support the resolution you have the game set to. Otherwise, the game will crash. If it does this, use the external settings editor to reset the video settings. We recommend using the biggest resolution values provided by the game.
- Borderless Window ⇒ This setting removes window decoration and set the game to the highest resolution possible. Giving the appearance that the game is full screen, but it's still in Windowed mode. Please note, the borderless window will initially try to set itself at 10,000 x 10,000 pixels in size, and relies on your operating system to correct that size to the supported resolution. If for some ever reason, your OS does not do this, please disable this setting using the external settings editor. This setting is only available for the DirectX9 renderer.
- Monitor Index ⇒ This setting allows you to change which monitor the game appears on by default when launching the game as full screen. Unfortunately, this setting is a little unpredictable depending on your OS, drivers, and desktop environment. In all cases, 0 should be your primary monitor. 1, your secondary, and so forth. If you don't get your desired effect, try a different number. Remember, 0 is the default if something goes haywire.
- Video Resolution ⇒ Resolution ⇒ This setting is number of pixels the game uses. The higher these numbers are, the smaller objects will appear in the game. If the text appears too small, you can use Scale GUI to increase it. If you want large Reports, Magazine, and Newspaper windows, please selected a vertical resolution above 1050px. Please note, if you are running in Windowed mode, your desktop environment, such as the task bar, window title bar, etc may decrease the size of the window below what you set it. For example, Windows 10 uses 40 pixels for the Task and Title bars. If you set the game to 1080p resolution, the game will only display 1040 pixles, and you will have the small reports window. The listed resolutions are the supported resolutions is provided by your graphics driver. If you want a custom resolution, enter the value in the two text boxes labeled “Width” and “Height”. If your monitor can support that resolution, the game will launch with this custom resolution, otherwise it will reset to a default resolution.
- Shadows ⇒ This drop-down is for the shadow system. Some shadow types may not work with the rendering API or your graphics drivers. The lower quality shadows are more compatible with various systems than the higher quality ones. But the highest quality shadows should work on the vast majority of modern computer systems.
- Low Definition Textures ⇒ The Low Definition Textures setting will set all textures in the game to resolutions of 1024×1024 and less. You should use this option if your graphic card does not support higher resolution textures, such as the Intel i915 and PowerVR. If your GPU is older than 2005, check its technical specifications for the maximum supported resolution.
- Shaders ⇒ The shader system adds reflectiveness to the vehicle paints. This effect may not work with the OpenGL renderer.
- Compositor ⇒ The compositor adds additional glow effects to the click-able objects in the office and safe. However, it can slow the program significantly if used at high resolutions.
- Hardware Mouse ⇒ If enabled, the game will use the Operating System's mouse, and it will no longer be bound to the window. If disabled, the game will use a locked software mouse cursor inside the window.
- VSYNC ⇒ This toggle enables vertical sync, which synchronizes the game's frame rate with your monitor's refresh rate. Keep this setting enabled unless it is causing suitability or performance issues.
- Frame Limiter (FPS) ⇒ This value is the maximum amount of frames the game will render per second (FPS). Increasing this value will make the game seem smoother, but it will increase the amount of work you're video card has to do. Reducing this value will cause the game to lag but may lead to better battery life or less heat if you are having problems with either.
Engine Settings 2
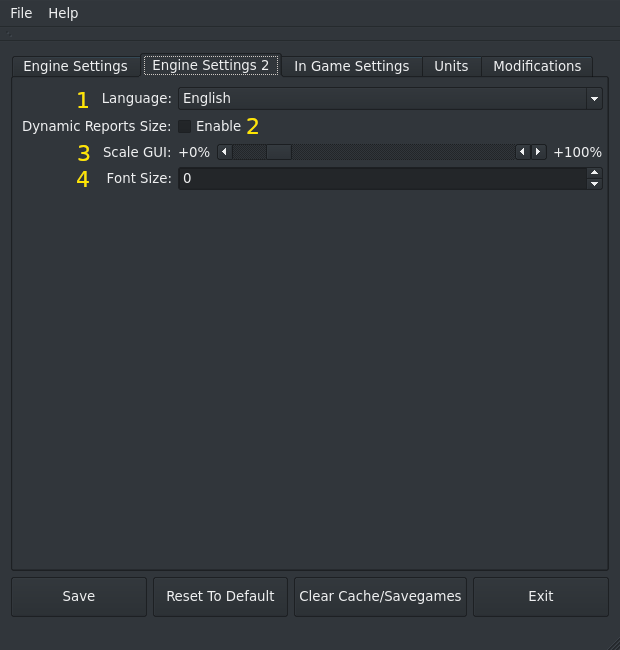
- Language ⇒ This drop-down lets you change the game language. Changing the language will require you to start a new game. Thanks to the community, many other languages are near translated and are in a playable state. If any translations are incomplete, missing translations will default to the English text.
- Dynamic Report Size ⇒ This setting makes the web browser (reports) window as large as the game's window. The browser will use non-power of two textures, and some GPUs using DirectX9, you may have issues with non-power of two textures. If you experience graphical distortion on the pages or low performance in the reports, disable this setting. This setting should work with OpenGL on all platforms.
- Scale GUI ⇒ Use this slider to increase the size of the font and GUI for HiDPI monitors. It's also helpful if you have trouble reading the game text. Please do not use this for low-resolution monitors. If you make a mistake, you can reset the GUI scale with the external video settings editor.
- Font Size ⇒ This is a legacy setting that allows you to increase the size of the font in the game. We replaced it with the Scale GUI system. In newer versions of the game, this setting has no effect. Please use the Scale GUI system instead. The Font Size Setter remains in the external settings editor for older version compatibility reasons.
In Game Settings

- Mouse Sensitivity ⇒ This slider changes how quickly the Software mouse cursor moves. Please note, this only applies if you disable the Hardware Mouse mouse setting.
- Map Sensitivity ⇒ Use this slider to adjust how quickly the world map moves when the mouse hits the edge of the screen.
- Enable Tutorials ⇒ This toggle enables the interactive in-game tutorials system. Disabling this setting will prevent the game from launch tutorial prompt pop-ups. You can reenable it at any time in the game. However, this does not reset “Do Not Show Again” prompts for a save game.
- Save On Exit ⇒ This checkbox enables automatic save on exit. Anytime you exit the program or return to the main menu, the game will automatically save over the last loaded save name or “save as” name.
- Auto Save Intervals ⇒ You can have the game automatically save every certain number of turns. To select the frequency, select a value from the drop-down. Please note, because of the amount of data in the game, save files can get into the hundreds of megabytes range. If you notice a considerable slow down during turn processing, you may want to disable Auto Saves, especially if you are using a spinning disk hard drive.
- Delete Old Reports ⇒ Every report in the game is an HTML file stored locally on your machine. To avoid having thousands of little files everywhere, the game automatically deletes reports that are older than 5 years. You can disable this feature with this checkbox.
- Lock Office Seasons ⇒ Some users may find the seasonal changes to the office annoying. For those users, you can disable this feature with this checkbox.
- Music Volume ⇒ This slider adjusts the volume of the in-game music.
- Sound Effects Volume ⇒ This slider adjusts the volume of the in-game sound effects and the tutorial voice-over.
- Disable Hotkeys ⇒ This toggle disables in-game hotkeys. This setting is particularly useful if you have the happen of using the “end” key to jump a cursor to the end of a text box.
- Auto Save GUI Positions ⇒ This setting will automatically save your changes to the GUI when you exit a room. The game will store your resized windows and your window positions. This setting also overrides the automatic centering of windows in the game. The game will delete saved positions if you decrease the game's resolution, or if the game updates.
Units
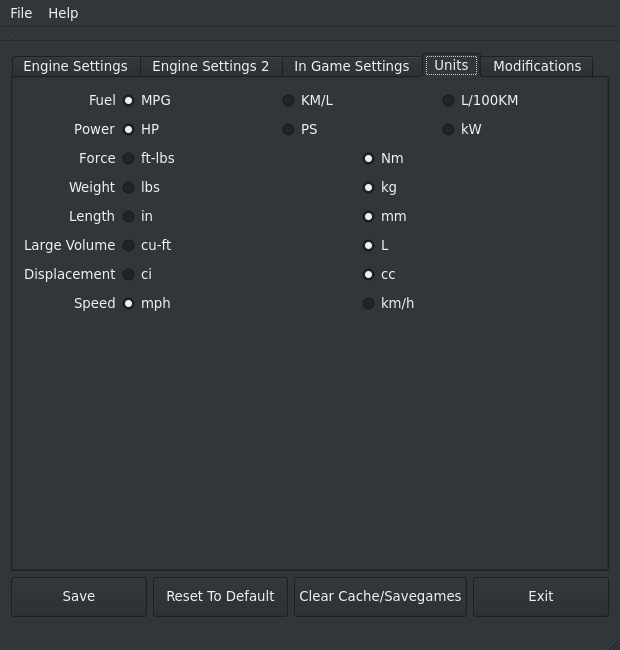
These are the measurement units in the game. The only measurement not customizable is the engine Bore and Stroke values. The data in the game uses a mixture of SAE and Metric. Some rounding minor errors may occur.
Modifications
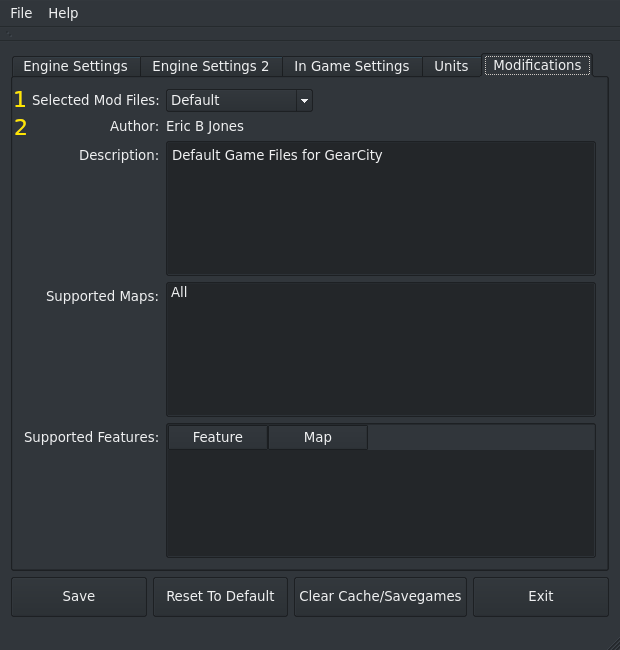
For a video tutorial on how to change mods, Click Here
- Selected Mod Files ⇒ Use this drop-down to select a modification that the game uses. Default is the original files that the game comes with.
- Description ⇒ These text boxes describe the mod using the mod's description. The next box below lists the maps the mod supports, and the final box lists the game files the mod changes. And which maps those files are for.
Bottom Buttons
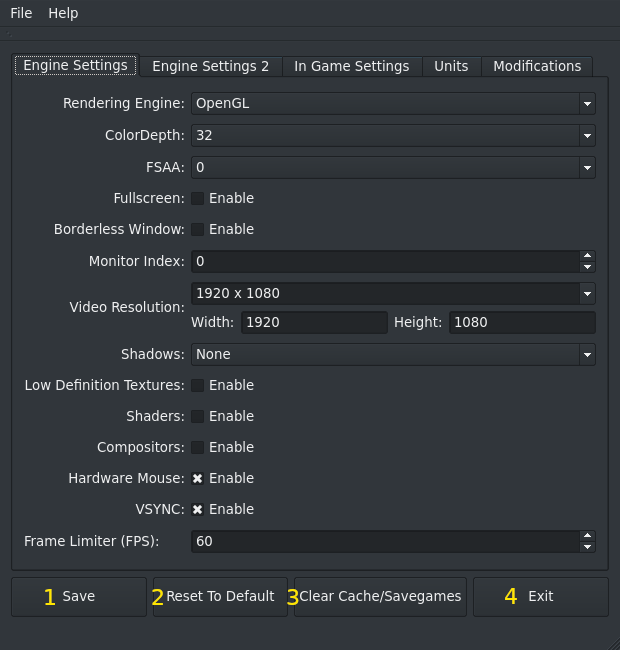
- Save ⇒ This button saves your changes to the settings file. You must click this button to save any changes.
- Reset To Default ⇒ Use this button to reset the settings to the default settings when you installed the game. This is a good option if you broke something.
- Clear Cache/Save Games ⇒ When uninstalling the game on Steam, Steam will not delete user-generated files. This button allows you to delete those files before uninstalling the game. It also works well to clear out caches if you have a crash issue related to hardware changes on your machine. You may want to copy save games before clicking this button, however.
- Exit ⇒ Closes the program.