Table of Contents
Components Editor
In GearCity, vehicles are made up of 3 components, the Chassis, the Engine, and the Gear Box. Each of these components have their own sub-components. The data for these sub-components are stored in the Components.xml file. The Components.xml file also contains the vehicle types and data, entries for vehicle artwork, and entries for accessory artwork.
The Components Editor can also edit the static popularity for AI sub-component selection. This is a separate file, but since it contains data for the sub-components, it utilizes the same Editor.
Both the Components.xml file and the ComponentsStartingPop.xml files are default game files and should not be modified directly. Use the mod system to override these files. This way you will not break your game files, won't lose your work the next time the game updates, and you can share the changes with everyone else! For more information: How to make a Mod File
Opening Components Editor
To access the Components Editor, you must open the Mod Tools. See How to Open the Mod Tools if you do not know how to access the Mod Tools.
The Components Editor is available on the center column, just under “Mod Data Tools” of the Mod Tool's Main Menu. Click the button labeled “Components Editor.”
The Editor
The Components Editor contains multiple sub-editors for each sub-component type in the game. As a few more editors for vehicle types, artwork, and AI. In addition to these editors there are a couple of “Global” settings such as picture files which used across all of the sub-editors.
The following picture is the upper portion of the Components Editor where you'll find the global settings for the editor, and the tabs to take you to the various sub-editors.
- Create a new Components.xml and ComponentsStartingPop.xml files by clearing the existing data in the editor.
- Opens an existing Components.xml and ComponentsStartingPop.xml file. Please note, you do not need to open both files at the same time. For example, if you just want to edit components.xml file, you'd click the Open Components File button, and select the Components.xml. When you're prompted to open the ComponentsStartingPop.xml file, just hit cancel. Your Components.xml file will be loaded and the AI Pop editor will be blank.
- This will save the Components.xml file and ComponentsStartingPop.xml file. If you only wish to save one file, you may cancel the prompt for the file you do not want to save. For example, if you're only editing the ComponentsStartingPop.xml file, you would hit “Save Components/AI Pop Files”, then hit cancel when it prompts you to save Components.xml file, the next prompt will ask you to save the ComponentsStartingPop.xml file, which you would then do.
- The takes you back to the previous editor or main menu.
- Use this to open the folder containing all of the .dds pictures for your Sub-components, vehicle types, accessories, etc. When making a mod, these files should be put into the mod's ComponentImages.zip file, without any sub-directories. Please see How to make a Mod File for more information on how to make mods, and DDS Textures on how to make DDS textures.
- This will tell you the current components file you are editing. If you Opened a file this will contain its file name. If you saved the file, it will tell you the save name.
- This tells you the current ComponentsStartingPop file you are editing. If you Opened a file this will contain its file name. If you saved the file, it will tell you the save name.
- Frames Tab allows you add, edit, or remove frame sub-components for the chassis.
- Suspensions Tab allows you add, edit, or remove suspension sub-components for the chassis.
- Drivetrain Tab allows you add, edit, or remove drivetrain layouts for the chassis.
- Engine Layouts Tab allows you add, edit, or remove engine layouts for the engine.
- Cylinders Tab allows you add, edit, or remove cylinder sub-components for the engines.
- Fuel Tab allows you add, edit, or remove fuel types for engines.
- Valves Tab allows you add, edit, or remove valvetrain sub-components for engines.
- Induction Tab allows you add, edit, or remove air induction sub-components for the engines.
- Gearbox Tab allows you add, edit, or remove gearbox types.
- Gears Tab allows you add, edit, or remove gear sub-components for the gearboxes.
- Car Types Tab allows you add, edit, or remove vehicle types from the game.
- Car Models Tab allows you add, edit, or remove vehicle body models (also called shells, meshes, etc) from the game.
- Accessories Tab allows you add, edit, or remove accessories (anything that can be added to the body shells, like tires, headlights, etc) to the game.
- AI Pop Tab allows you add or edit AI component selection popularity values. This saves to a separate file but the editor is included with the components editor because it relies on the component editor's data.
Frames
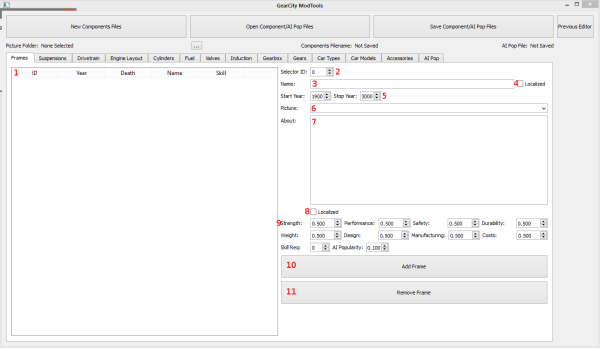
This tab allows us to edit the frame sub-component of the chassis. The following picture will tell you were the the components of the editor are. The Frame Variable section has a detailed explanation of the effects of each variable.
- This list the frame sub-components currently in the editor. Selecting a frame from this list will load its information on the right.
- This is the Selector ID used in the TurnEvents.xml file. You can use the Turn Events Editor to alter popularity values of the components as time progresses.
- Name of the frame type. If localizing, this should be the number of the ID in the localization files.
- Checking this box will make the game use the text in the localization file as the name of the frame. The game will use the frame name value for the Localization ID number.
- The starting year is the year that the frame will be available to use in the game. The Ending year is the last year that the frame can be used in the game.
- Select a picture from the drop down to be used as the frame's selector image. The folder containing these files must be set with #5 in this image. See DDS Textures on how to make the proper pictures.
- Write a description of the frame here. If using the localization system this should have the number of the localization ID.
- Check this box to localize the “About” in #7. If localized the game will look for the text with the ID number in the box, then use that text as the description.
- These are the specific variables for the Frame. See Frame Variable for more details.
- This adds or edits the frame to the list of frames.
- This removes the selected frame from the list of frames.
Suspensions
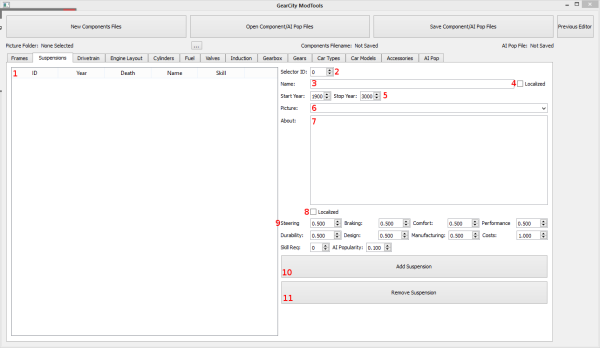
This tab allows us to edit the Suspension sub-component of the chassis. The following picture will tell you were the the components of the editor are. The Suspension Variable section has a detailed explanation of the effects of each variable.
- This list the suspension sub-components currently in the editor. Selecting a suspension from this list will load its information on the right.
- This is the Selector ID used in the TurnEvents.xml file. You can use the Turn Events Editor to alter popularity values of the components as time progresses.
- Name of the suspension type. If localizing, this should be the number of the ID in the localization files.
- Checking this box will make the game use the text in the localization file as the name of the suspension. The game will use the suspension name value for the Localization ID number.
- The starting year is the year that the suspension will be available to use in the game. The Ending year is the last year that the suspension can be used in the game.
- Select a picture from the drop down to be used as the suspension's selector image. The folder containing these files must be set with #5 in this image. See DDS Textures on how to make the proper pictures.
- Write a description of the suspension here. If using the localization system this should have the number of the localization ID.
- Check this box to localize the “About” in #7. If localized the game will look for the text with the ID number in the box, then use that text as the description.
- These are the specific variables for the Suspension. See Suspension Variable for more details.
- This adds or edits the suspension to the list of suspensions.
- This removes the selected suspension from the list of suspensions.
Drivetrain
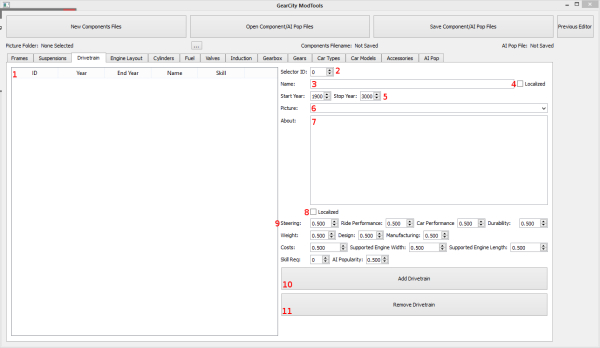
This tab allows us to edit the drivetrain of the chassis. The following picture will tell you were the the components of the editor are. The Drivetrain Variable section has a detailed explanation of the effects of each variable.
- This list the drivetrains currently in the editor. Selecting a drivetrain from this list will load its information on the right.
- This is the Selector ID used in the TurnEvents.xml file. You can use the Turn Events Editor to alter popularity values of the components as time progresses.
- Name of the drivetrain type. If localizing, this should be the number of the ID in the localization files.
- Checking this box will make the game use the text in the localization file as the name of the drivetrain. The game will use the drivetrain name value for the Localization ID number.
- The starting year is the year that the drivetrain will be available to use in the game. The Ending year is the last year that the drivetrain can be used in the game.
- Select a picture from the drop down to be used as the drivetrain's selector image. The folder containing these files must be set with #5 in this image. See DDS Textures on how to make the proper pictures.
- Write a description of the drivetrain here. If using the localization system this should have the number of the localization ID.
- Check this box to localize the “About” in #7. If localized the game will look for the text with the ID number in the box, then use that text as the description.
- These are the specific variables for the Drivetrain. See Drivetrain Variable for more details.
- This adds or edits the drivetrain to the list of drivetrains.
- This removes the selected drivetrain from the list of drivetrains.
Engine Layout
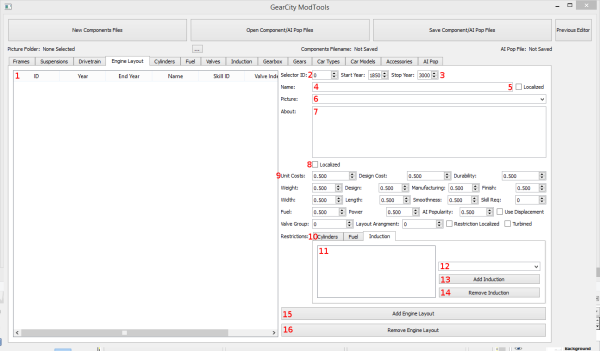
This tab allows us to edit the Engine Layout sub-component of the engine. The following picture will tell you were the the components of the editor are. The Engine Variable section has a detailed explanation of the effects of each variable.
- This list the engine layouts currently in the editor. Selecting a layout from this list will load its information on the right.
- This is the Selector ID used in the TurnEvents.xml file. You can use the Turn Events Editor to alter popularity values of the components as time progresses.
- The starting year is the year that the engine layout will be available to use in the game. The Ending year is the last year that the engine layout can be used in the game.
- Name of the engine layout type. If localizing, this should be the number of the ID in the localization files.
- Checking this box will make the game use the text in the localization file as the name of the engine layout. The game will use the engine layout name value for the Localization ID number.
- Select a picture from the drop down to be used as the engine layout's selector image. The folder containing these files must be set with #5 in this image. See DDS Textures on how to make the proper pictures.
- Write a description of the engine layout here. If using the localization system this should have the number of the localization ID.
- Check this box to localize the “About” in #7. If localized the game will look for the text with the ID number in the box, then use that text as the description.
- These are the specific variables for the engine layout. See Engine Layout Variable for more details.
- This is the restriction system. The engine layout restricts which cylinders, fuel types, and induction systems that the engine can use. Each tab contains the restriction system for the sub-component type labeled on the tab selectors.
- This list the current restrictions for the selected tab. The engine layout will only be able to use these sub-components. If the names have been localized, you may see numbers. Please note, if Restriction Localization must be enabled for the layout for Localization to occur. Localization ID's below 10000 and non-number entries will be disregarded. This is so you can mix and match localized and localized sub-components.
- This is a list of sub-components you can add to the restrictions.
- This adds the selected sub-component from #12 in this image to the list of sub-components that can be used with the engine layout #11 in this image.
- This removes the selected sub-component from the list of sub-components that the engine layout can use #11 in this image.
- This adds the engine layout to the list of engine layout.
- This removes the selected engine layout from the list of engine layout.
Cylinders
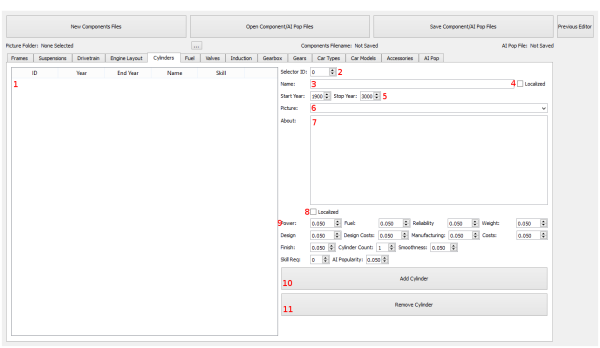
This tab allows us to edit the cylinder data for the engines. The following picture will show the various parts of the cylinder editor. The Cylinder Variables section has a detailed explanation of the effects of each variable.
- This list the cylinders currently in the editor. Selecting a cylinder from this list will load its information on the right.
- This is the Selector ID used in the TurnEvents.xml file. You can use the Turn Events Editor to alter popularity values of the components as time progresses.
- Name of the cylinder type. If localizing, this should be the number of the ID in the localization files.
- Checking this box will make the game use the text in the localization file as the name of the cylinder. The game will use the cylinder name value for the Localization ID number.
- The starting year is the year that the cylinder will be available to use in the game. The Ending year is the last year that the cylinder can be used in the game.
- Select a picture from the drop down to be used as the cylinder's selector image. The folder containing these files must be set with #5 in this image. See DDS Textures on how to make the proper pictures.
- Write a description of the cylinder here. If using the localization system this should have the number of the localization ID.
- Check this box to localize the “About” in #7. If localized the game will look for the text with the ID number in the box, then use that text as the description.
- These are the specific variables for the Cylinder. See Cylinder Variable for more details.
- This adds or edits the cylinder to the list of cylinders.
- This removes the selected cylinder from the list of cylinders.
Fuel
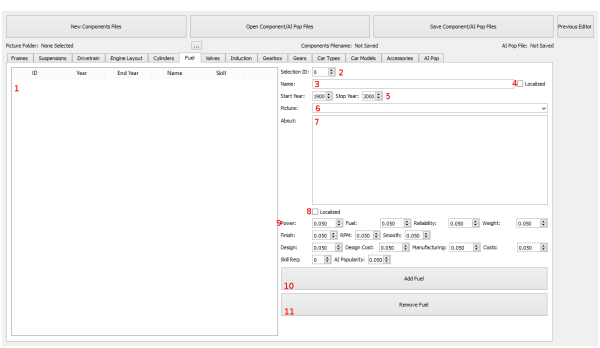
This tab allows us to edit the fuel data for the engines. The following picture will show the various parts of the fuel editor. The Fuel Variables section has a detailed explanation of the effects of each variable.
- This list the fuels currently in the editor. Selecting a fuel from this list will load its information on the right.
- This is the Selector ID used in the TurnEvents.xml file. You can use the Turn Events Editor to alter popularity values of the components as time progresses.
- Name of the fuel type. If localizing, this should be the number of the ID in the localization files.
- Checking this box will make the game use the text in the localization file as the name of the fuel. The game will use the fuel name value for the Localization ID number.
- The starting year is the year that the fuel will be available to use in the game. The Ending year is the last year that the fuel can be used in the game.
- Select a picture from the drop down to be used as the fuel's selector image. The folder containing these files must be set with #5 in this image. See DDS Textures on how to make the proper pictures.
- Write a description of the fuel here. If using the localization system this should have the number of the localization ID.
- Check this box to localize the “About” in #7. If localized the game will look for the text with the ID number in the box, then use that text as the description.
- These are the specific variables for the Fuel. See Fuel Variable for more details.
- This adds or edits the fuel to the list of fuels.
- This removes the selected fuel from the list of fuels.
Valves
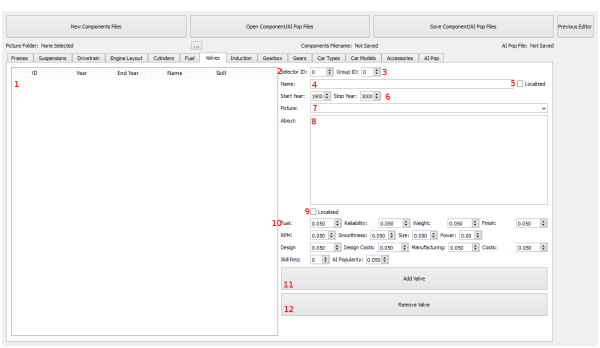
This tab allows us to edit the valvetrain data for the engines. The following picture will show the various parts of the valve editor. The Valve Variables section has a detailed explanation of the effects of each variable.
- This list the valves currently in the editor. Selecting a valve from this list will load its information on the right.
- This is the Selector ID used in the TurnEvents.xml file. You can use the Turn Events Editor to alter popularity values of the components as time progresses.
- This is the group ID. The Valve Groups are used by the Engine Layouts to select which valves are usable by the engine layout. A valve entry may only belong to one group. Thus if you have an engine layout that does not use all the valves in a group, you will have to make duplicate valve entries belonging to a new group ID.
- Name of the valvetrain type. If localizing, this should be the number of the ID in the localization files.
- Checking this box will make the game use the text in the localization file as the name of the valve. The game will use the valve name value for the Localization ID number.
- The starting year is the year that the valve will be available to use in the game. The Ending year is the last year that the valve can be used in the game.
- Select a picture from the drop down to be used as the fuel's selector image. The folder containing these files must be set with #5 in this image. See DDS Textures on how to make the proper pictures.
- Write a description of the valvetrain here. If using the localization system this should have the number of the localization ID.
- Check this box to localize the “About” in #7. If localized the game will look for the text with the ID number in the box, then use that text as the description.
- These are the specific variables for the Valves. See Valves Variable for more details.
- This adds or edits the valve to the list of valves.
- This removes the selected valve from the list of valves.
Induction
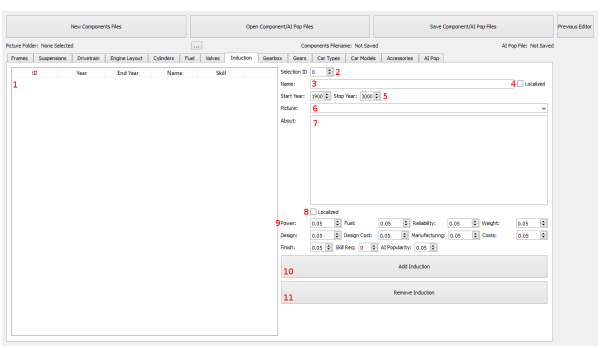
This tab allows us to edit the induction system data for the engines. The following picture will show the various parts of the induction editor. The Induction Variables section has a detailed explanation of the effects of each variable.
- This list the induction systems currently in the editor. Selecting an induction system from this list will load its information on the right.
- This is the Selector ID used in the TurnEvents.xml file. You can use the Turn Events Editor to alter popularity values of the components as time progresses.
- Name of the induction system. If localizing, this should be the number of the ID in the localization files.
- Checking this box will make the game use the text in the localization file as the name of the induction system. The game will use the induction name value for the Localization ID number.
- The starting year is the year that the induction system will be available to use in the game. The Ending year is the last year that the induction system can be used in the game.
- Select a picture from the drop down to be used as the fuel's selector image. The folder containing these files must be set with #5 in this image. See DDS Textures on how to make the proper pictures.
- Write a description of the induction system here. If using the localization system this should have the number of the localization ID.
- Check this box to localize the “About” in #7. If localized the game will look for the text with the ID number in the box, then use that text as the description.
- These are the specific variables for the induction system. See Induction Variable for more details.
- This adds or edits the induction system to the list of inductions.
- This removes the selected induction system from the list of inductions.
Gearbox
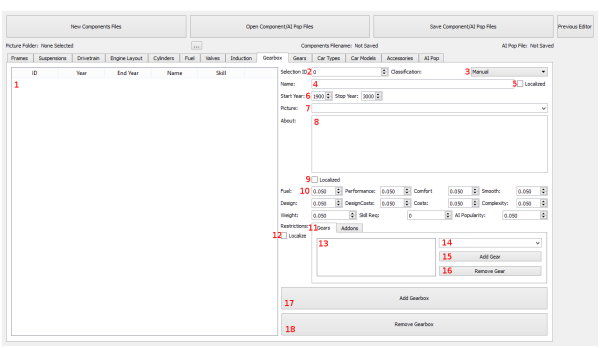
This tab allows us to edit Gearboxes. The following picture will tell you were the the components of the editor are. The Gearbox Variable section has a detailed explanation of the effects of each variable.
- This list the gearboxes currently in the editor. Selecting a gearbox from this list will load its information on the right.
- This is the Selector ID used in the TurnEvents.xml file. You can use the Turn Events Editor to alter popularity values of the components as time progresses.
- This allows you to select whether the gearbox is manually shifted or automatically shifted. This will effect various calculations used in the game.
- Name of the gearbox type. If localizing, this should be the number of the ID in the localization files.
- Checking this box will make the game use the text in the localization file as the name of the gearbox. The game will use the gearbox name value for the Localization ID number.
- The starting year is the year that the gearbox will be available to use in the game. The Ending year is the last year that the gearbox can be used in the game.
- Select a picture from the drop down to be used as the gearbox's selector image. The folder containing these files must be set with #5 in this image. See DDS Textures on how to make the proper pictures.
- Write a description of the gearbox here. If using the localization system this should have the number of the localization ID.
- Check this box to localize the “About” in #7. If localized the game will look for the text with the ID number in the box, then use that text as the description.
- These are the specific variables for the gearbox. See Gearbox Variable for more details.
- This is the restriction system. Gearboxes types can restrict which gears and add on features that the gearboxes can use. Each tab contains the restriction system for the sub-component type labeled on the tab selectors.
- Checking this box will tell the game if restricted gears are localized or not.
- This list the current restrictions for the selected tab. The gearbox will only be able to use these sub-components. If the names have been localized, you may see numbers. Please note, if Restriction Localization must be enabled for the layout for Localization to occur. Localization ID's below 10000 and non-number entries will be disregarded. This is so you can mix and match localized and localized sub-components.
- This is a list of sub-components you can add to the restrictions.
- This adds the selected sub-component from #14 in this image to the list of sub-components that can be used with the gearbox #13 in this image.
- This removes the selected sub-component from the list of sub-components that the gearbox can use #11 in this image.
- This adds the gearbox to the list of gearboxes.
- This removes the selected gearbox from the list of gearboxes.
Gears
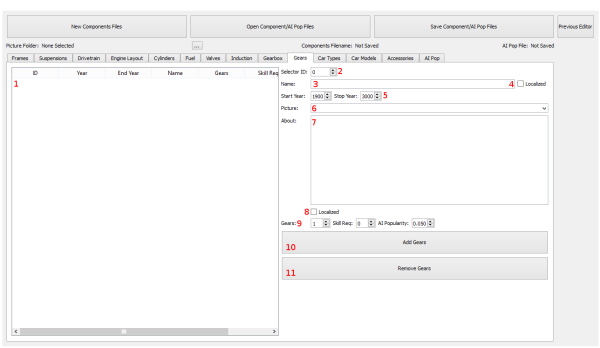
This tab allows us to edit the gear information for gearboxes. The following picture will show the various parts of the gear editor. The Gear Variables section has a detailed explanation of the effects of each variable.
- This list the gears currently in the editor. Selecting a gear from this list will load its information on the right.
- This is the Selector ID used in the TurnEvents.xml file. You can use the Turn Events Editor to alter popularity values of the components as time progresses.
- Name of the gear. If localizing, this should be the number of the ID in the localization files.
- Checking this box will make the game use the text in the localization file as the name of the gear. The game will use the gear name value for the Localization ID number.
- The starting year is the year that the gear will be available to use in the game. The Ending year is the last year that the gear can be used in the game.
- Select a picture from the drop down to be used as the gear's selector image. The folder containing these files must be set with #5 in this image. See DDS Textures on how to make the proper pictures.
- Write a description of the gear here. If using the localization system this should have the number of the localization ID.
- Check this box to localize the “About” in #7. If localized the game will look for the text with the ID number in the box, then use that text as the description.
- These are the specific variables for the gears. See Gear Variable for more details.
- This adds or edits the gear to the list of gears.
- This removes the selected gear from the list of gears.
Car Types
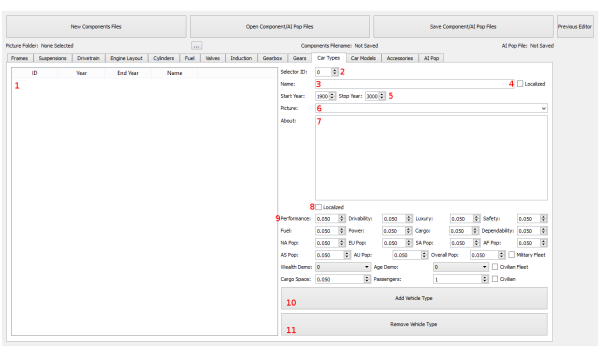
This editor allows us to change the car types in the game. The following picture will tell you were the the components of the editor are. The Car Type Variable section has a detailed explanation of the effects of each variable.
- This list the vehicle types currently in the editor. Selecting a vehicle type from this list will load its information on the right.
- This is the Selector ID used in the TurnEvents.xml file. You can use the Turn Events Editor to alter popularity values of the vehicle types as time progresses.
- Name of the vehicle type. If localizing, this should be the number of the ID in the localization files.
- Checking this box will make the game use the text in the localization file as the name of the vehicle type. The game will use the vehicle type name value for the Localization ID number.
- The starting year is the year that the vehicle type will be available to use in the game. The Ending year is the last year that the vehicle type can be used in the game.
- Select a picture from the drop down to be used as the vehicle type's selector image. The folder containing these files must be set with #5 in this image. See DDS Textures on how to make the proper pictures.
- Write a description of the vehicle type here. If using the localization system this should have the number of the localization ID.
- Check this box to localize the “About” in #7. If localized the game will look for the text with the ID number in the box, then use that text as the description.
- These are the specific variables for the vehicle type. See Car Types Variable for more details.
- This adds or edits the vehicle type to the list of types.
- This removes the selected vehicle type from the list of types.
Car Models
This editor allows us to add more bodies to the game. It also allows us to define which body models go with which vehicle type and when they are available. Each car model in the game must have a .mesh file that complies with our in game requirements. For details on how to make car bodies, see: Vehicle Artwork.
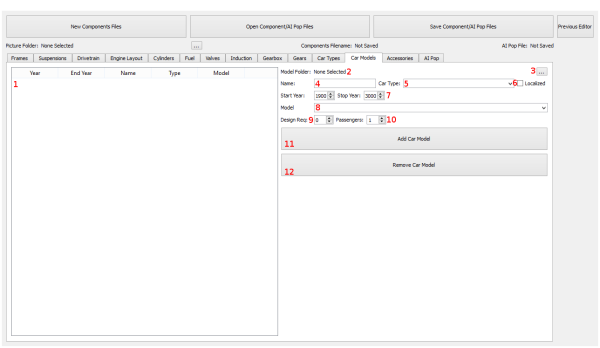
The following picture will break down the parts of the editor:
- This is a list of the current car bodies added to the game. Selecting a model from this list will load the information on the right.
- This is the name of the selected folder with the body .mesh files in them. You use the button to the right to select the folder. The folder will populate the drop down in #8, thus allowing you to select bodies.
- This button allows you to select a folder with .mesh files in it. Upon selecting a folder, the #8 drop down will be populated with the .mesh files in the folder. You will then select these mesh files to be used as car bodies in the game.
- This is the name of the body model.
- This is the car type which the body model can be used for. You will have to make multiple entries if it belongs to more than 1 car type. The Car Type drop down is populated by entries made in the Car Types tab.
- This checkbox lets the game know if the car types have been localized or not. If the car type names are localized, the game will look up the ID numbers in the drop down boxes rather than using the names of the car types.
- The Starting year is the year which the car body can be selected. The Stop year is the last year the car body can be used.
- This is the body model file which is to be used in game. Please refer to Vehicle Artwork on how to make vehicle models. See #2 and #3 for directions on how to populate this list.
- This is the design requirements to unlock this vehicle body. Currently this system is disabled in the game.
- This allows you to set how many passengers this vehicle body supports. The game will use this for the passenger count.
- This adds a car model to the list of car models.
- This removes the selected car model from the list of car models.
Accessories
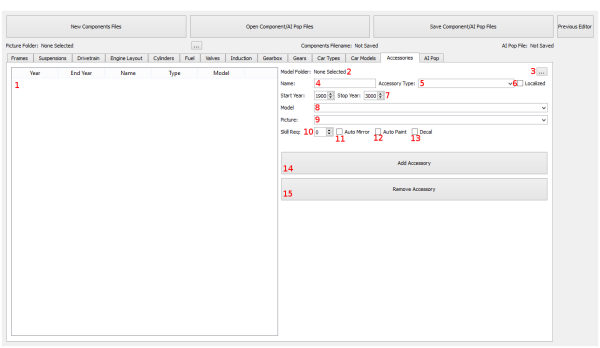
This is the accessories editor. Any piece of artwork that is applied to a vehicle model, but is not a vehicle model is considered an accessory and is added to the game using this editor. The following picture and list will explain the parts of the editor.
- This is the list of the accessories currently in the editor. Selecting an item from this list will load the information on the right.
- This is the name of the selected folder containing the accessory artwork. Use the button in #3 to select the folder.
- This allows you to select the folder containing the accessory artwork. This will automatically fill drop down boxes in #8 and #9 with .meshes and .dds files. See Accessory Artwork for details on how to create accessories.
- This is the name of the accessory.
- This is the type of accessory. The game will group accessories together based on this accessory type name. If you're creating a new accessory type, enter the text into the drop down. If using an existing type, you can select it from the drop down.
- If the localization box is checked, the accessories type name will use the text in the localization file. As such the Accessory Type should be the ID number of the text in the localization file.
- The starting year is the year which the accessory is available to use. The stop year is the year which the accessory will no longer be usable.
- This is the file name for the accessory mesh or decal dds. If you have selected an artwork directory, the drop down should be populated with file names. Otherwise you will have to type in the name (it is case sensitive).
- This is the thumbnail/icon picture for the accessory. This is used when the player views the grid of available accessories. If you have selected an artwork directory, the drop down should be populated with file names. Otherwise you will have to type in the name (it is case sensitive).
- This is the skill required to unlock the accessory. Currently this is disabled in game.
- Checking this box will cause the accessory to automatically be duplicated and mirrored over the front axis of the vehicle. For example, the default mirrors in the game, will automatically place two mirrors on both sides of the vehicle.
- This checkbox will automatically paint the accessory with the last selected paint color, or white if none has been selected.
- This signifies to the game that the accessory is a “Decal”, or 2d image instead of a 3d model. Examples of this in the default game is late model headlights.
- This adds the accessories to the list of accessories.
- This removes the selected accessory from the list of accessories.
AI Pop
This editor allows you to set the AI popularity (or AI selection preference) for component types. Each popularity value weighs toward the selection of a component based on the vehicle type they are building for. For example, if a vehicle type has a high performance importance rating. Then the components with high Performance AI Popularity values will be selected more often than ones with low Performance AI Popularity values.
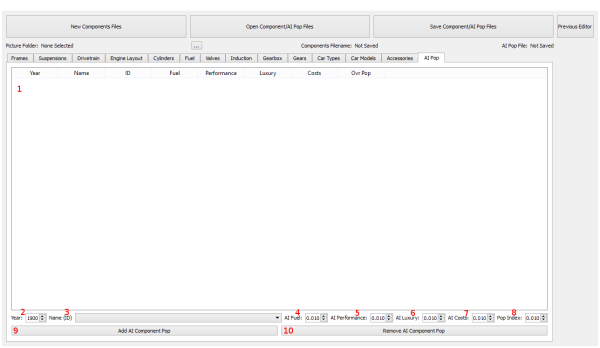
The following picture shows you the parts of the editor and explains what they do.
- This is the list of components that have AI pop values. Selecting a component from this list will load the information below.
- This is the year which the AI popularity takes effect. The game will interpolate values between two changes.
- This is the name and selection ID of the component. Information in this drop down is taken from the editor tabs in this image.
- The higher this value is, the more likely this component will be chosen for vehicle types that have high fuel importance ratings.
- The higher this value is, the more likely this component will be chosen for vehicle types that have high performance importance ratings.
- The higher this value is, the more likely this component will be chosen for vehicle types that have high luxury importance ratings.
- The higher this value is, the more likely this component will be chosen for vehicle types that have lower wealth demographics.
- The higher this value is, the more likely this component will be chosen for all vehicle types.
- This adds the popularity values to the list.
- This removes the selected popularity value from the list.
Files and How it Works
The sub-components, vehicles types, and vehicle artwork are all handled by a single file called the components.xml file. The AI Pop files are loaded through the ComponentsStartingPopularity.xml file. For more information on the location of these files, see: File Locations
Upon creating a new save game, the game will read the components.xml and save all the data into the save game database. After which, the components.xml file will not be used for the rest of the save game's life. Thus any changes made to the components.xml file requires a new save game.
The game then reads the ComponentsStartingPop.xml files and saves that information to the database. However, unlike the components.xml file, the game will read the ComponentsStartingPop.xml at the end of every game year in order to interpolate and save new popularity values. However changes to the ComponentsStartingPop.xml file will only take effect when the year values in the entries are hit.
Variables
The following are components variables that adjust the characteristics of the specific component. The + indicates that it improves that rating or spec. The - indicates that it worsens that rating or spec.
Frames
Frames are the structure that holds together the various parts of a vehicle. As such there are certain characteristics of the frame that effect the vehicle in different ways. We'll try to describe to you the effects of each variable, however, extremely detailed data will have to wait until we write the “In-depth” wiki pages. When those pages are implemented, we'll link you there.
| Name | Description | Chassis Effect | Vehicle Effect |
|---|---|---|---|
| Strength | Represents how strong the frame is in its ability to handle stresses and weight. | +Str | +Safety, +Dependability, +Towing |
| Performance | Conveys the chassis handling abilities, it's roadhold, and how well it handles torsional stresses to maximize traction. | +Performance | +LateralG, +Braking, +Safety (Due to LateralG and Braking), +Performance, +Driveability |
| Safety | Represents the chassis safety design, such as crumple zones design, and how well the chassis absorbs and distributes impacts on the vehicle. | No Effects on Chassis Ratings | +Safety |
| Durability | This is how long the frame design typically lasts and how much stress it can handle over time. | +Strength, +Durability | +Safety, +Quality, +Dependability |
| Weight | Some designs may require more weight to implement than others. This variable is for the weight of the frame. Higher the value, the heavier it is. | -Manufacturing Requirements, -Weight, +Strength | -Weight, -Performance, -Fuel Economy, -Driveability, -LateralG, -Braking, -Acceleration, -Top Speed |
| Design | This variable is for the difficulty in design with this frame. The higher the value, the hard it is. | -Time To Design, -Costs to Design | -Time To Design, -Costs to Design |
| Manufacturing | This is how difficult the frame is to manufacturer. Higher the value the harder it is to make. | -Units per factory line, -More advance factory needed to not have per line penalties. | -Units per factory line, -More advance factory needed to not have per line penalties. |
| Costs | This is how much the frame costs. The higher the values, the more it costs. | -Costs | -Costs |
| Skill Req | This is the minimum amount of Chassis Design skills points needed to unlock the frame. This value will automatically decrease over time after the “start” year has been hit. | -Unlock Requirement | No effect on Vehicles. |
| AI Popularity | This is the base percentage of how likely the AI is to use this item if no AI components Popularity file is present. | No effect on Chassis | No effect on vehicle. |
Suspensions
Suspensions are the support structures that connect the vehicle to the wheels and keep the wheels connected to the road. Certain characteristics of the suspension system effects the vehicle in different ways. We'll try to describe to you the effects of each variable, however, extremely detailed data will have to wait until we write the “In-depth” wiki pages. When those pages are implemented, we'll link you there.
| Name | Description | Chassis Effect | Vehicle Effect |
|---|---|---|---|
| Steering | This is the suspension's effects on drivability, handling, and roadhold of the chassis. Higher values here typically means more performance oriented suspension systems. | +Comfort, +Performance | +Performance, +Driveabilty, +Luxury |
| Braking | This is the suspension's effect on stopping the vehicle. Higher the value the better it is at braking. | +Performance | +Braking, +Safety, +Performance |
| Comfort | This shows how well the suspension system handles bumps, holes, and other road obstacles. The more comfortable the suspension, the less likely the driver will notice problems in the road. | +Comfort | +Luxury, -Design Requirements |
| Performance | This is the effect on performance for the suspension. The higher this value the better the suspension is at high speed handling. | +Performance | +Performance, +Driveability |
| Durability | This is how well the suspension system handles stress. How long the parts will last, etc. | +Strength, +Durability | +Dependability, +Quality |
| Design | This variable is for the difficulty in design with this frame. The higher the value, the hard it is. | -Time To Design, -Costs to Design | -Time To Design, -Costs to Design |
| Manufacturing | This is how difficult the frame is to manufacturer. Higher the value the harder it is to make. | -Units per factory line, -More advance factory needed to not have per line penalties. | -Units per factory line, -More advance factory needed to not have per line penalties. |
| Costs | This is how much the frame costs. The higher the values, the more it costs. | -Costs | -Costs |
| Skill Req | This is the minimum amount of Chassis Design skills points needed to unlock the frame. This value will automatically decrease over time after the “start” year has been hit. | -Unlock Requirement | No effect on Vehicles. |
| AI Popularity | This is the base percentage of how likely the AI is to use this item if no AI components Popularity file is present. | No effect on Chassis | No effect on vehicle. |
Drivetrain
Drivetrains consists of the position of the engine and the powered wheels in relation to the vehicle body. We'll try to describe to you the effects of each variable, however, extremely detailed data will have to wait until we write the “In-depth” wiki pages. When those pages are implemented, we'll link you there.
| Name | Description | Chassis Effect | Vehicle Effect |
|---|---|---|---|
| Steering | This is the drivetrain's effect on how 'easy' the vehicle is to drive. The higher this rating is, the less skills one requires to drive this vehicle in poor conditions such as wet roads and at high speeds. | +Comfort | +Driveability, +Luxury |
| Ride Performance | This is the drivetrains's effects on drivability, handling, and roadhold of the chassis. Higher values here typically means more performance oriented chassis systems. | +Performance | +Performance, +Driveabilty |
| Car Performance | This is the drivetrains's effects vehicle performance. Higher values here typically means more performance oriented chassis systems. | +Performance | +Performance, +Acceleration |
| Durability | Represents how durable the drivetrain layout is. | +Strength, +Durability | +Dependability, +Quality |
| Weight | This variable is for the weight of the drivetrain layout. Higher the value, the heavier it is. | -Manufacturing Requirements, -Weight, +Strength | -Weight, -Performance, -Fuel Economy, -Driveability, -LateralG, -Braking, -Acceleration, -Top Speed |
| Design | This variable is for the difficulty in design with this drivetrain. The higher the value, the hard it is. | -Time To Design, -Costs to Design | -Time To Design, -Costs to Design |
| Manufacturing | This is how difficult the drivetrain is to manufacturer. Higher the value the harder it is to make. | -Units per factory line, -More advance factory needed to not have per line penalties. | -Units per factory line, -More advance factory needed to not have per line penalties. |
| Costs | This is how much the drivetrain costs. The higher the values, the more it costs. | -Costs | -Costs |
| Supported Engine Width | This effects the maximum supported engine width of the chassis. Higher numbers here will means you'll be able to use bigger engines. | +Increases Chassis' Supported Engine Width | +Allows for bigger engines |
| Supported Engine Length | This effects the maximum supported engine length of the chassis. Higher numbers here will means you'll be able to use bigger engines. | +Increases Chassis' Supported Engine Length | +Allows for bigger engines |
| Skill Req | This is the minimum amount of Chassis Design skills points needed to unlock the drivetrain. This value will automatically decrease over time after the “start” year has been hit. | -Unlock Requirement | No effect on Vehicles. |
| AI Popularity | This is the base percentage of how likely the AI is to use this item if no AI components Popularity file is present. | No effect on Chassis | No effect on vehicle. |
Engine Layout
Engine Layouts are the various types of engines. They are generally described in how the cylinders are positioned in the block. We'll try to describe to you the effects of each variable, however, extremely detailed data will have to wait until we write the “In-depth” wiki pages. When those pages are implemented, we'll link you there.
| Name | Description | Engine Effect | Vehicle Effect |
|---|---|---|---|
| Unit Costs | This effects the costs of the engine based on the layout selection. Higher this number is the more expensive the engine will be. | -Costs | -Costs |
| Design Costs | This is how much the engine layout effects the design costs, the higher this number is the more expensive it will be to design. | -Design Costs | -Design Costs |
| Durability | This is the engine layout's effect on engine reliability. The higher this number the more reliably this design is. | +Engine Reliability | +Dependability |
| Weight | This is how much effect the engine layout has on the weight of the engine. The higher this number is, the heavier the engine will be. | -Weight | -Weight |
| Design | This is how difficult it is to design the engine layout. Higher values here will increase the engine design difficulty | -Design | -Design |
| Manufacturing | This is how difficult it is to manufacture the engine layout. The higher this is, the harder it will be to manufacture, thus reducing the number of units you can produce per turn. | -Manufacturing | -Manufacturing |
| Finish | This is how much of an effect on development the engine layout has on the engine. The higher this is, the longer it will take to develop the engine. | -Finish Time | None |
| Width | This defines the width multiplier for the engine layout. The higher this number is the wider the finished engine will be. | -Width, +Bore/Stroke | None |
| Length | This defines the length multiplier for the engine layout. The higher this number is the long the finished engine will be. | -Length, +Bore/Stroke | None |
| Smoothness | This is the engine layouts effect on engine smoothness/comfort. The higher this value is the less vibration the engine will have. | +Engine Smoothness | +Luxury, +Buyers In Wealthier Classes |
| Skill Req | This is the minimum amount of Engine Design skills points needed to unlock the engine layout. This value will automatically decrease over time after the “start” year has been hit. | -Unlock Skill Points | No Effect On Vehicles. |
| Fuel | This is the engine layout's effect on fuel consumption. The higher it is, the better the fuel consumption | +Fuel Economy | +Fuel Economy |
| Power | This is the layout's effect on engine power | +Power Rating,+Torque | +Power Rating |
| AI Pop | This is the base percentage of how likely the AI is to use this item if no AI components Popularity file is present. | No Effect on Engine | No Effect on Vehicle |
| Use Displacement | Checking this box will make the engine use volume (displacement) figures based off bore and stroke (or just bore in case of “Turbined” engines. For something like an electric engine, you would uncheck this box so that the game will not use bore/stroke and volume calculations. | No Effect On Engine | No Effect On Vehicle. |
| Valve Group | This assigns the type of valves that work with the engine layout. When creating valve sub components, you will be able to assign them to a group. Only one group can be applied to an engine layout and only one group can be applied to valves. As such you may have to make duplicate valves to attach them to multiple groups. | Restricts which valves works with the engine | No effect on vehicle. |
| Layout Arrangement | This represents how many “banks” of cylinders the layout has. This effects the engine length of cylindered engines. A Value of -1 means that the engine has no “Banks” and the cylinders all come off a fixed point, generally in a circle such as a rotary or radial engine. A value of 0 is the standard 2 bank engine. Any other value (1,2,3,4, etc) represents how many banks the engine has. | Length and Width of Engine | No Effect on Vehicles |
| Restriction Localized | This toggles whether the names of the restricted cylinders/fuel types/induction systems are in the Localization files or in the Components file. | No Effect | No Effect |
| Turbined | This sets the game to a spinning, cylinderless engine type. Such as a Wankel or a Jet Turbine engine. | Removes stroke data from Engine Designer | No effect |
Cylinders
Cylinders are the components that transfers the force of combustion to the crankshaft allowing the engine to generate work. We'll try to describe to you the effects of each variable in the following table, however, extremely detailed data will have to wait until we write the “In-depth” wiki pages. When those pages are implemented, we'll link you there.
| Name | Description | Engine Effect | Vehicle Effect |
|---|---|---|---|
| Power | This has a direct effect on the torque produced by this engine. | +Torque, +Power | +Power, +Performance |
| Fuel | This effects the fuel consumption, the higher this value is, the better the fuel consumption will be | +Fuel Economy | +Fuel Economy |
| Reliability | This effects the reliability of the engine, the higher this value is the more reliable the engine is. | +Reliability | +Dependability, +Quality |
| Weight | This effects the weight of the engine. The higher the value the heavier the engine will be. | -Weight | -Weight |
| Design | This is how difficult it is to design the cylinders. Higher values here will increase the engine design difficulty | -Design | -Design |
| Design Costs | This is how much the cylinder selection effects the design costs, the higher this number is the more expensive it will be to design. | -Design Costs | -Design Costs |
| Manufacturing | This is how difficult it is to manufacture the cylinders. The higher this is, the harder it will be to manufacture, thus reducing the number of units you can produce per turn. | -Manufacturing | -Manufacturing |
| Unit Costs | This effects the costs of the engine based on the cylinder selection. Higher this number is the more expensive the engine will be. | -Costs | -Costs |
| Finish | This is how much of an effect on development the cylinder has on the engine. The higher this is, the longer it will take to develop the engine. | -Finish Time | None |
| Cylinders | This is the actual number of cylinders the cylinder type has. This effects various spec calculations. If this is a cylinderless type, put the equivalent cylinder value here. | +Power, -Fuel Economy | +Power -Fuel Economy |
| Smoothness | This is how smooth the cylinder selection is. Generally the more cylinders the engine has the smoother it is. Thus higher values should be here for cylinder types with many cylinders | +Reliability, +Smoothness | +Luxury, +Buyers Rating |
| Skill Req | This is the minimum amount of Engine Design skills points needed to unlock the cylinder. This value will automatically decrease over time after the “start” year has been hit. | -Unlock Skill Points | No Effect On Vehicles. |
| AI Pop | This is the base percentage of how likely the AI is to use this item if no AI components Popularity file is present. | No Effect on Engine | No Effect on Vehicle |
Fuel
Fuel is the source of the energy that is used by the engine to create combustion. The type of fuel used effects the way the engine performs. We'll try to describe to you the effects of each variable, however, extremely detailed data will have to wait until we write the “In-depth” wiki pages. When those pages are implemented, we'll link you there.
| Name | Description | Engine Effect | Vehicle Effect |
|---|---|---|---|
| Power | This has a direct effect on the torque produced by this engine. | +Torque, +Power | +Power, +Performance |
| Fuel | This effects the fuel consumption, the higher this value is, the better the fuel consumption will be | +Fuel Economy | +Fuel Economy |
| Reliability | This effects the reliability of the engine, the higher this value is the more reliable the engine is. | +Reliability | +Dependability, +Quality |
| Weight | This effects the weight of the engine. The higher the value the heavier the engine will be. | -Weight | -Weight |
| Finish | This is how much of an effect this fuel type will have on finishing the design of the engine. The higher this is, the longer it will take to develop the engine. | -Finish Time | None |
| RPM | This is the effect of the fuel type on engine revolutions per minute. Some fuel types such as diesel have a lower burning point which typically leads to lower RPM engines. Where as a fuel type such as electric would have an extremely high RPM value. | +RPM | +Performance |
| Smoothness | This is the effect of the fuel type on engine smoothness. Typically lower burning fuels are more violent in their explosions, thus causing increased vibration. The higher this value, the more smooth the engine will be. | +Reliability, +Smoothness | +Luxury, +Buyers Rating |
| Design | This is how difficult it is to design using this fuel type. Higher values here will increase the engine design difficulty | -Design | -Design |
| Design Costs | This is how much the fuel type effects the design costs, the higher this number is the more expensive it will be to design. | -Design Costs | -Design Costs |
| Manufacturing | This is how difficult it is to manufacture engines with this fuel type. The higher this is, the harder it will be to manufacture, thus reducing the number of units you can produce per turn. | -Manufacturing | -Manufacturing |
| Costs | This effects the costs of the engine based on the use of this fuel type. Higher this number is the more expensive the engine will be. | -Costs | -Costs |
| Skill Req | This is the minimum amount of Engine Design skills points needed to unlock the fuel type. This value will automatically decrease over time after the “start” year has been hit. | -Unlock Skill Points | No Effect On Vehicles. |
| AI Pop | This is the base percentage of how likely the AI is to use this item if no AI components Popularity file is present. | No Effect on Engine | No Effect on Vehicle |
Valves
Valves are the gateways that allow air in and exhaust out of the combustion chamber of an internal combustion engine. As such they play an important role in fuel consumption, performance, and smoothness of the engine. Some engine types, such as electric, do not have a valvetrain, but for the sake of calculations they must have an entry in the valve list. The following table gives you a basic overview of the variables effect. Please see the In Depth formulas for more details.
| Name | Description | Engine Effect | Vehicle Effect |
|---|---|---|---|
| Fuel | Effects the fuel economy of the engine. The higher the values, the better the fuel economy will be. | +MPG, +Fuel Rating | +Fuel Rating |
| Reliability | Effects the reliability of the engine. The higher the value, the more dependable the engine will be. | +Reliability | +Dependability, +Quality |
| Weight | This effects the weight of the engine. The higher the value the heavier the engine will be. | -Weight | -Weight |
| Finish | This is how much of an effect this valve type will have on finishing the design of the engine. The higher this is, the longer it will take to develop the engine. | -Finish Time | None |
| RPM | This is the effect of the valvetrain has on the engine revolutions per minute. In many cases, the higher the RPMs, the more horsepower the engine will have | +RPM, +HP | +Performance |
| Smoothness | This is the effect of the valve type has on engine smoothness. The higher this value, the more smooth the engine will be. | +Reliability, +Smoothness | +Luxury, +Buyers Rating |
| Size | This effects the width and length of the engine. The higher the value, the more room the valve train will need, thus the larger the engine will be. | -Width, -Length | None |
| Power | This effects the engine torque. As a result it also effects the engine horsepower. | +Torque, +HP,+Power Rating | +Power Rating |
| Design | This is how difficult it is to design using this valve type. Higher values here will increase the engine design difficulty. | -Design | -Design |
| Design Costs | This is how much the valve type effects the design costs, the higher this number is the more expensive it will be to design. | -Design Costs | -Design Costs |
| Manufacturing | This is how difficult it is to manufacture engines with this valve type. The higher this is, the harder it will be to manufacture, thus reducing the number of units you can produce per turn. | -Manufacturing | -Manufacturing |
| Costs | This effects the costs of the engine based on the use of this valve type. Higher this number is the more expensive the engine will be. | -Costs | -Costs |
| Skill Req | This is the minimum amount of Engine Design skills points needed to unlock the valve type. This value will automatically decrease over time after the “start” year has been hit. | -Unlock Skill Points | No Effect On Vehicles. |
| AI Popularity | This is the base percentage of how likely the AI is to use this item if no AI components Popularity file is present. | No Effect on Engine | No Effect on Vehicle |
Induction
The Induction system is the method in which air is introduced into the combustion chamber of Internal combustion engines. In most cases, the induction system will force more air into the chamber than normal atmospheric conditions would allow. As such they play an important role in fuel consumption and performance of the engine. Some engine types, such as electric, do not have a induction system, but for the sake of calculations they must have an entry in the induction list. The following table gives you a basic overview of the variables effect. Please see the In Depth formulas for more details.
| Name | Description | Engine Effect | Vehicle Effect |
|---|---|---|---|
| Power | This effects the engine torque by forcing more air into the combustion chamber. As a result it also effects the engine horsepower. The higher the values, the more power you will have. | +Torque, +HP,+Power Rating | +Power Rating |
| Fuel | This effects the fuel economy of the engine based on the selection of an induction system. The induction system it self does not improve the fuel economy, but allows for engineers to make adjustments on how fuel is delivered to the system to improve the fuel economy. As such if you wish for the engineers to improve fuel consumption when using a turbo, rather than just making the engine more powerful, increase this value. | +MPG, +Fuel Rating | +Fuel Rating |
| Reliability | Effects the reliability of the engine. The higher the value, the more dependable the engine will be. | +Reliability | +Dependability, +Quality |
| Weight | This effects the weight of the engine. The higher the value the heavier the engine will be. | -Weight | -Weight |
| Design | This is how difficult it is to design using this induction system. Higher values here will increase the engine design difficulty. | -Design | -Design |
| Design Costs | This is how much the induction system effects the design costs, the higher this number is the more expensive it will be to design. | -Design Costs | -Design Costs |
| Manufacturing | This is how difficult it is to manufacture engines with this induction system. The higher this is, the harder it will be to manufacture, thus reducing the number of units you can produce per turn. | -Manufacturing | -Manufacturing |
| Costs | This effects the costs of the engine based on the use of this induction system. Higher this number is the more expensive the engine will be. | -Costs | -Costs |
| Skill Req | This is the minimum amount of Engine Design skills points needed to unlock the induction system. This value will automatically decrease over time after the “start” year has been hit. | -Unlock Skill Points | No Effect On Vehicles. |
| AI Popularity | This is the base percentage of how likely the AI is to use this item if no AI components Popularity file is present. | No Effect on Engine | No Effect on Vehicle |
Gearbox
The gearbox is the component which transfers and amplifies the power of the engine to the wheels. (There are a couple more parts between the wheel and gearbox of course.) The following table gives you a basic overview of the variables effect. Please see the In Depth formulas for more details.
| Name | Description | Gearbox Effect | Vehicle Effect |
|---|---|---|---|
| Fuel | This is the effect of the gearbox on engine fuel economy. Effective shifting can improve vehicle fuel economy. Thus the higher the value, the better the fuel economy. | -Manufacturing Req, -Design Req, +Fuel Rating | +MPG, +Fuel Rating |
| Performance | This is the performance characteristics of the gearbox system. The higher the value, the more effect the gearbox will have on vehicle performance. | -Manufacturing Req, -Design Req, +Performance | +Acceleration, +Torque, +Performance, +Power |
| Comfort | This effects how easy it is to shift gears. The higher the value, the less effort is required by the driver. | -Manufacturing Req, -Design Req, +Comfort | +Luxury, +Consumer Buyer Rate |
| Smooth | This effects the smoothness of shifting, making it easier for the driver to shift gears and makes it shifting faster and more efficient, thus slightly improving performance. | -Manufacturing Req, -Design Req, +Performance, +Comfort | +Performance, +Luxury, +Consumer Buyer Rate |
| Design | This is how difficult it is to design using this gearbox. Higher values here will increase the gearbox design difficulty. | -Design | -Design |
| Design Costs | This is how much the gearbox type effects the design costs, the higher this number is the more expensive it will be to design. | -Design Costs | -Design Costs |
| Costs | This effects the costs of the gearbox based on the use of this gearbox type. Higher this number is the more expensive the gearbox will be. | -Costs | -Costs |
| Complexity | This is how difficult it is to manufacture gearboxes with this gearbox type. The higher this is, the harder it will be to manufacture, thus reducing the number of units you can produce per turn. | -Manufacturing | -Manufacturing |
| Weight | This effects the weight of the gearbox. The higher the value the heavier the gearbox will be. | -Weight | -Weight |
| Skill Req | This is the minimum amount of Gearbox Design skills points needed to unlock the gearbox type. This value will automatically decrease over time after the “start” year has been hit. | -Unlock Skill Points | No Effect On Vehicles. |
| AI Popularity | This is the base percentage of how likely the AI is to use this item if no AI components Popularity file is present. | No Effect on Gearbox | No Effect on Vehicle |
Gears
The number of gears allows for different ratios that can be used for various purposes. The more gears you have, the broader range of benefits your engineers can get out of the gearbox by using a larger array of ratios. The following table gives you a basic overview of the variables effect. Please see the In Depth formulas for more details.
| Name | Description | Gearbox Effect | Vehicle Effect |
|---|---|---|---|
| Gears | This is the number of gears. The more gears, the different the ratios that can used in the gearbox. This improve fuel economy, acceleration, and performance. | -Manufacturing Reqs, -Design Reqs, +Fuel Rating, +Performance Rating | +MPG, +Fuel Rating, +Acceleration, +Top Speed, +Performance |
| Skill Req | This is the minimum amount of Gearbox Design skills points needed to unlock the gear type. This value will automatically decrease over time after the “start” year has been hit. | -Unlock Skill Points | No Effect On Vehicles. |
| AI Popularity | This is the base percentage of how likely the AI is to use this item if no AI components Popularity file is present. | No Effect on Gearbox | No Effect on Vehicle |
Car Types
The variables for car types effect the importance of of the specific ratings for generic buyers of that vehicle type. As well effects several specs, AI decisions, and sales figures of the vehicles. In the following list, we'll give you a generic overview of what each variable does. However you should look at the in-depth explanation when the documentation for that is written.
| Name | Description |
|---|---|
| Performance | This effects the importance of the performance rating for consumers purchasing this vehicle type. It also influences the AI's design decisions. |
| Driveability | This effects the importance of the Driveability rating for consumers purchasing this vehicle type. It also influences the AI's design decisions. |
| Luxury | This effects the importance of the Luxury rating for consumers purchasing this vehicle type. It also influences the AI's design decisions. |
| Safety | This effects the importance of the Safety rating for consumers purchasing this vehicle type. It also influences the AI's design decisions. |
| Fuel | This effects the importance of the Fuel rating for consumers purchasing this vehicle type. It also influences the AI's design decisions. |
| Power | This effects the importance of the Power rating for consumers purchasing this vehicle type. It also influences the AI's design decisions. |
| Cargo | This effects the importance of the Cargo rating for consumers purchasing this vehicle type. It also influences the AI's design decisions. |
| Dependability | This effects the importance of the Dependability rating for consumers purchasing this vehicle type. It also influences the AI's design decisions. |
| NA Pop | This is the popularity of the vehicle type in North America or Map Region #1. The higher this rating is, the more potential customers the vehicle type will have. |
| EU Pop | This is the popularity of the vehicle type in European or Map Region #2. The higher this rating is, the more potential customers the vehicle type will have. |
| SA Pop | This is the popularity of the vehicle type in South America or Map Region #3. The higher this rating is, the more potential customers the vehicle type will have. |
| AF Pop | This is the popularity of the vehicle type in African or Map Region #4. The higher this rating is, the more potential customers the vehicle type will have. |
| AS Pop | This is the popularity of the vehicle type in Asia or Map Region #5. The higher this rating is, the more potential customers the vehicle type will have. |
| AU Pop | This is the popularity of the vehicle type in Australia or Map Region #6. The higher this rating is, the more potential customers the vehicle type will have. |
| Overall Pop | This is the overall popularity of the vehicle type in the game world. The higher this rating is, the more potential customers the vehicle type will have. |
| Military Fleet | Checking this box will allow militaries to contract this vehicle type. If it is unchecked, then this vehicle type will not be contracted by militaries. |
| Wealth Demo | This is the target wealth demographic. The higher the numbers, the more wealthy the demographic is. The wealth demographic effects the willingness customers are to spend more money on this vehicle type. Their expectations for luxury, quality, and smoothness. Model Markup, AI Design decisions, and many more things. |
| Age Demo | This effects the target age demographic for the vehicle type. This changes the consumer prospective of the vehicle type. Vehicles types with younger age demographics will put more emphasis on fuel economy, costs, and dependability. Middle aged demographics emphasis on cargo, performance, and safety. Upper age demographics emphases luxury, dependability, quality, etc. |
| Civilian Fleet | Checking this box will allow civilian fleets to contract this vehicle type. If it is unchecked, then this vehicle type will not be contracted by civilian fleets. |
| Cargo Space | This value adjusts the cargo space calculation modifiers. This is used to increase or decrease the cargo space of a vehicle. This works as a modifier to the physical dimensions of the vehicle. |
| Passengers | This is the generic amount of passengers for the vehicle type. If the information is not available in the car model's info, it will use this number instead. |
| Civilian | Checking this box will allow consumers to purchase this vehicle type. If it is unchecked, then this vehicle type will not be purchased by consumers. |
Examples
Videos coming eventually…
Troubleshooting
My Changes Are Not In Game!
Changes require you to start a new save game. As the Components.xml data is stored in the save game. Also if creating a mod, be sure that you have the mod selected.
Game Crashes!
If the game crashes when opening a component designer, when selecting a car body, when viewing an accessory type, or when trying to use an accessory, then you are most likely missing artwork, or did not properly zip and package your artwork correctly. Check the log files for the missing artwork, and file locations for the proper location to put these files.


