
This is an old revision of the document!
Table of Contents
プレイヤーロゴエディター
プレイヤーロゴエディターでは、自分のロゴをゲームに追加することができます。これらのロゴは、ゲーム開始時やマーク作成時に使用することができます。
すべてのロゴファイルは256×128の解像度で、DTX1、DTX5、またはA8R8G8B8圧縮を使用したDDS形式でなければなりません。DDS作成の詳細については、DDSの作成方法を参照してください。

MODツール
プレイヤーロゴエディターにアクセスするには、MODツールを開く必要があります。MODツールへのアクセス方法が分からない場合は、MODツールの開き方を参照してください。
プレイヤーロゴエディターは、MODツールのメインメニューの右側にあります。以下の画像の丸で囲ったボタン、「プレイヤーロゴエディター」をクリックしてください。
ファイルと仕組み
ロゴ情報はPlayerLogos.xmlというXMLファイルに保存されます。このXMLファイルはMODファイルによって上書きすることができます。MODファイルがXMLファイルを上書きしない場合、またはデフォルトのゲームファイルが使用されている場合、ゲームのデフォルトのmedia/scriptsフォルダにあるファイルが使用されます。を参照してください: ファイルの場所については、ファイルの場所を参照してください。
PlayerLogos.xmlファイルの各エントリには、固有の名前とDDSファイルのファイル名が必要です。
ゲームはzipファイルからDDSファイルを読み込みます。しかし、プレイヤーロゴエディター(およびすべてのMODツール)はzipファイルからDDSファイルを読み込むことができません。そのため、プレイヤーロゴエディターが読み込めるように、必要なロゴをすべてフォルダに入れる必要があります。その後、ゲーム内でロゴを使用する準備ができたら、すべてのロゴのDDSファイルをMOD用のMiscellaneous Artwork zipか、MODを作成していない場合はゲーム用のデフォルトLogosフォルダ内のLogos.zipファイルに直接入れる必要があります。
ご注意ください、フォルダ全体をzipファイルに入れないでください。個々のファイルを1つのzipファイルに入れてください。ゲームは.zipファイルの中にあるフォルダの中を読むことができません。
エディター
エディターはリスト、ボタン、テキストボックスで構成されています。それぞれの機能を説明しましょう。

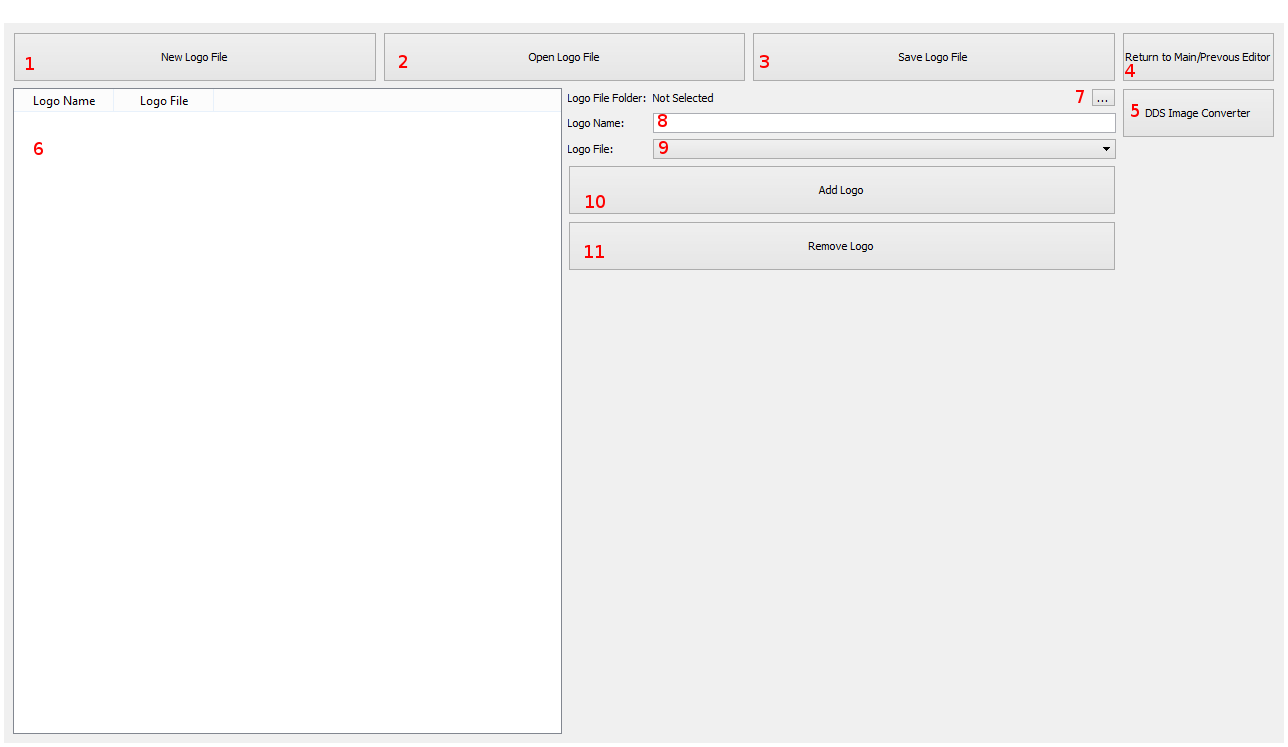
- 新しいプレイヤーロゴリストを作成します。IE は、入力またはロードしたすべてのデータをクリアします。
- デフォルトファイルまたはMODファイルから、既存のプレーヤーロゴリストを開きます。ただし、ロゴ画像の入ったフォルダを選択する必要があります。
- #6リストの情報をPlayerLogo.xmlファイルに保存します。
- 前のエディターまたはメインメニューに戻ります。
- Opens Aorta, the DDS Converter Program (Windows and OSX).
- This is a list of the existing logos saved in the Editor, whether you opened them from a file or created them from scratch. Please note, this does necessarily mean they're saved to disc, you must use #3 to save to disc. Selecting an item in this list will automatically fill the content on the right with its data.
- This is where you'll select a folder which contains all the DDS images of the logos you wish to add or edit in the game/mod.
- This is the name of the logo. This will appear in the game from the drop down lists where you select the logos.
- This is file name of the logo you are adding. The drop down box is filled with the files located in the selected logo files folder in #7.
- This adds the logo information on the right to the list on the left.
- This removes the selected logo on the left from the list.
Walkthroughs
There are two ways to implement your own logos. The most straight forward way is to edit the core game files. Do not do this if you plan to distribute your changes. Any updates to the game will erase your changes.
The other way is through the mod file system. This is a little more work, but it allows you to easily share the files and it won't be erased with any updates to the game.
Editing Core Files
Only edit core game files if you do not intend to distribute them. Updates to the game may erase any changes to these files, and errors may cause the game to not work. If you break your install, please verify your game cache, or reinstall the files (remember to back up before editing), or reinstall the game.
- Open the Mod Tools and Player Logo Editor
- Click “Open Logo File”, navigate to the media/scripts folder. In Windows and Linux this is typically back one folder (..) then media/scripts. In OSX it would be back one folder (..) then Resources/Media/scripts. See File Locations for more information on locations.
- Open the PlayerLogos.xml file.
- Open the /media/Logos folder in your file browser. See File Locations on how to get there.
- Extract the contents of Logos.zip into this or another folder.
- Add the new DDS files to the same folder
- Next click the Logo File Folder selector “…” button. ( #7 in the picture).
- Navigate to the folder with your logo DDS files, and select that folder.
Adding New Logos
- Write the name of the logo as you wish it to appear in the game in ( #8 in the picture).
- Select the logo file you wish to use (#9 in the picture). If no logo files appear, then you did not select a folder with DDS files in it on step #5 or #7 under Editing Core Files. If the specific file you want is not there, then you did not do step #6 under Editing Core Files.
- Finally click Add Logo (#10 in the picture) to add the logo to the list.
Removing Logos
- Click the logo on the left from the list (#6 in the picture).
- Click Remove Logo (#11 in the picture).
Saving Changes
- Click Save Logo File (#3 in the picture).
- Save over top of the PlayerLogos.xml you in step #2 and #3 under Editing Core Files.
- Navigate your file explorer to your /media/logos folder as you did in step #4 under Editing Core Files.
- Add all the files back into Logos.zip. Or create a new Logos.zip and overwrite the previous one. Please note, some files from Logos.zip are required, so include all files from the old Logos.zip otherwise the game will crash. Also Note, do not include any folders. The game is unable to read folders inside of zip files. Please just place the files themselves into the zip file.
As a Mod File
Editing the Player Logo List as a mod file is a little more involved, however it does allow you to distribute the resulting files and protects you from having your work overwritten by a game update.
If you wish to use the default PlayerLogos.xml as a base, the directions for opening, adding, and removing logos is the same as Editing Core Files. If you wish to open a PlayerLogos.xml from an existing mod, you would follow the same directions for in Editing Core Files for opening, adding, and removing, except you would open the mod_MODNAME_PlayerLogos.xml from the /media/mods/MODNAME/scripts/ folder. Instead of the PlayerLogos.xml file found in the /media/scripts/ folder.
If you wish to create a PlayerLogos.xml file from scratch, you would just create it.
Saving PlayerLogos.xml Mod File
Modifying an Existing Mod
- Overwrite the mod_MODNAME_PlayerLogos.xml in the /media/mods/MODNAME/scripts/ folder.
- Add the new .DDS files to either mod_MODNAME_MiscArtwork.zip, mod_MODNAME_ComponentImages.zip, or mod_MODNAME_VehicleArtwork.zip. The default zip file ismod_MODNAME_MiscArtwork.zip, if it exists. If none of these zip files exist in the mod, you will have to modify the mod by using the Mod Data Editor.
Creating A New Mod
If you are creating a new mod, then you just need to save the PlayerLogos.xml into a location you remember, and add all the new artwork into one zip (including any other artwork you may need from other editors).
You will then select these items when using the Mod Data Editor.
When you export the finished mod, all files that you checked off in the Mod Data Editor will be moved to the exported folder and properly renamed.
Trouble Shooting
After editing the PlayerLogo.xml files, if something breaks:
Game Crashes On Start
Most likely you overwrote the core Logos.zip file and forgot to include the core DDS files used in the game. Files such as VentLogo.dds and GearCityMainLogo.dds are required. Check your Log Files to see which file is missing and add it to the .zip.
Game Crashes When I Select A Logo
Most likely that specific logo filename is incorrect or missing. First Check your Log Files to see which file it says is missing. Next check your zip file containing the logos to see if it is there. If it is not, add it. If the name of the file is wrong in the log file, then it is named wrong in your PlayerLogos.xml file.
None of the Logos I made Are There
If you saved them to a Mod File, then be sure you've Loaded the Mod.
If you're trying to alter the core files, be sure that you overwrote the PlayerLogos.xml file in the script folder. It must be named exactly the same, everything is case sensitive.