
Table of Contents
Office
The Office is the main hub of the game. You access every other room in the game from here. It also contains much of the information you need to run your company. And some limited versions of features that exist in other rooms for quick access.
Top Bar
The top bar contains buttons to open every parent window in the Office. It also has the Help button. See Office Top Bar for more details.
End Turn

You will use the End Turn window to end the turn. This system allows you to run through multiple turns without stopping by setting the number of turns you want to skip into the text box (#1). You may also use the buttons (#2). The game will go through each turn without stopping unless there is an Action Memo, or you receive a standard Memo that meets your pop-up priority requirement. See Memos for more details.
When you're ready to end the turn, click the “Yes” button (#3). If you click “No” (#4), the End Turn window will close.
If you have hotkey enabled, you can skip a turn anywhere in the game by hitting the “End” key on your keyboard.
When enabled, “View Did You Know in Office” checkbox (#5) will display the Did You Know text once the game finishes skipping your turns.
Reports
See the Reports page for a listing of reports and their location and use.
The reports system is a collection of information about your company which you'll find useful in your activities in the game.
By default, the reports system opens to a Monthly Summary after you end the turn. You can also access the reports system in every room from the game via the Top Bar. And in the case of the office, you can also click the paperwork on your desk. Or you can use a hot-key to jump to a specific report.
The Reports Window
This page does not cover individual reports and their use. See Reports for that information.
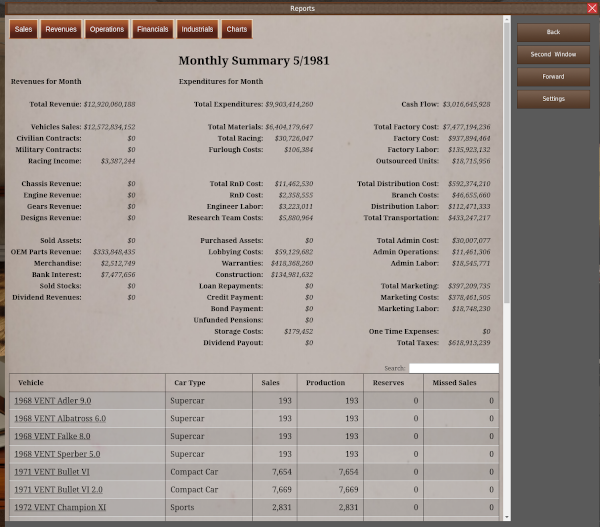
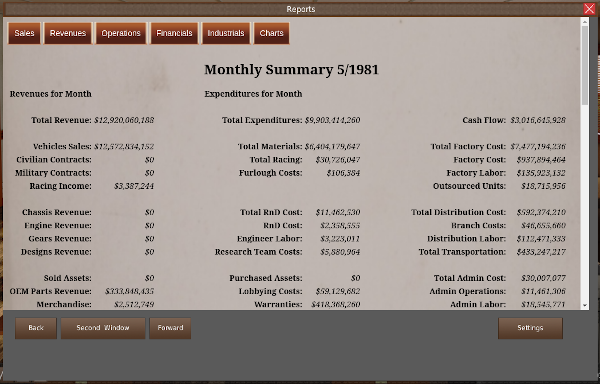
There are two types of Reports windows depending on the game's resolution. If your vertical pixels are greater than 1050, the game will use large windows. Otherwise, you get the small window. There is also an extra-large window for players running the game at greater than 2056 pixels high.
Please note, if you are running the game windowed, your window decoration and taskbar may cause the game window to be less than 1050 Pixels even if you have a 1080p monitor. By default, the Windows 10 taskbar takes up 40 pixels of space, which would cause the game to run at 1040p if you have it set to 1080p Windowed.

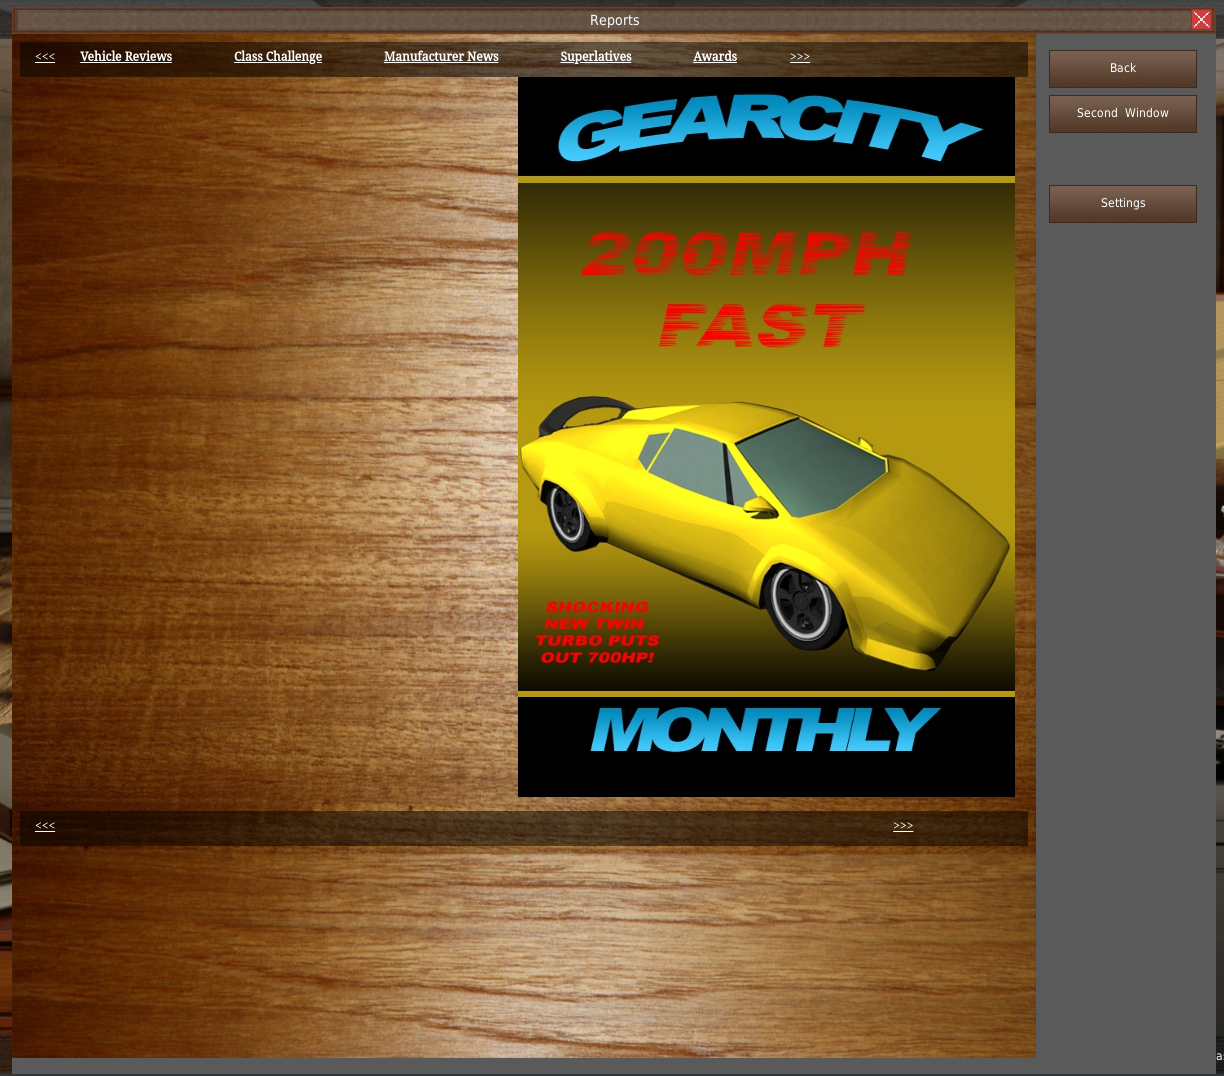
In the grey area of the window is the web browser's tools. While you can open the reports in other rooms, these tools are only available in the Office.
- Back ⇒ Takes you to the previous page you visited.
- Second Window ⇒ Opens a second reports window to your current page.
- Forward ⇒ If you hit the Back button, you can use the Forward button to undo it.
- Settings ⇒ This button opens the report generation settings. See Report Settings
At the top of the report is the Report Menu.

This menu is on every report in the game. And it contains a way to access all of the statically generated reports. It can not access any report that requires player input, such as the Wealth Demographics report.
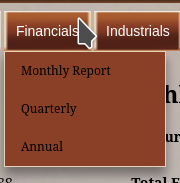
Hovering your mouse over one of the red buttons will open a menu with a list of reports. Click any report from the list to open them.
Reports Settings
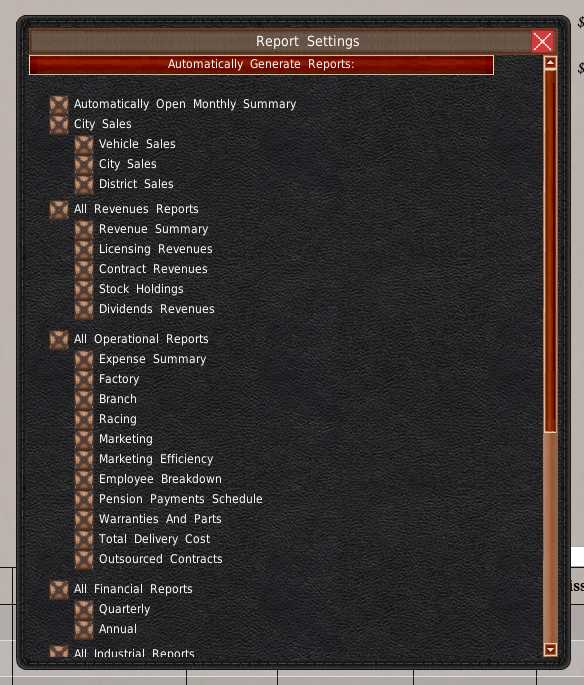 Reports require a significant portion of processing power when you end the turn. If you wish to speed up the game, you can disable the generation of reports you don't use. To do this, you use the Reports Settings window.
The window shows a list of checkboxes. Each of these checkboxes is either a group or a report.
The left-most checkboxes are groups. If you uncheck a group, all reports under that group are unchecked. The indented checkboxes are individual reports. Unchecking them will stop the game from generating them.
There are no “Save” or “Apply” buttons to click. The game will automatically apply any changes made in this window.
Memos
 Memos are the game's internal notification system. It contains both extremely important information and some mundane stuff. Because of this, the memo system comes with filters and a priority system.
You can access the Memo system by clicking the memos on the Top Bar or by clicking the organized papers on the shelf on the desk.
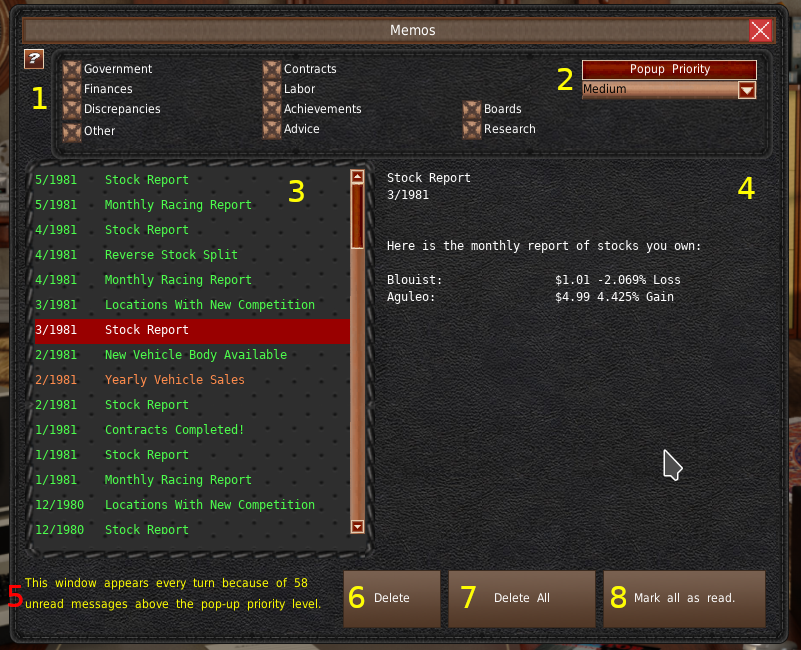
At the top of the memo system, is the memo filter (#1). These checkboxes filter the memos to display in the list (#3) only the categories checked.
To the right of the filters is the priority drop-down (#2). The priority system will stop multi-turn end turns and open the memo system automatically when you receive a memo of the same priority or higher. The order of priorities goes from None, which disables the priority system, all the way to Highest, which will only popup the Window if you receive a high priority message. Please note there are no “Apply” or “Save” buttons to change to the priority levels.
The list (#3) contains all the memos you have received, but only the 40 latest are visible in the list. Unread messages are color-coded based on their priority. Green messages are the lowest priority, orange medium, and red highest. Read messages are white.
Clicking on a Subject in the memo list will display that memo in the body section (#4).
The message located in the bottom left (#5) appears when you have more than one unread memo that meets your popup priority setting. If you see this message, the memo system will pop up every turn until you have read or deleted the memos triggering the popup.
To delete a memo, select it from the list and then click the “Delete” button (#6). If you want to delete all your memos, click the “Delete All” button (#7). Finally, clicking “Mark all as read.” (#8) will mark all memos as read. There is no undoing these actions.
Magazine

Like the reports window, the magazine comes in two sizes depending on the vertical resolution of the game.
If your vertical pixels are greater than 1050, the game will use large windows. Otherwise, you get the small window.
The smaller window is missing some irrelevant filler information, but it contains much of the same information as the larger window.

At the top of the magazine are navigation links. The arrow links (#1) flip the pages back and forward, respectively. You can also find these links at the bottom of the page.
- The “Vehicle Reviews” link takes you to the vehicle review page. This page has reviews of your most recently designed vehicles.
- “Class Challenge” is an article that tests several vehicles of the same type in multiple categories.
- “Manufacturer News” contains a list of design actions AI companies have taken recently.
- “Superlatives” lists the best and worst designs for several different things.
- The “Awards” shows last year's best vehicles by class, region, and overall.
The small magazine window limits magazine to a single page which only contains Vehicle Reviews, Superlatives, and the Awards.
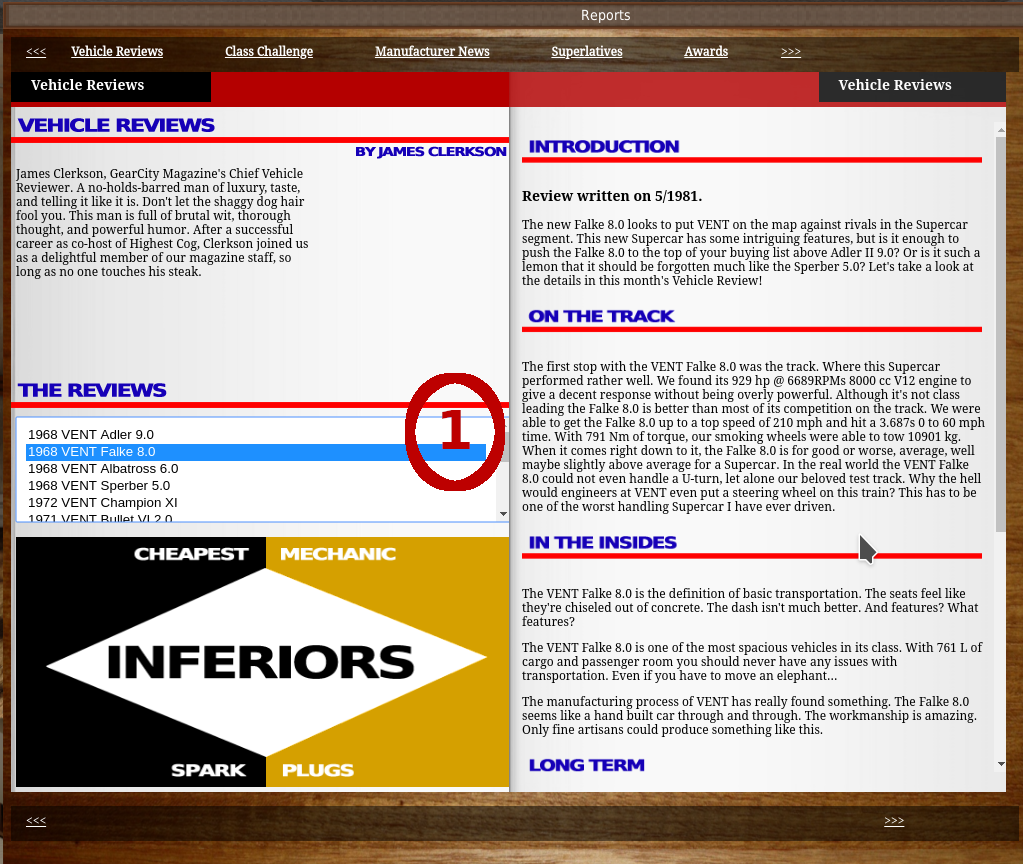 When reading the vehicle reviews from the magazine, you need to select which vehicle you want to view from the list on the page (#1).
Music And Sound
To adjust music and sound volumes or to select which song plays, you'll need to access the music window.
To access the music window, click the button in the Top Bar, or click the radio/music player in the Office.
 At the very top of the Music Player is the current song playing. Just below that and to the left are three checkboxes.
- The Random checkbox will play songs at random from the playlist.
- The Year Limit checkbox limits which songs the game plays based on the song's available years. You can find the years a song is available in the information panel (#7)
- The Continuous Play checkbox will loop the currently playing song over and over.
The Music Volume and Sound Effects Volume (#5) sliders are just below these checkboxes. You'll also find a mute button (#4) that disables sound for both sliders.
Below the volume sliders is a list of songs (#6). Selecting a song from this list will display its information in the Information panel (#7). In this panel, you can find the song name, the artist or composer, the years that the song is available in the game if “Year Limit” is enabled, and the music licensing.
Finally, to play a song you selected from the list, click the “Play” button (#8).
Newspaper

The newspaper contains historical and world event information. You can access the newspaper by clicking the button in the Top Bar or by clicking the newspaper at your desk.
The newspaper will glow if there is an important event. But anything that immediately affects you will also be a high-priority memo.
The newspaper is broken into three columns. The top of the left-most column (#1) will always contain the most important historical events.
Manufacturer events, such as building a new factory or founding a company, appear in the left and right columns (#1 and #3). These articles will appear below any historical events.
Filler articles, used to make the newspaper appear full, are in the middle column (#2). If there is little news, the filler articles will fill the left and right columns too.
At the top of the right column is a stock report (#4). This report displays the stock price of the biggest car companies in the game. You can find a complete breakdown of stock price changes in the stock report.
If you want to read older newspapers, click the “Previous Editions” button (#5). The game stores the last year's worth of newspapers.
Door Menu

To access RnD, Racing, or the Showroom, you'll need to use the Door menu. Click the door in the Office to open the menu. Then click on the button for which room you want to visit.
You may also use the buttons in the Top Bar or hotkeys to access these rooms.
Game Menu / In-Game Settings
There are additional settings options located inside the game. These are mainly specific to saving data and how the game should handle old data. Beyond that, the basic Game Menu features are also included in this window.
To access this window, click the file cabinets in the Office, the gear button in the Top Bar, or hit the escape key.
See Settings for more details about this window.
 The game menu portion of this window is on the left.
- The Return button closes the Game Menu.
- Saves the game to the current save name. The current save file is the name of the file you most recently saved. So using “Save As” changes the current save file to the file you “Saved As.” If no file was saved, then the current save game is the save file you loaded.
- “Save As” saves the game under a unique filename that you must supply. The current save name is now that save. After using “Save As,” anytime the game saves during this session, it will save over that filename.
- The Save GUI button will save the position and size of the in-game windows. See Adjusting and Saving Window Sizes
- This button returns you to the Main Menu of the game.
- The Return To OS button exits the game.
Side Panel
The side panel is available in every room of the game. And it is the same for each room. For the sake of brevity, this will be the only entry for the panel.
 On the right side of the screen is the Side Panel. If you place your mouse over the side, the panel will expand to show itself.
The panel consists of three lists and some buttons. The top list (#1) shows any components or vehicles you have in development and how long before you complete them.
The middle list (#2) displays any active factory construction and their time until completion.
And the bottom list (#3) contains your most recent activities.
The button at the bottom left (#4) opens up the notepad system, whereas the bottom right (#5) button opens the memo system. This button also displays how many unread memos you have.
Notepad
 Upon clicking the Notepad button, the side panel switches to the Notepad panel. In this panel, you can make notes for any purpose. They could remind you what you're doing the last time you played, or they can make them as guides with your naming scheme. Or you can even use them to remind yourself to buy some milk on your way home.
The list at the top (#1) is your saved notes. Selecting a from this list will load the note in the subject bar (#2) and body area (#3).
If you want to delete this note, click the “Delete” button (#4). This action will delete whatever entry you selected from the list. To edit the note, make the changes you want in the subject and body areas, and then click “Save” (#5).
If you want to make a new note, you must select “>Create New<” from the top of the list. After you fill out the subject and body of the note, click the save button.
Finally, to close the notepad and return to the side panel, click the “Close” (#6) button.
Mega Menu
The Mega Menu is a centralized spot to manage many of the frequently used parts of the game. This system is designed to save you time from visiting other rooms to perform common tasks. The Mega Menu does not contain advanced features, so you will have to visit the other rooms when you need to do those.
To access the mega menu, click the computer button from the top bar, or click the computer on the desk.
Task Menu

Use the Task Menu on the left side of the window to switch between Mega Menu panels. Each button corresponds to the panel named on the button. We will cover each entry a little later on this page.
Location Selection

At the very top of the Mega Menu is the Location Selector. The Factory, Branch, and Marketing panels require a selected location. So you will need to use these tools to change locations.
In the middle is the currently selected location (#3).
On the left side of this menu is the districting system. The two drop-down boxes (#1) allow you to select a district. See Districts for more information.
On the right side are two drop-downs (#4) containing every factory and branch location.
With all four of these drop-downs, selecting any of them will change the selected location.
Finally, there are two buttons (#2) in the center, labeled “<” and “>”. These buttons will cycle through your branch or factory locations depending on which panel you are on.
List Filters

These list filters appear in the Factory and Branch panels. They are used to reduce the number of entries in the lists.
The first dropdown (#1) can limit the entries in the list to a specific vehicle type. The game only displays vehicle types you have active designs for.
The middle dropdown (#2) allows you to limit the list to a specific marque you own.
And the final dropdown (#3) displays only trims and base models of specific vehicles. This filter is useful if you have many trims of a single model.
The lists are limited to 40 entries. If you have more than this number of models, you'll need to use the page flippers (#4) on the left and right of this section. In the middle, the game displays the current page number and the total number of pages.
Factory Mega Menu
The default panel for the Mega Menu, and the one you'll be using the most if you are manually managing production, is the Factory panel.
This panel is visible when Autoproduction is disabled. And you can access it by clicking the Factory button from the left side menu.
If Autoproduction is enabled, you'll see the Autoproduction Restrictions panel. We will cover that shortly.
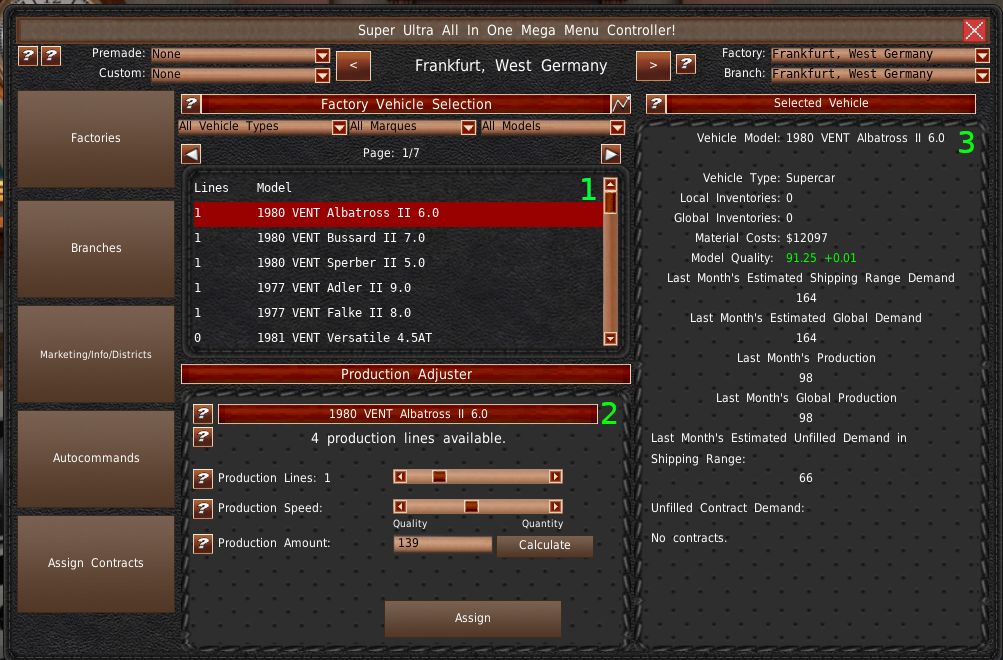
At the top of this panel is a list of your active vehicles (#1). Below that is where you adjust production (#2). And to the right side is production information for the selected vehicle.
Production List

The list of vehicles contains two columns. The first column is the number of production lines assigned to the vehicle (#1). The second column (#2) is the model name.
Production Adjustment Panel

Upon selecting a vehicle from the list, its production information will automatically load into the Production Adjustment panel.
The top of the panel displays the total number of available production lines at your selected location (#1).
The current number of production lines assign are automatically loaded when selecting a vehicle. You can adjust the number with the Production Lines slider (#2). The number of production lines you wish to assign is also here. As you move the slider, you will notice that the number at location #2 changes in the opposite direction as the number at the top (#1).
The Production Speed slider (#3) adjusts how fast your production lines produce vehicles. The faster you build them, the more you will build. But the worse quality they are.
The number of vehicles the game predicts you'll build is in the Production Amount textbox (#4). This textbox also serves a dual purpose, in that you can type the number of vehicles you want to build and click “Calculate” (#5). The game will then calculate the Production Line and Production Speed sliders for you.
Finally, to save any changes you make, click the “Assign” button. The game will not alter any production numbers until you do.
Production Vehicle Info
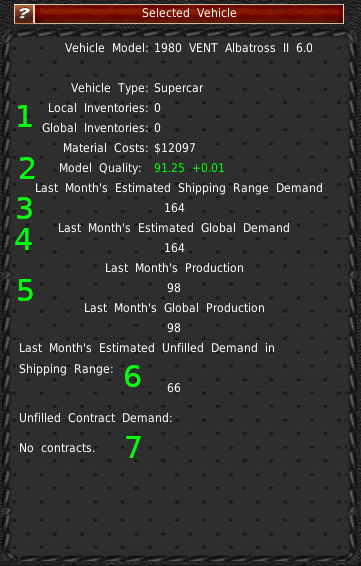
When you select a vehicle from the list, production information for that vehicle appears in the right-side panel.
Most of the information here is self-explanatory, so we will only touch on some of the information presented here.
- Local Inventories are the number of unsold vehicles of this model you have in reserve at this location. And Global Inventory is the number of units you have in reserve worldwide.
- Model Quality is the average build quality of the selected vehicle. This rating changes over time, based on the production speed. Higher quality production speed leads to an increase in the rating, whereas more quantity will decrease the rating. The game generates the base value from the initial vehicle design. For more detail on this, see the help buttons in RnD. The quality rating is an important factor in consumer purchasing decisions. By increasing the model quality, you should improve your sales over the competition.
- Last Month's Estimated Shipping Range Demand is an estimation of the number of units of this model branches are requesting from this factory and any other factories inside the branches' shipping radius. You can fill this demand with one factory or several. Nearby factories may also supply the same branches.
- Last Month's Estimated Global Demand is an estimation of the number of units branches requested worldwide. If the demand worldwide is not being met, and you have excess production capacity at this location, you may want to increase shipping ranges of branches that don't pull from this location. Please note the further you have the transport vehicles, the more expensive it will be.
- Last Month's Production is the number of units we produced of the selected vehicle at this factory. The Last Month's Global Production is the number of units you produced of this model worldwide.
- Last Month's Estimated Unfilled Demand in Shipping Range is the number of vehicles we could have sold but didn't because we did not produce enough units. Use this value as an estimate of the number of additional vehicles you need to fill all branch demand that pulls from this factory. Please note, if multiple factories are in this shipping range, they too can fill this order. Be careful not to overproduce!
- Contract Demand shows how many units contracts require from this vehicle each month.
Auto Production Mega Menu
If you have Autoproduction on, you'll find the Autoproduction panel instead of the Factory Production panel when clicking the Factory button in the Mega Menu.
The Autoproduction panel allows you to restrict the production to certain geographical locations, factories, or specific models.
By default, the Autoproduction system manages production and shipping globally. These restrictions allow you to somewhat shape production and shipping.
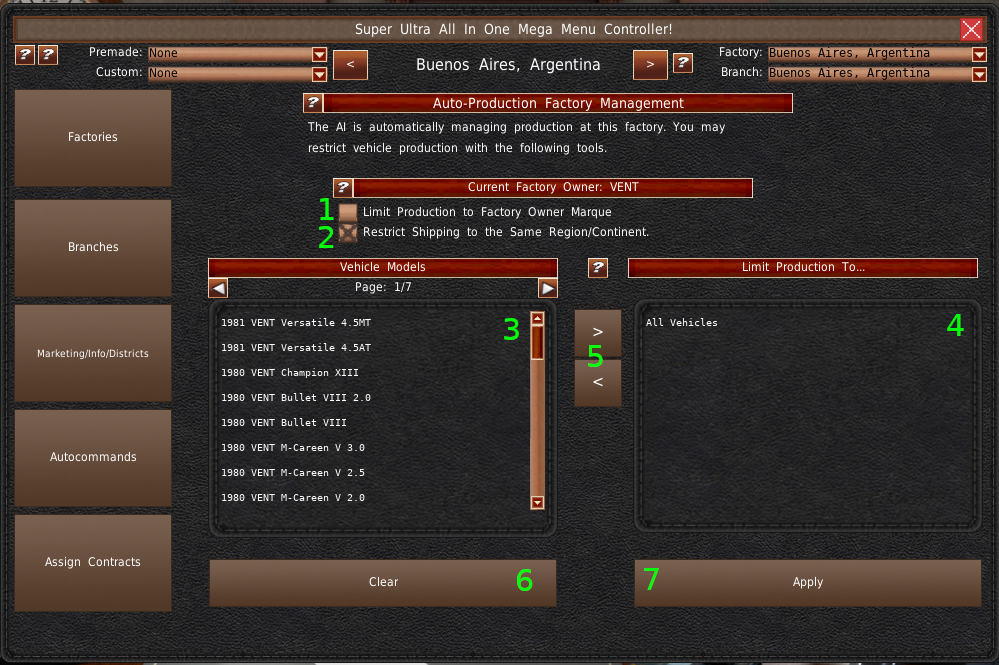
The checkbox labeled “Limit Production to Factory Owner Marque” (#1) will limit production at the selected factory to only vehicles models that share the same marque as the factory owner. You can see who owns the factory with the header just above this checkbox.
Below that checkbox is the “Restrict Shipping to the Same Region/Continent” checkbox (#2). This checkbox will limit production and shipping to the same Continent or Region, depending on the map you're using. For example, this means European factories will only produce and ship vehicles to European cities. A factory bordering Asia or Africa will not ship vehicles to those continents, even if the factory is closer to Asian cities than European cities.
Below the checkboxes are two lists (#3, #4) and some buttons (#5). This is the model restriction system. It allows you to tell the factory which models they can produce. The vehicles in the right list (#4) are the vehicles that the factory can build. If there are no models in this list, and it says “All Vehicles”, then the factory can build all vehicle models as needed.
To restrict a factory to build only a certain model, choose that model from the left list (#3). And then click the “>” button (#5). This action will put the vehicle model from the left list to the right list.
Upon doing that, this factory will only produce this vehicle. It will not produce any other model under any circumstance.
To remove a restricted vehicle, choose it from the right list. And then click the “<” button.
If you wish to reset your restrictions, click the “Clear” button (#6).
Finally, any changes you make on this panel, including the checkboxes, must be applied by clicking the “Apply” button (#7).
Branch Mega Menu
 The Branch Mega Menu, accessed via the “Branches” button, handles most of the features you'd find in the World Map's Branch Distribution window.
The list in the center (#1) is your active vehicle models and their sales price. The buttons and UI elements below that are the Price Change panel (#2). To the right is the selected vehicle information panel (#3), and at the very bottom is the location competition panel (#4).
Vehicle Price List

The Vehicle Price list displays the current sales price of the vehicle. If this price is $0, then the vehicle is not for sale. You will need to select a vehicle from this list to view its information, change the price, or alter the distribution information.
In the upper of the panel is the “Merge Trims” checkbox. If you have many trims, you can check this box, and the game will merge all the trims in the list into the base model. If you make price changes to the base model, it will change the price of the trims based on the percentage difference over material costs. For example, if your base model's material costs are $1,000 and you set the sale price to $1,500, then if your trim's material costs are $2,000, the game will automatically assign it a $3,000 sales price.
Price Change Panel

Upon selecting a vehicle from the list, the game loads its sales information for this location into the Price Change Panel. This panel allows you to make pricing and shipping distance changes.
The vehicle sales price is in the text box at the top of this panel (#1). It is in this box that you would change the price. Any changes require you to hit an Apply button to take effect (#4 or #5).
The graph button next to the Sales Price header (#2) is one of the most important reports in the game. It is the Wealth Demographics and Buyer Rating table. Use the information in this report to set your price.
Below the price textbox is the Shipping Distance system (#3). Use the slider to adjust how far you're willing to source vehicles from. The slider ranges from Local to Global. Local will only ship from the same city or territory of the branch. However, Globally allows for any factory in the world to ship the model to this branch.
The checkbox next to the Shipping Distance slider is the shipping distance lock. This lock prevents branch-wide or district shipping changes from affecting this model.
To save any price or distance changes, you'll need to click the Apply button (#4) or the “Apply To All” button (#5). The “Apply To All” button will save the changes to every branch you control in the game.
If you want to remove a vehicle from sale, you can click the “Remove” button (#6). Or you can set the price to $0 and hit “Apply.” If you want to remove the vehicle from sale at all locations, one way is to set the price to $0 and then click “Apply To All.”
The panel also allows you to clone another branch's prices by clicking the Clone Distribution button (#7). Upon clicking that button, the game presents you with a new window with a drop-down and a list. The drop-down contains your branches, and the list contains vehicles and their prices for the selected branch in the drop-down.
Selected Vehicle Information

When you select a vehicle, the game will pull up information specific to unit costs and the distribution of that model. Most attributes here are self-descriptive, so we will only cover some of the more important variables.
- The upper portion of the Information Panel contains the shipping information. The Shipping Distance is how far away you're willing to source this vehicle from a factory. Below that are the Shipping Locks. These indicate if you locked this vehicle to get vehicles only from a particular district.
- The Minimum Transportation Costs is the lowest amount it costs to ship one vehicle to this location. The maximum value is the maximum amount it will cost to ship a unit to this location. Several factors affect where branches source vehicles from. The location of inventory, the city ratings, and the number of units needed in other cities all impact which vehicles get shipped to this location. The game will automatically choose the cheapest options possible, depending on its shipping priorities.
- The Manufacturing Cost only factors in the costs to manufacture the selected vehicle and the material cost of that vehicle. It is the break-even point for manufacturing if you sold every unit manufactured this month. The Total Unit Cost is the break-even price for the selected vehicle's portion of your corporate expenses IF you sold every unit you produce this month. (Including other vehicle models.) This price only includes a portion of corporate overhead costs based on the number of units you have of this model compared to other vehicles.
- Estimated Units in Shipping Range is the number of vehicles within the shipping range of this branch that you have inventories of or you are producing.
- Project Profit is the profits or losses the selected vehicle has generated since its creation. This value includes all manufacturing, marketing, and branch costs, its share of research costs, and its share of fixed costs. The number excludes corporate overhead, racing, and other miscellaneous expenditures. It does not factor in additional research costs being offset by licensing or contracting of vehicles and components or any additional income generated by these ventures. But it does include units sold through the contracting system.
Selected Vehicle Competition

At the bottom of the window is the competition list. This lists all vehicle models of the same vehicle type in the selected city as your selected vehicle. The list displays the name of the model, the sales price, how many units were sold last month, the specific vehicle type rating, the overall rating, and the vehicle type. The game also highlights your vehicles in yellow for easy identification.
Marketing Mega Menu

The Marketing/Info/Districts button opens the Marketing and Location Information panel. This part of the Mega Menu allows you to manage your marketing budgets and view information about the selected mega menu location. The window is broken into two segments. On the left is the Marketing Budget panel (#1). And on the right is the City or District information panel (#2). We cover the Marketing Budget panel shortly. But for the City Information panel, you'll need to visit the World Map page
Marketing Budget Panel

See Marketing Gameplay Mechanics for information on how marketing works and the individual marketing types.
The marketing panel allows you to adjust the marketing budgets for the selected location without visiting the World Map.
At the top of the Marketing Budget panel are the different types of marketing and your current budget (#1) for the selected location.
The dropdown box (#2) below your budget totals is to select which marketing category you want to adjust the budget of. Each entry corresponds to the matching category name, except for “All Forms.” This entry changes the budget of every marketing category.
The budget adjustment slider is just below the dropdown (#3). This slider allows you to quickly change the budget within a minimum and maximum budget range. You will also find the monthly dollar budget in the textbox below (#4). Adjusting the slider will change the numbers here. Alternatively, you can enter the values you want here too. This budget is the monthly amount you will spend on the select category. If you have “All Forms” selected, the game will apply the slider's percentage to each marketing category.
To save the changes to your marketing budget, click the “Apply” button (#5). You can also apply the same changes to every location in the game using the “Apply To All” button (#6). Using this button will apply the slider's percentage to each city's budget for the selected marketing category.
Next are the locking checkboxes (#7). Every year the maximum marketing budget increases. If you check either of these boxes, the game will automatically increase the marketing budget based on the slider's percentage. The top box, “Lock City's Marketing Percentage,” will affect only the selected city. The lower box, “Lock All City's Marketing Percentage,” will affect every city in the game.
Finally, at the bottom of this panel is the “Clone Marketing” button (#8). This button allows you to clone another's city's marketing budget. You will still need to click “Apply” (#5) to save the changes.
Auto Commands Mega Menu

The Auto Commands panel contains many tools and options to manage your company with reduced micromanagement. Some of these options require manual input, and some enable automatic systems to manage parts of the game for you. As such, we break down the Auto Commands into two categories, Tools and Autos.
A list of tools buttons is on the right-hand side of the window (#2). Some of these tools require no player input. But some will require additional data from you. If a tool requires additional information, a panel will appear in the center of the window (#1). We cover each tool on the Auto Command Tools page.
At the bottom of the window are the Auto Assistance toggles and a few other optional settings (#3). Checking the checkboxes will enable the corresponding Auto system or option. We also cover each of these on the Auto Command Tools page.
Assign Contracts Mega Menu

The Assign Contracts button opens the Assign Contracts Mega Menu panel. This system lets you assign component contracts to factories, change which factories vehicle contracts source from, and terminate contracts.
A list of your contracts is on the left side (#1) of the window. You have not assigned red entries to a factory, or you're not producing enough units per month. If a list entry is green, then you are producing enough to fill all contract demands for that unit.
The contract fulfillment panel appears on the right with information about the selected contract (#2).
Component Contracts

When you select a component contract, the fulfillment panel will look like this. With component contracts, you must assign the unit to a factory from this panel.
At the top of the panel is production information about the component. There is also information about the total number of units you need for this contract. And how many you need for all contracts (#1).
To assign a component to production, you'll need to open the Manage Contract Components window. You do this by clicking the “Manage Contract Components” button (#2). We cover this window shortly.
After assigning a component to a factory, the factory location will appear in the center list (#3). If you wish to remove a component from production, select the factory from the list (#3) and click the “Remove Contracted Component From Factory” button (#4).
Finally, if you wish to terminate (end) a contract, click the “Terminate Contract” button (#5). Please note, some contracts have penalties associated with ending them prematurely.
Manage Contract Components

The Manage Contract Components window contains 3 panels and one button. In the upper left (#1) is a list of all contracts which use the same component of the contract you selected to open this window. If these entries are red, then you are not making enough units. If they're green, then you are making enough units to cover that contract.
Available factories are in the list below (#2). Any factory with open production lines should be listed here.
On the right side (#6) is information about the selected contract and factory. This panel lets you know how many factory lines are open, how many units the factory can make per production line, and how many units you need for the contract.
To assign a component to the selected factory, click the “Assign to Factory” button (#4). The contract list will update colors, letting you know if you need to assign more production lines.
Vehicle Contracts

When it comes to vehicle contracts, you manage production just as you would any other vehicle. The Fulfilment system instead lets you choose which location the contract should source vehicles from.
At the top of the panel is the number of vehicles needed for the contract. And how many vehicles you have in production and inventories (#1).
A list of factories producing this vehicle is in the middle (#2).
The drop-down (#3) allows you to change which factory the contract will receive vehicles from. If the factory does not have enough vehicles to fill the contract requirement, it will pull from other factories next.
To save sourcing changes, you need to click the “Apply” button (#4).
If you want to end the contract, click the “Terminate Contract” button (#5).
Phone Menu
 You access a few additional Office features via the phone menu. To open the phone menu, click the phone button from the top bar or click on the phone in the office.
The phone menu will appear with three buttons. These buttons open the corresponding systems to the names on the button. We will cover these systems in the next three sub-sections of the manual.
Human Resources
 Upon clicking the Human Resources button, you'll access the Human Resources system. This system is how you manage your employees and their compensation.
All the features in this system can be managed by the AI. And some parts of this window will not be visible if you have enabled the Auto systems or did not start the game with those features selected.
In the top left is a drop-down box you'll use to switch between your company's departments (#1). Below that is a list (#2) containing the locations of employees in that department. Some departments, such as engineering or administrative, do not have multiple locations listed.
On the top right, you'll find the Benefits panel (#3). If the benefits system is not enabled, you will see placeholder text instead. We cover the benefits system in detail on the Employee Benefits page. The top section of this panel displays how much benefits you'll owe over time. The percentage of benefits to wages, and a breakdown of your liabilities, fees, and pensions funds.
If you want to negotiate with the union to change your benefit payouts or fees, click the “Negotiate Benefits” button (#4).
If you do not have Auto-Hire or Auto-Wage enabled, you can manage the number of employees in the top section of the bottom right panel (#5). The slider ranges from no employees to full employment, and the text box allows you to enter a value manually.
Just below that are the average employee wages (#6). The top shows the current wage you pay. Below that is the baseline wage for this job. To change your employee's wage, use the text box to enter the amount you want to pay.
You will need to click the “Apply” button (#7) to save any changes you make to your headcount or wages.
At the bottom of the window are the Fill buttons (#8) and the Wages buttons {#9}. The Fill buttons will automatically fill the named department with the maximum number of employees. The wage buttons increase the wages of the named department to the standard/baseline wage.
Benefits System / Union Negotiations

If you have the Benefits game setting enabled, you'll need to negotiate benefits with unions at some point. To do that, you'll use the Union Negotiations window.
At the top of this window are buttons for each department (#1).
The top panel (#2) is for the selected department's Direct Benefits. Visit the Employee Benefits page for more information. At the top is the Total Monthly Benefits, which is the amount of money you're paying out each month across all departments. Below that is the amount you're paying each month to just this department, And finally, below that is the amount you're paying out as a percentage of employee wage.
To make changes to the Direct Benefits, use the slider on the left (#3). You'll see the changes to the percentage of wages and the monthly payouts on the right.
In the center panel is the Defined Benefits system, also known as a Pension (#4). Visit the Employee Benefits page for more information on how pensions work. But for a brief explanation, pensions are a retirement system in which employees earn future retirement payments. And on some occasions, employees can be made to pay into the fund used to make the retirement payments.
At the top of this panel (#4), you'll find information about your current pension liabilities, funds, payouts, and collections.
You can change the percentage of earnings an employee receives at retirement with the Benefits Payout slider (#5). You'll find the new rate to the right of the slider, along with an estimation of increased liabilities per year.
To adjust the amount of money employees contribute to the pension fund, look at the slider just below the payout rate (#6). You'll find the new rate of wages your employees have to pay each year to the right of the slider. This area also includes an estimation of yearly payments.
At the bottom left of the window is the Union approval section (#7). If the Union approves the deal, the text will say so, and it will be green. If they do not approve, the text is red. Just below the approval text is what the Union is expecting. Unions are willing to give a little room with their demands, especially if you are bribing lobbying them.
Anytime you make changes in this window, you'll need to click the “Apply Benefits” button (#8). If the Union approves, the game will save the new benefits.
At the very bottom of the window is the “Fund Pensions” button (#9). You will need to use this button if you want to put extra money into your pension fund.
Funding Pension

Upon clicking the “Fund Pensions” button, a new panel will appear on the bottom left of the window. Use this panel to submit cash into your pension fund.
The amount of cash you have appears at the top (#1), and the amount you are injecting is just below (#2). Use the slider to add more funds. When you are ready to submit, click the “Apply” button (#3). Otherwise, the “Cancel” button (#4) will close the panel and show the Union Approval text again.
Lobbyist
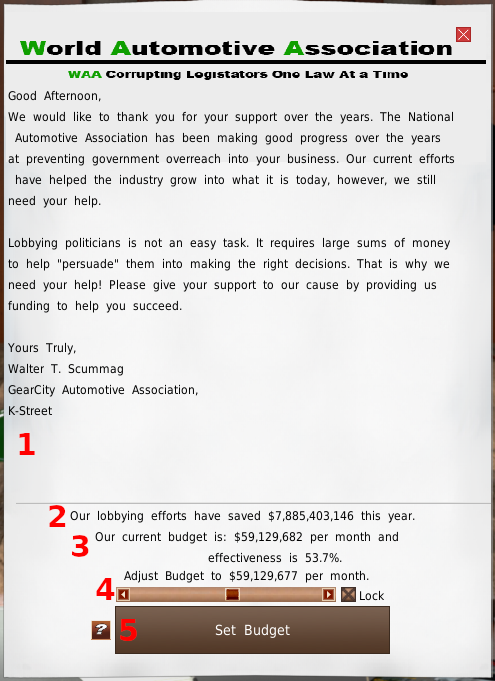
In real terms, Lobbying is the art of legally bribing people of power to get what you want. But to save you the time and effort of knowing how to do it within the bounds of the law, the only thing you need to know in the game is setting the budget.
See Lobbying for more information.
The lobbying window contains a bit of fluff text (#1) because that's what lobbyists are good at. How much money you've saved this year is seen in the text just below the horizontal bar (#2). Your current budget and your effectiveness is just below (#3). To adjust your budget, use the slider (#4). The new amount you'll spend per month is just above. There is also a lock button to the right of the slider. Every year, the maximum amount you can lobby increases. This lock button will automatically update the lobbying budget to the same slider percentage you set.
Any changes you make to lobbying must be saved by clicking the “Set Budget” button (#5).
Contracts
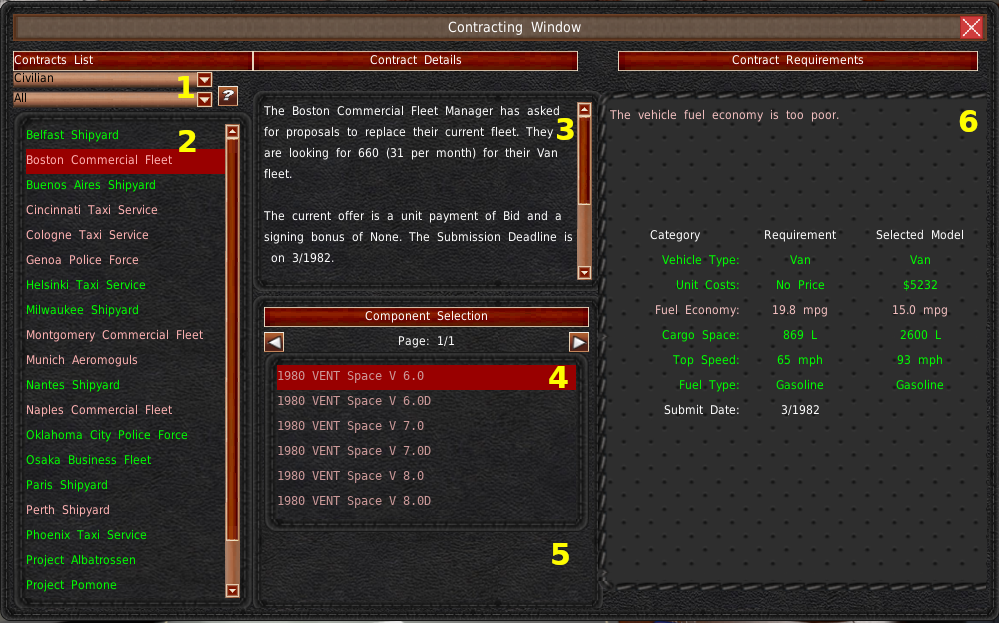
Contracts can play an important role in your company. See Contracts for more detailed information on how they work.
In the top left of the window are two dropdowns (#1). These dropdowns filter the contract lists by what component the client wants and what type of client they are.
Just below that is a list of contract requests (#2). Requests that you have at least one model that meets the requirement are green. The requests that you do not have a model that meets the requirements are red.
Upon selecting a contract from the left-most list, detailed information about that contract will appear in the top central panel (#3). This information includes how many units are needed, when the bidding ends, and what they're willing to pay if applicable.
Below that, is another list of all your models of this type (#4). Models listed in red do not meet the requirements. Models listed in green do meet the requirements.
Under the model lists is an area where you make a submit your bid (#5). We cover this a little more in the next section.
Finally, on the right is a panel that breaks down the individual requirements for the contract and the specifications of the model you selected. At the very top is a summation of why the design failed. Any green text is good, and red text is bad. Any red categories will cause the client to reject the contract.
Contract Bid
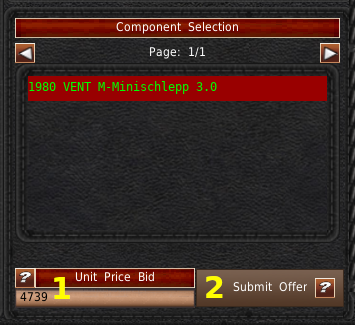
When you selected a contract and an acceptable unit, the submit bid UI appears at the bottom center of the window. (#5 in the previous image)
There are two types of contract bids. The first is a fixed rate bid. These contracts have a fixed price per unit. The textbox (#1) will not appear for these contracts. To submit your bid, click the “Submit Offer” button (#2).
The other type of contract is a price bid contract. In these, you must submit your proposed price for a unit. You do so with the textbox on the left (#1). When you're ready to submit the bid, click the “Submit Offer” button (#2).
Action Memos
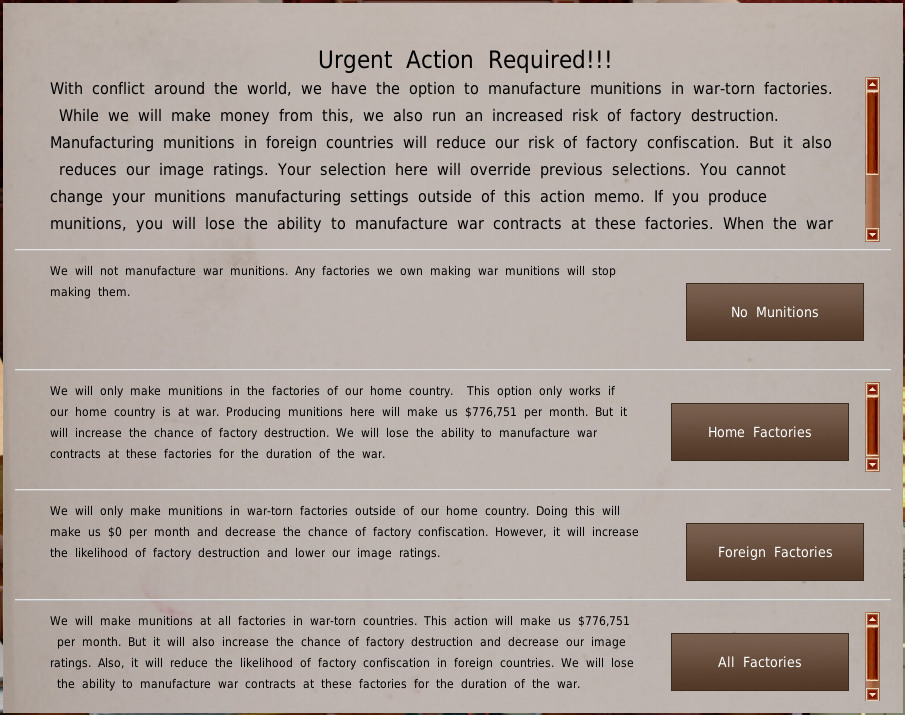
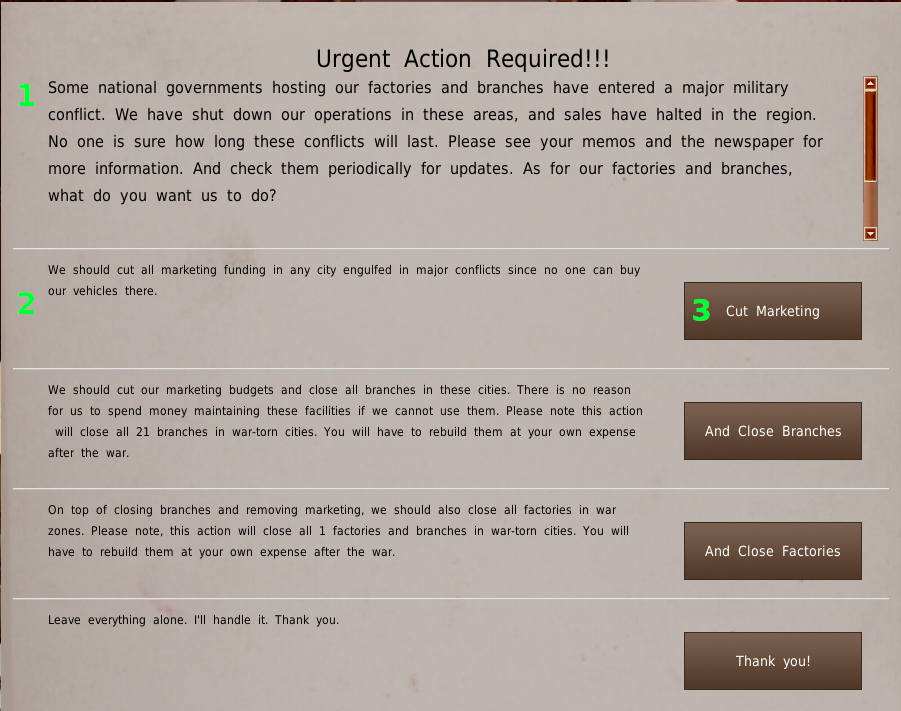
Occasionally an event will happen that needs your immediate input. These are called action memos. Action memos will stop any multi-turn simulations you have. And in general, require immediate input. There are a few exceptions. We cover these on the Action Memos page, along with a listing of all action memos in the game.
An action memo is broken down into three parts. The top part is the description of what has happened (#1). It is important to read this to make an informed decision.
Below are between 1 to 4 actions you can take. A description of the action and its possible results are on the left side (#2). To take that action, click the buttons on the right side (#3). Once you have taken an action, there is no undoing it. So be sure that is the course you want to take.